VISUAL OBSERVATIONS OF ASTEROIDS
1.0 Finding
asteroids by visual telescopic observation
1.1 Introduction
Finding asteroids is
reasonably easy and is a good introduction to this particular sphere of
observations and finding your way around the night sky. Asteroids move with
respect to the background stars so having prepared your star charts it then
rains and you have destroyed another tree. A run of bad weather soon turns
those trees in to forests ! By far the best method is to invest in a laptop PC.
A cheap or second hand one will do and it really does make life a lot
easier. The fact that they move also
means that you can, if patient, be sure you have the correct object in view. By
observing the particular asteroid after an hour or so, or on another night, its
movement will be detectable.
Described here are
methods of;
- finding asteroids
- estimating their
positions
- estimating their
magnitudes
Note; Although I refer
to Megastar any star charting program which has the same
facilities will suffice.
1.2 Targets for
tonight
Use a planisphere to
identify the area of sky most suitable for observing. For example on the
evening of
The BAA Handbook
includes a list of the brighter asteroids in its Minor Planets section. By
using the ‘What’s Observable’ web site of NASA JPL’s Solar System
Division one can also
select suitable asteroids for observation. Be aware that the asteroid data in
your planetarium software may be out of date. Having selected suitable
asteroids it is worthwhile downloading the latest orbital elements from the
Part of the field mentioned above is shown in the Megastar chart below. The chart also shows asteroids equal to or brighter than 12th magnitude.
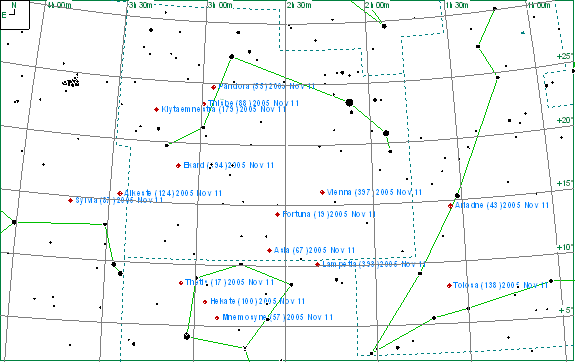
The constellation of Aries contains a number of asteroids and this part of the chart is shown below.
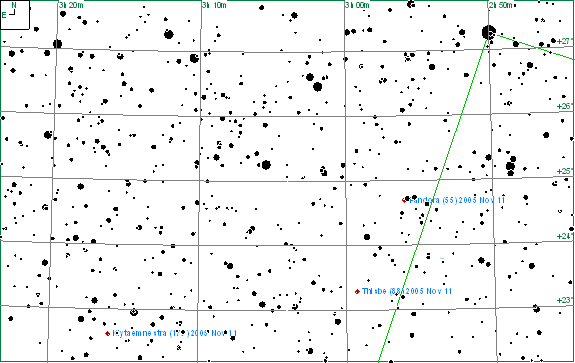
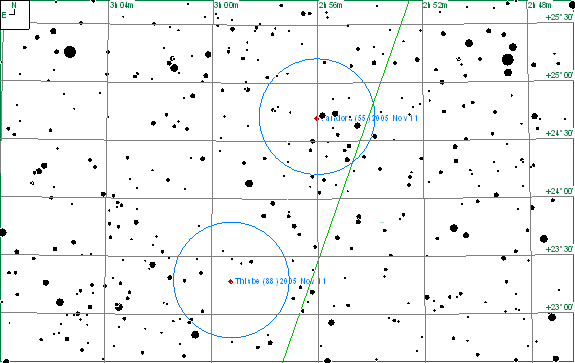
Two of the asteroids, 55 Pandora and 88 Thisbe, are shown on the chart below overlaid with 40mm eyepiece circles.
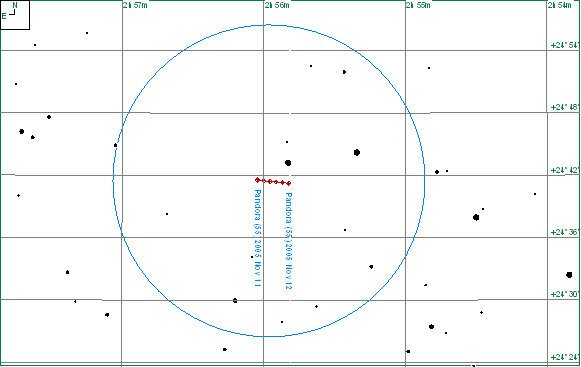
As mentioned in the opening paragraph the fairly rapid motion of asteroids is both a plus and a minus. The plus side is that they can be identified by that very movement. The chart below shows the track of 55 Pandora, each point representing one hour. It can be seen that the position of the asteroid changes significantly after a couple of hours.
1.3 Observing
program
a) Choose a number of asteroids as
described in 1.2 above
b) Observe each one in turn
c) Draw the star field and plot the
position of the asteroid using the ARPS form. When plotting the star field mark the positions
of a few of the brighter, widely spread stars first. Then plot the others
trying to keep the correct relationship with all previously plotted stars. It
helps to see patterns eg; triangles, squares, straight lines made by the stars.
If you wish to plot the
path of the asteroid;
d) Repeat (b) and (c) the same evening after
a couple of hours and/or on subsequent evenings
e) Combine the plots on to a single chart.
Depending on how quickly the asteroid is moving you may be able to use the ARPS form or print a star chart covering the area of sky
concerned and plot the path on that. As well as plotting the asteroid and
adjacent stars it may be worthwhile adding any other objects seen eg; galaxies
and nebula. Never immediately dismiss something you have seen but can’t find on
a star chart or planetarium program. It may be that the object has been missed
off the chart but it might just be something new or changed eg; a new comet or
variable star suddenly brightening (or in outburst).
When completing the
ARPS form use double date eg; 2005 December 2/3 for an observation on the
evening of the evening of the 2nd December or early morning hours of
the 3rd December.
A word of caution.
Visual estimates of position are not accurate enough for reporting to the Minor
Planet Center. Such reporting requires the observer to obtain an Observatory
Code and measure positions on images obtained with a CCD camera. This activity
is described in the Tools and Techniques section of this web site.
2.0 Position
estimates (visual astrometry)
Having worked through
the Observing Program described in 1.3 above you can now try your hand at
estimating the position of the asteroid in terms of its Right Ascension and
Declination. Here is one method you can try.
2.1 Estimating
positions using Megastar
a) Work through 1.3 (a to c).
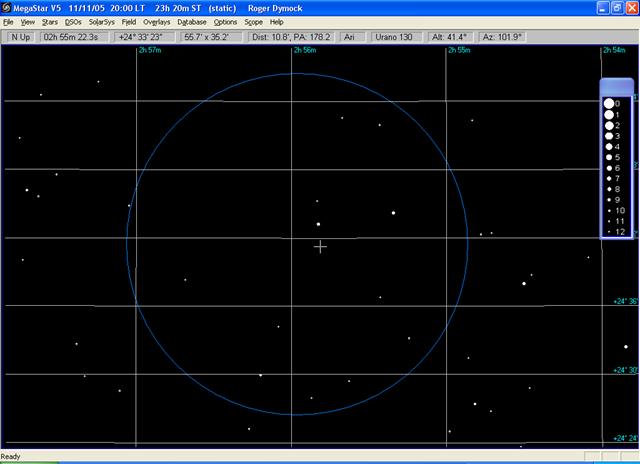
b) Display the same chart (see below) as
that shown immediately above para 1.3 but without the asteroid shown
c) Position the pointer/cross hairs in the same position as you have drawn and click. The estimated RA and Dec are
then shown in the top left hand corner of the screen (02h 56m 22.3s and +24° 33’ 23”)
d) Repeat for each estimate required
e) If you would like confirmation of the
accuracy of your work or assistance then send the forms with any
comments/questions/to the ARPS Director.
3.0 Magnitude
estimates (visual photometry)
3.1 Estimating
methods
Having found your asteroid and plotted its position the next task you might like to try is estimating its brightness or magnitude. There are various methods for doing this but all rely on comparing the brightness of the asteroid with that of the known magnitudes of other stars in the field of view. The observer must be sure to record which of the methods has been used when reporting observations. Record observation son the ARPS form
(a)
The Fractional Method
This is probably the simplest in practice and most beginners start in this way. Two comparison stars must be first selected, one just brighter and one just fainter than the object. The brightness of the object under study is then estimated as a fraction of the difference in brightness of the two comparison stars. These should be simple fractions and should be noted down according the following convention:
For example, if the difference between the brighter comparison (star A) and the planet is 1/3 the difference between star A and the fainter comparison (star B), then the estimate is written as A(1)Planet(2)B. Note that the brighter comparison star is always written first.
It is easier if the comparisons with the stars which are much brighter or fainter than the asteroid are done first. When comparing the asteroid with stars of similar brightness try defocusing slightly as this appears to enhance any small differences.
b)
The Argelander Step Method
Using the Step Method, the observer estimates the difference in brightness between the object and only one comparison star. This process is then repeated several times using other comparison stars. In the Argelander Method allowance is made for the unsteadiness of the atmosphere and the imprecision of the human eye. Indeed it could be said that the method relies on these two factors to decide upon brightness steps. The following technique is used:
- If, after prolonged viewing, the star appears brighter than the planet for the same amount of time that planet appears brighter than the star, then the planet is assigned the same magnitude as that of the star.
- If one appears brighter more often but on one occasion it is sometimes fainter, then it is noted down as being one `step' brighter.
- If one appears brighter most of the time, but on occasion equal to the fainter, then it is two 'steps' brighter.
- If one is always brighter but on occasions only just so, then the difference is three 'steps'.
Further 'steps' can also be recorded but are less reliable to estimate. Several comparison stars should be used to achieve maximum accuracy. Note that no attempt is made to estimate the size of an individual observer's `step', which actually varies for different observers due to physiological factors. Typical 'steps' fall in the range 0.06 to 0.09 magnitudes.
c) Pogson's Step Method
This method is, in fact, relatively popular even though it is probably the most difficult of the three methods described here. Here the observer trains himself (or herself) to recognize brightness steps of 0.1 magnitude difference. The method demands great discipline from the observer but can be used (with caution) when only one comparison star is present. Where possible, however, several comparison stars should be used.
3.2 An
example
This example works through how to estimate the magnitude of an asteroid using the comparison stars in the field of view. Shown below is a screen shot of a megastar chart with the magnitudes of the comparison stars and the position of the asteroid displayed.
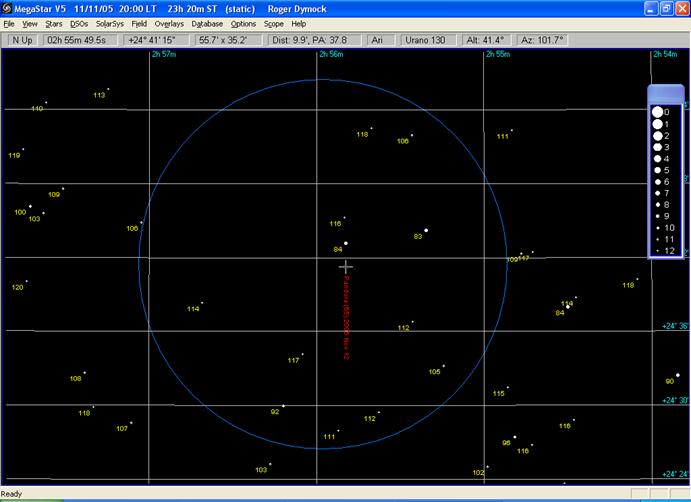
Shown below is a table of comparison star magnitudes (taken from Megastar) and the relationship of the asteroid with that star. Magnitudes can be confusing – larger numbers mean fainter objects. If object A has a magnitude of, say, 8 and object B has a magnitude of 10 then A is brighter than B but we say the magnitude of A, (8) is greater than (>) B, (10).
|
Brighter |
|||
Looking at the comparisons we can see that the asteroid is fainter than stars of mags (GSC); 10.6, 10.5, 9.2, 8.4, and 8.3 and brighter than stars of mag (GSC); 11.8, 11.7, 11.6, 11.4, 11.2 and 11.1. Taking the extremes of these we can say the magnitude of the asteroid lies between 10.6 and 11.1. The predicted magnitude of the asteroid was 10.8. This estimate could be further refined using the Fractional method described above. The GSC magnitudes used here are only accurate to +/ 0.4 mag. but by referring to other star catalogues a more accurate estimate can be obtained.
If you would like
confirmation of the accuracy of your work or assistance then send the forms
with any comments/questions/to the ARPS Director.