BAA Photometry Database User Guide to Sequence Administration
Contents
Sequence
Versions and Alias Names
Setting
up a Completely New Sequence for a Star that Previously had No Sequence
Setting
up a New Sequence Version
Basics
In order to administer the sequence data in the BAA Photometry Database it is necessary to have an “Officer” level login for the website.
The sequence data is accessed by clicking on “Standing Data and Summaries” from the website homepage. This will take you to a screen with a number of links and buttons for reviewing and editing data. The links allow anyone to view the data, while the buttons are only available with the “Officer” level login and enable editing of the data.
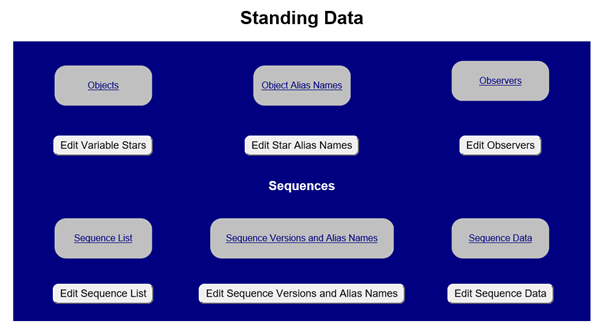
There are 3 buttons for editing and creating sequences. By using these it is possible to setup new sequences and edit existing sequences.
· Edit Sequence List
· Edit Sequence Versions and Alias Names
· Edit Sequence Data
Setting up new sequences will normally involve using each one of these screens.
Important
It should be noted that the MySQL database is case insensitive. This means it is only necessary to enter one of “a” and “A” for a comparison star. Equally “lambda” and “LAMBDA” are equivalent and only one should be entered.
The database stores sequence numbers that were used by the
old BAA VSS visual observation database, e.g. 360 for 3C273. These numbers are set
when a new sequence is created. However, it should be remembered that the most
important identifier is the object id.
Edit Sequence List
This screen is limited to displaying a maximum of 100 sequences at a time. This keeps the load time of this screen acceptable.
This is the master screen for setting up top level sequence data. That is the variable star for the sequence, and which sequence is the latest. This “latest” sequence will be used whenever magnitudes are recalculated to the latest sequence.
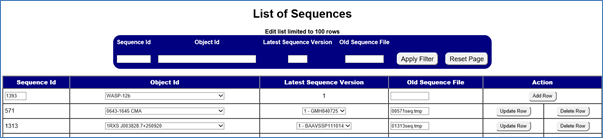
The screen is divided into 2 sections:
1. The top part of the page contains buttons and boxes that allow the list of sequences to be filtered.
2. The second part of the screen is a display of the sequences, which is subdivided into 2 sections.
· The first row allows a new sequence to be created.
· All other rows are existing sequences, and enable the top level sequence information to be edited or deleted.
Sequence Versions and Alias Names
This screen is all about the different versions that can exist for a sequence, and the names that those versions are given. Since sequences can have multiple alias names there is also a column for setting which sequence is the primary alias. This sets the display name for the sequence version. Each sequence version must have exactly 1 “Primary Alias”.
The sequence alias names form is limited to displaying 100 rows at a time.
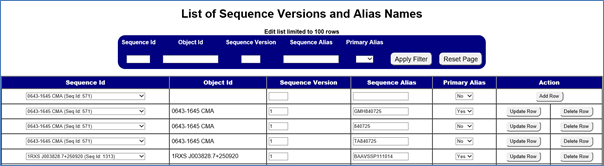
This screen is split into 2 parts:
1. The top part is for filtering the list of versions and alias names.
2. The second part of the screen is for displaying and editing.
· The first row allows a new sequence version or alias name to be created.
· The other rows allow existing sequence versions and alias names to be edited.
Sequence Data
This screen is different in setup to the last 2 screens. It enables the sequence comparison star names and magnitudes to be created.
The first stage is to select the sequence from the list. The sequences are in star name order, with the sequence id in brackets.
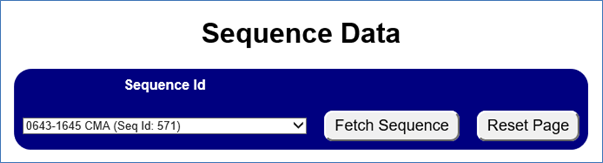
Once the sequence has been selected, pressing the fetch sequence button will bring back a table containing the entire sequence including all versions.
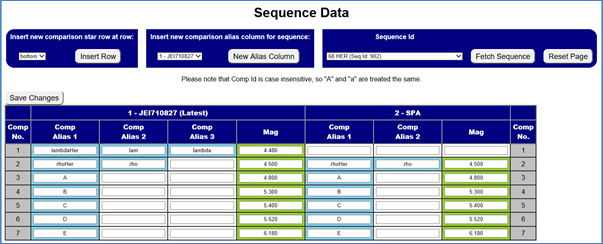
This screen can be daunting at first as it presents a wealth of information. We shall start by looking at the main grid of sequence data. The grid is colour coded as follows:
· Headers are in Dark Blue with White text.
· The comparison row numbers have a grey background.
· Comparison star names have a background colour of blue.
· Comparison star magnitudes have a background colour of green.
· Where there is no comparison star name, or magnitude, then the cell has a neutral White background.
The grid has a column for the comparison star numbers at both ends. The columns are grouped together by sequence version, with the latest sequence flagged with “(Latest)” in the name. Multiple columns can be setup for comparison star alias names within a single sequence version, e.g. “lambda” and “lam”.
To create a new comparison star press the “Insert Row” button, noting that there is a drop down so that the location of the new row can be chosen. It is important that at least 1 alias name and a magnitude are entered for a new row.
To create a new column for comparison star alias names, first select which sequence version to add the new column to, and then press the “New Alias Column”.
Changes are only made to the sequence when the “Save Changes” button is pressed. Pressing the “Fetch Sequence” button will reset the page without saving the changes.
Setting up a Completely New Sequence for a Star that Previously had No
Sequence
The following is a general procedure to set up a completely new sequence for a star that previously had no sequence.
1. Go to the “Edit Sequence List” screen.
a. The top row of the table is for creating a sequence for a star that previously had no sequence. On the far right of the row is the button “Add Row”.
b. The first cell is sequence Id, and this defaults to the next available number, ignoring any gaps in the sequence numbering. This can be overridden by simply overtyping the number. If the number you type in is already used then an error message will be displayed when you try to create the sequence and the sequence will not be created.
c. Next select the “Object Id” for the new sequence.
d. If applicable then type in the old sequence file name.
e. Press the “Add Row” button.
2. Go to the “Edit Sequence Versions and Alias Names” screen.
a. Repeat for the following for each sequence version and alias name. Note that for a new sequence there would normally only be 1 sequence version, but there could be several alias names for this version.
i. Select the Sequence Id – This will be the Object Id along with the new sequence number in brackets.
ii. Type in the sequence version – This will normally be 1 for a brand new sequence.
iii. Type in the Sequence Alias – It is best to type in the primary alias first (display name).
iv. Select Yes or No for the Primary Alias – It is best to set the primary alias first. Otherwise a warning message will be displayed to indicate that no primary alias has been setup.
v. Press Add Row.
b. Note each sequence version must have exactly 1 primary alias. If this is not the case then a red warning message will be displayed at the top. This screen should then be used to correct the data so there is only 1 primary alias. Otherwise problems may be encountered when setting up the sequence data.
3. Go to the “Sequence Data” screen.
a. Select the sequence id (object id) and press “Fetch Sequence”.
b. Enter the first comparison star alias name and magnitude.
c. Press “Save Changes”.
d. Repeat the following for all comparison stars.
i. Press “Insert Row” button with the drop down list set to “bottom”.
ii. Type in the comparison star alias name and magnitude.
iii. Press “Save Changes”.
e. If
some comparison stars have more than 1 alias name then repeat the following
until all comparison star alias names have been created.
i.
Press the “New Alias Column” button. Since this is the first sequence, the
sequence version to which the new column is to be added should have defaulted
correctly to the only sequence version.
ii. Add the additional alias names in the new column.
iii. Press “Save Changes”.
4. Go back to the “Edit Sequences” screen.
a. Locate the new sequence, using the filter if required.
b. Check the “Latest Sequence Version” is correctly populated, and update if required.
Setting up a New Sequence Version
The following are basic instructions on how to setup a new sequence version for existing sequence. An example would be setting up sequence “244.02” for 3C273.
1. Go to the Edit Sequence Versions and Alias Names screen.
a. Type in the object id or sequence id and press “Apply Filter”. This will help you to check you are setting up the new sequence correctly as you will only see the versions and alias names for the sequence you are working on.
b. All actions will now be in the top row of the sequence list, as this is for adding new sequence versions and alias names.
c. Select the sequence id. This is the object id followed by the sequence numeric id.
d. Type in the sequence version. This is the next unused number for this sequence if it is a new version, e.g. 2 if this is the second sequence for this star.
e. Type in the sequence alias name by which the sequence will be known. This is the primary alias name and will be shown on the web pages whenever the sequence is displayed.
f. Set primary alias to “Yes”.
g. Press “Add Row”.
h. Repeat for additional alias names.
i. Select the sequence id.
ii. Type in the sequence version. This will be the same as set above, e.g. 2, unless multiple sequence versions are being setup at once.
iii. Type in the sequence alias name.
iv. Set the primary alias to “No”. Unless for some reason this is to be the primary alias. (Remember only 1 primary alias can be set for each sequence version.)
v. Press “Add Row”.
2. Go to the “Edit Sequence Data” screen.
a. Select the sequence id.
b. Press “Fetch Sequence”.
c. New blank columns will have been created in the sequence table.
d. First type in the comparison star alias names and magnitudes for stars that are already in the sequence.
e. Press “Save Changes”.
f. Repeat the following for each new comparison star in the sequence, noting that often new sequences will contain no new comparison stars. (Changes can be undone by pressing “Fetch Sequence” rather than “Save Changes”.)
i. Next to the insert row button select the correct location for the new comparison star.
ii. Press “Insert Row”.
iii. Type in the comparison alias name and magnitude in the appropriate columns of the new row.
iv. Press “Save Changes”.
3. If the new sequence should now be the latest sequence, used for magnitude recalculations, then do the following.
a. Go to the “Edit Sequence List” screen.
b. Filter the list by sequence id (number) or object id, to locate the sequence.
c. Select the “Latest Sequence Version” as appropriate for the new sequence.
d. Press “Update Row”.
Other Notes
At present there is no button to delete a line of data from a sequence data screen. This can however be achieved in 2 ways:
1. Manually move each row up one, copying or typing in values from the row below, and deleting values from the bottom row.
2. Contact the BAA Photometry Database Manager with the required changes.