Charts sub-menu
How to convert a chart to red on black

(This is no longer important because we now generate red-on-black versions of our charts automatically, but it may be of interest.)
This process enables a chart to be displayed while observing, to assist in finding the relevant object. We will describe the process in Windows but if you are using a different operating system there will be very similar steps; you just have to find the corresponding menu options. Also we refer to Adobe Photoshop but other image processing applications can do this, perhaps with different menu options again.
- Save the chart as an image file on your disc
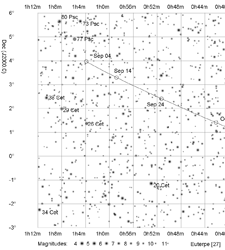
Either (a) right-click on the link in one of the tables or lists above and from the pop-up menu select "Save link as..." (in some browsers it may be "Save target as...") or (b) click the link to open the chart in a new window, right-click on the chart and select "Save image as...". You will see that the image name is quite descriptive, eg, 27Euterpe2011Oct4(J2000).png - Open the file in Photoshop
The file type is Portable Network Graphic, a web standard that most general-purpose imaging applications can open. It is PNG-24 which means it has 3 colour channels (red, green, blue). 24 because each channel has 8-bit depth. - Invert the contrast
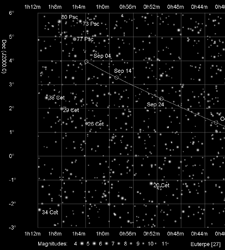
Ctrl-I is the short-cut key in Windows/Photoshop, corresponding to the menu option Image/Adjustments/Invert. The image should now be white on black. - Remove the green and blue channels
- This requires the Channels window to be on display (select it from the Window menu).
- It also requires the background colour to be set to black (at the bottom of the floating tool bar).
- Select the whole image (Ctrl-A).
- In the Channels window select (highlight) only the green channel and press the Delete key. The green channel becomes entirely black (zero).
- Similarly select (highlight) only the blue channel and press the Delete key.
- In the Channels window select RGB to see all channels again and now the image is red on black.
- Save the red/black image on disc