2018 May 5
Star hopping
The problem is that the sky is a very big place and your telescope will likely have a very small field of view, possibly no larger than the full moon.
An earlier tutorial discussed how to find constellations. This article goes to the next level and shows how find interesting objects in the sky.
There are a number of different ways of locating an object:
- Using a computerised GOTO telescope.
- Using setting circles.
- Star hopping from an easily identifiable start point.
In this tutorial we will focus on the last method and conclude with a brief introduction to the free “Hopper” software available from the BAA Computing Section.
So what is star hopping? It is starting from a known object, usually a readily visible star and following patterns of stars until the desired target is reached.
Star charts
You will obviously need some sort of star map or atlas. The software for PC and mobile devices outlined in a previous tutorial will likely meet your needs. Alternatively there are a number of good star atlases available commercially. If your particular interest is deep sky objects, galaxies, clusters and nebulae, you might consider downloading one or more of the Deep Sky Log Atlases which show stars down to magnitude 10, 12 and 15 depending on which one you select. Another useful resource is the Aladin Sky Atlas which offers a more ‘photographic’ representation.
If it is comets or asteroids you are after then the Computing Section has a set of charts for these bodies. As you would expect, the Variable Star Section provides charts for those variable stars they have under study. Wherever the charts come from you will need to star hop to your target.
Equipment
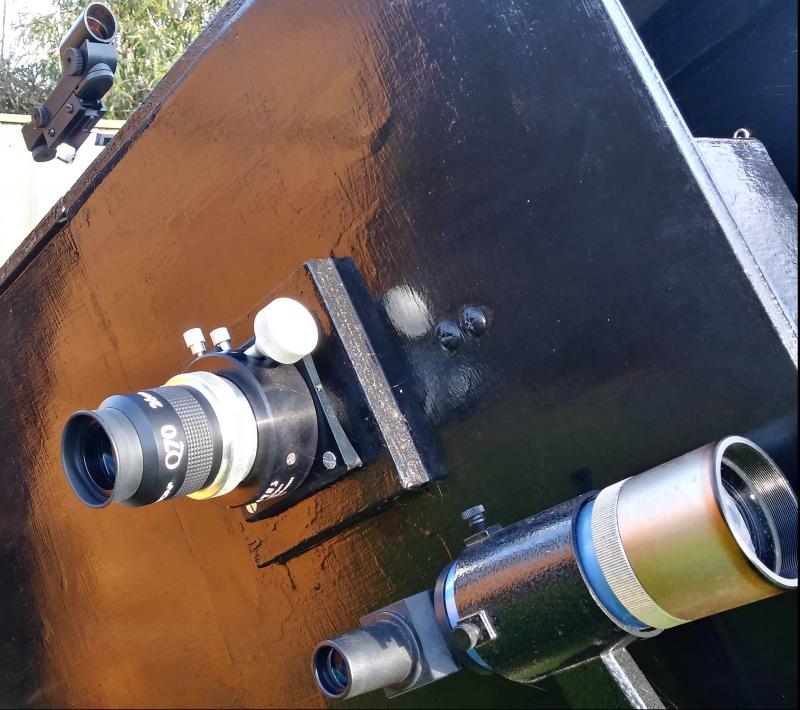
Let’s consider some of the hardware that will make things easier (Figure 1). First and foremost a finder, a small telescope with a wide field, say 5 degrees attached to the main scope and aligned in such a way that when an object is centred in the finder it is visible in the eyepiece of the main telescope. This may be regarded as a necessity unless you have a small telescope with a low power field of view of at least 2 degrees and preferably more. The finder does need to have a reasonable aperture; 50-60mm is a good size for use on the average amateur telescope and gives a good compromise between light grasp and width of field of view.
You may well also need a device that aims the telescope roughly so that the starting point of the star hop is present in the finder’s field of view. Possibly you can sight along the main tube; this is certainly practical if it is square in section. Alternatively is quite easy to make some sort of peep sight from pieces of wood and/or metal.
Commercially available are ‘red dot finders’ which when you look through them you see a red dot projected onto the sky. These work quite well but it is very easy to leave them turned on as they do not show any light unless you look straight through them. The result is a flat battery the next time you want to use it.
On small telescopes it is sometimes the case that the only provided finder is of the red dot type. This is because the telescope will have a comparatively large field of view and a red dot should be sufficient to aim the main telescope. This does however presuppose that your sky is sufficiently free of light pollution that you can see faint enough stars with the naked eye to aim the red dot in the first place.
A pair of binoculars is not strictly necessary but can make life easier. They can be used to locate and scout out the area of interest before bringing the finder into play. It is much easier to sweep across the sky with a pair of binoculars than it is with a telescope mounted finder particularly if you have to indulge in neck wringing contortions to use it. If your binoculars have a field of view and light grasp similar to that of the finder so much the better, that way you will know what to expect to see in the finder. I have a pair of 10×50 binoculars I was given as a teenager something like 45 years ago and I invariably use them every time I want to locate something that is not bright enough to see with the naked eye.
You will want to have a low power eyepiece in the main telescope, one that gives a wide field of view. This way you stand a much better chance of having what is in the finder visible in the main telescope. This is especially true if you only have a red dot finder.
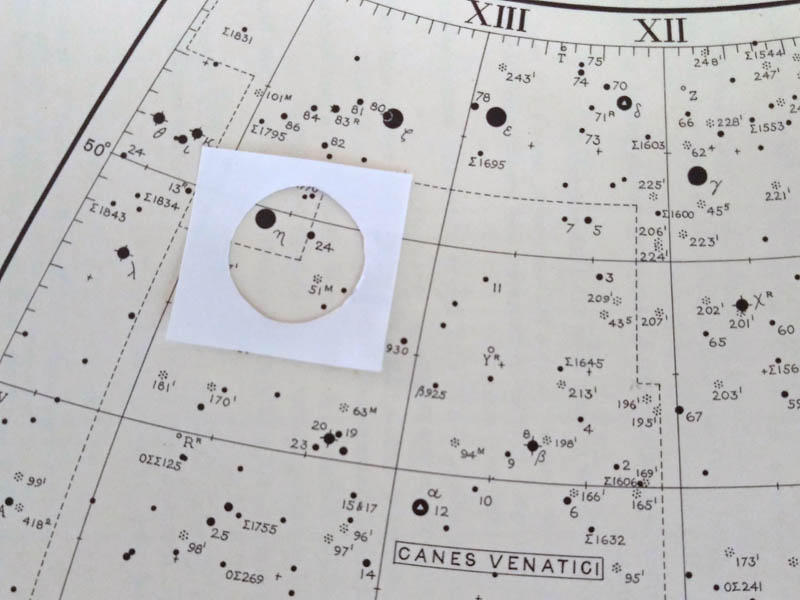
With this information you will then know how much of your chart will be visible in either the finder or the eyepiece.
If using paper charts it can be helpful to make a simple guide either with a loop of wire, a circle drawn on a piece of clear plastic or even just a circular hole in a piece of paper to replicate on the chart what you will see in the sky (Figure 2).
If you are using software you may well find it has the facility to display circles of varying size to give the same result.
Direction finding
Your chart will likely be based on Right Ascension and Declination and we need know which direction is which in both our finder and telescope. Things can become complicated as telescopes (but not all finders and not binoculars) usually provide an inverted image. What’s more, if you are using a star diagonal on your finder or telescope the image will likely be reversed. Stewart Moore has produced an excellent tutorial which covers not only direction finding but finders as well. What follows is just a brief overview.
How do we work out which direction is which? Start by recalling that North is always in the direction of the Pole Star so if we nudge the telescope in that direction then North will be the direction that stars enter the field of view. As to East and West, turn off your drive, stars enter from the East side and leave on the West. You will very quickly get to know how things line up in your telescope and finder wherever they are pointing.
Of course, with an equatorially mounted telescope life is easier, one axis will always move the telescope North-South and the other East-West.
Try and have your chart, be it paper or software based, oriented to match what you see in the sky. However if you are using paper charts and have a reversed image because of a star diagonal then no amount of rotating the chart will give you a match. Turning the chart over and shining a light through it from the back will in principle solve this problem though it may be difficult in practice.
Star hopping
The best way to describe how to star hop is to give some worked examples. All of the objects come from the catalogue of Charles Messier originally published in the late eighteenth century, are visible in a small telescope and can be found in the northern springtime evening sky. The charts are oriented to reflect how the constellations appear in the sky at this time and I have also added a red arrow to indicate north.
In the charts that follow, the three red circles are 4, 2 and 0.5 degrees in diameter. Clicking on a chart will open it full size in a new window if you wish to use it at the telescope.
M51
We’ll start with a well known galaxy, M51 the Whirlpool Galaxy in Canes Venatici. This is close to Ursa Major which is riding high in the eastern sky on spring evenings.
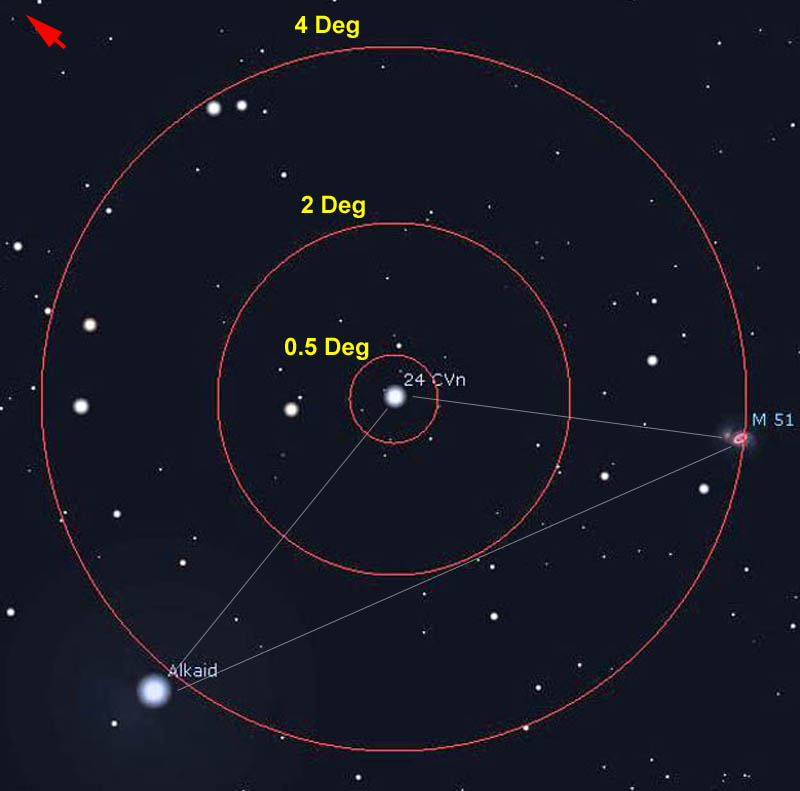
Looking at the chart we can see a star slightly west from Alkaid, 24 CVn at magnitude 4.7. This is an excellent jump point.
Starting from Alkaid we can then centre 24 CVn in the finder (Figure 3). From there is it only 2 degrees to M51. The chart shows a row of 7th, 8th and 9th magnitude stars leading to M51 which we use to reach it using either the finder or a wide field eyepiece on the main telescope.
However we can see that M51 with Eta and 24 forms an isosceles triangle with 24 at the apex. In this case you could simply point your finder at the ‘blank’ vertex of the triangle where M51 would be and it should be in the main telescope’s field of view. Sometimes there is a simpler way than star hopping!
M101
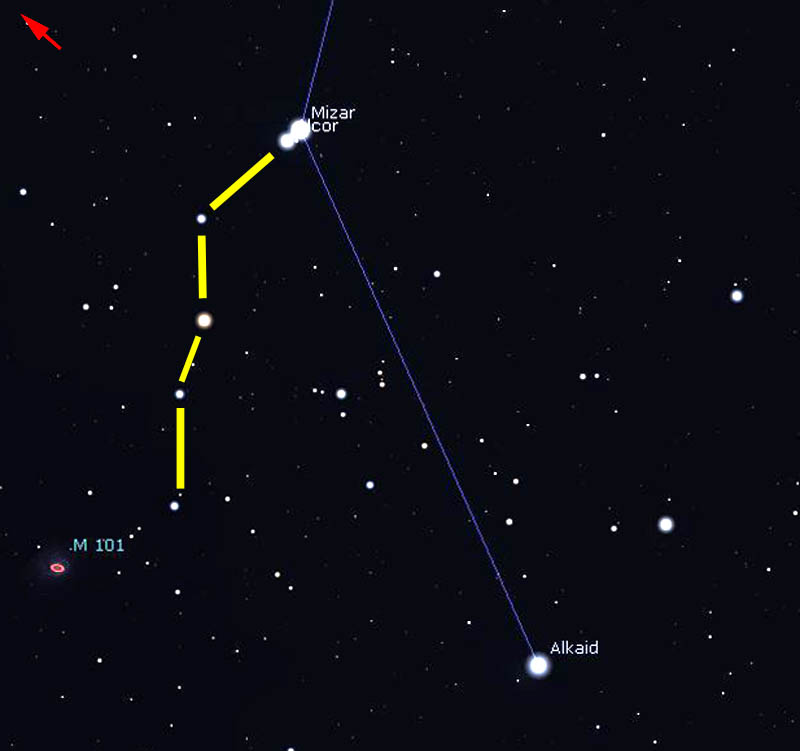
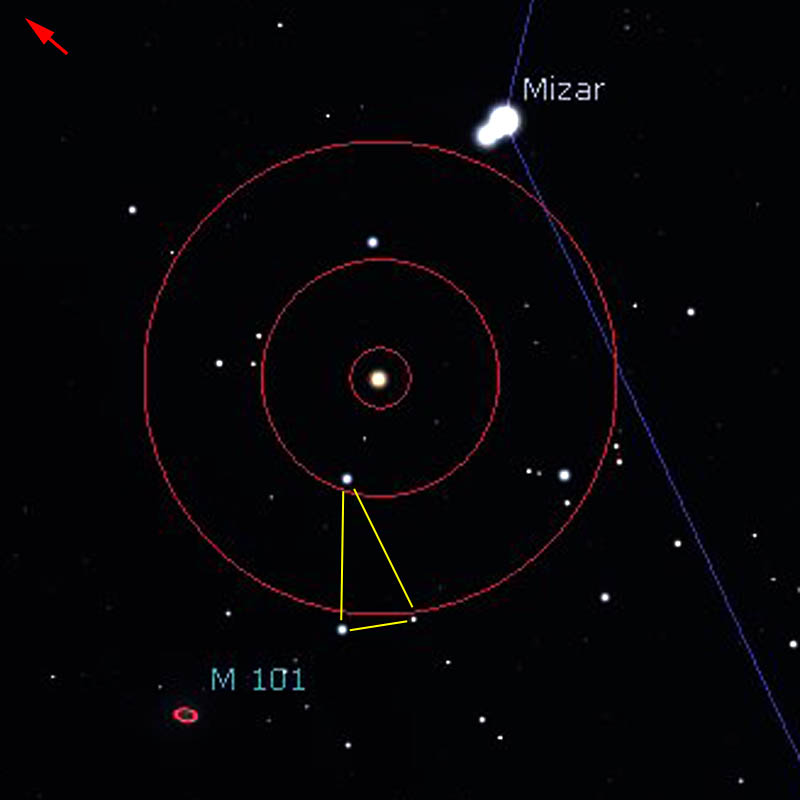
The chart (Figure 4) shows a row of 5th and 6th magnitude stars running from Mizar towards M101 so we will start there. Patterns such as lines, triangles and arcs of stars are the stock in trade of star hopping and you should always be on the lookout for them.
This row of stars is suitably placed so you can track them in either the telescope or a finder.
Figure 5 shows the field centred on the second and brightest of these stars. Towards the edge of the field of view is a triangle of 6th magnitude stars. Centre the telescope on the easternmost of these (Figure 6) and M101 is a little over 1 degree to the east. You can either blind aim the finder, nudge the telescope in the appropriate direction or use the fainter stars on the chart to hop to M101.
M3
Our next object is the bright globular cluster M3. Because at magnitude 6.5 this is bright enough to be readily visible in even a small finder we will take a direct route though it is quite a distance from any bright star.
First find the bright first magnitude star Arcturus in Boötes by following round the arc of the Plough’s handle (Figure 7). Next locate the 2.8 magnitude star Cor Caroli or Alpha (α) in Canes Venatici. This is roughly at the centre of the arc of the Plough’s handle. Imagine a straight line between these two stars and M3 is a little over a third the distance from Arcturus to Cor Caroli (Figure 8). This is definitely a case where scouting out the position first with binoculars will help.
Virgo cluster of galaxies
Our last example of a hop is a little different; we start with a finder hop to our first target and then use the telescope from there to locate a number of different objects.
There are 13 galaxies in Virgo from Messier’s list that are clustered together, these are our target.
First locate the bright star Spica in Virgo by following the arc from the Plough through Arcturus and extending it onwards (Figure 7).
 |
 |
From Spica move northwest to the bowl of Virgo. Centre your finder on Vindemiatrix or Epsilon (ε) the north-eastern most star of the bowl (Figure 9). Move 5 degrees west to locate 5th magnitude Rho (ρ) Vir.
Centre this star in your main telescope and move a little over 1 degree northwards. This will bring you to the galaxy pair M59 and M60 (Figure 10).
Once there use the charts in Figures 11 and 12 to locate the remaining Messier galaxies in this region. A good route is M60, 59, 58, 89, 90, 91 and 88. Back to M89 then 87, 86, 84, 99, 98 and 100. Be aware that the chart only shows the brightest galaxies, there are many others in this area that may be within the reach of your telescope depending on its size.
Let’s just reflect on what we have done in this last step. Rather than hopping with the finder we have used the main telescope, in this case a galaxy hop rather than a star hop. Quite often you will find your last jumping off point is some distance from your target and you will need to hop to it using your telescope with fainter stars than you can see in your finder. Equally your target may be itself very faint or possibly invisible and you will need to verify its position with regard to the faint stars around it to confirm that you are looking in the right place.
Hopper software
The Computing Section of the BAA has made available a piece of free software by the name of HOPPER which can help locate faint objects by suggesting a starting point and direction for the star hop.
What follows is a very brief ‘taster’ of what the software does, for a complete set of instructions visit the Hopper page. Here you can download the software to your computer which includes all the necessary data. Once installed on your computer the program works in stand-alone mode and will not require any internet connection making it ideal for use at the telescope.
To demonstrate some of its capabilities we will recreate the hop to M51 this time using Hopper.
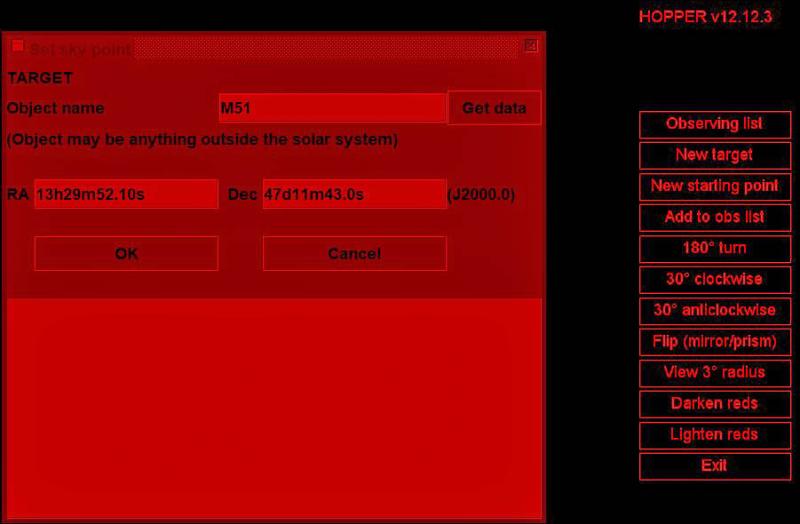
After launching the software we see a screen similar to Figure 13.
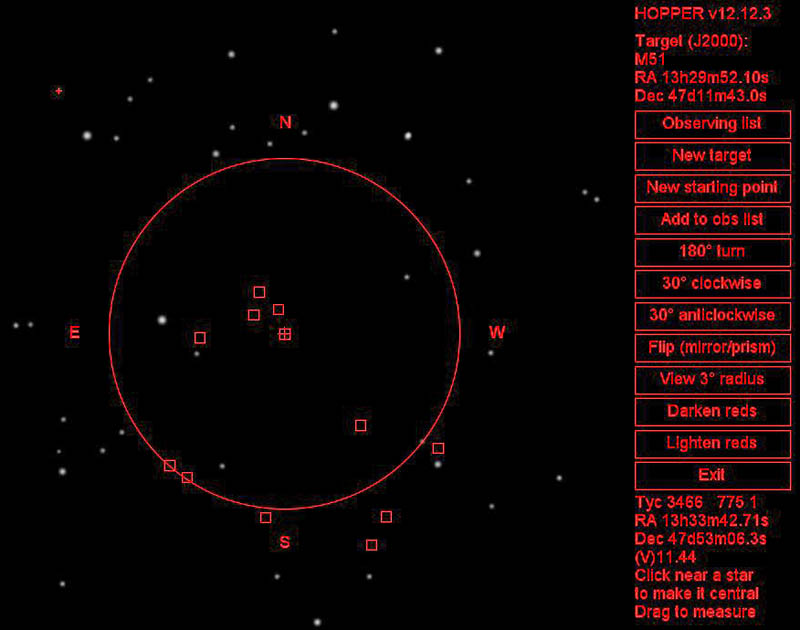
Here I have already typed in M51, its coordinates are automatically displayed and if you hit OK you get the initial star map based on a one degree field (Figure 14). Stars are shown down to around 12th magnitude and the M51 is in the centre of the field marked by a square with a cross in it. The other squares represent different galaxies in the field of view.
Let’s just pause for a moment and look at some of the options available here. We can switch to a three degree field and very usefully we can rotate the field of view to match what we actually see in the telescope or finder, this includes ‘flipping’ the field to match the view when using a star diagonal.
 |
 |
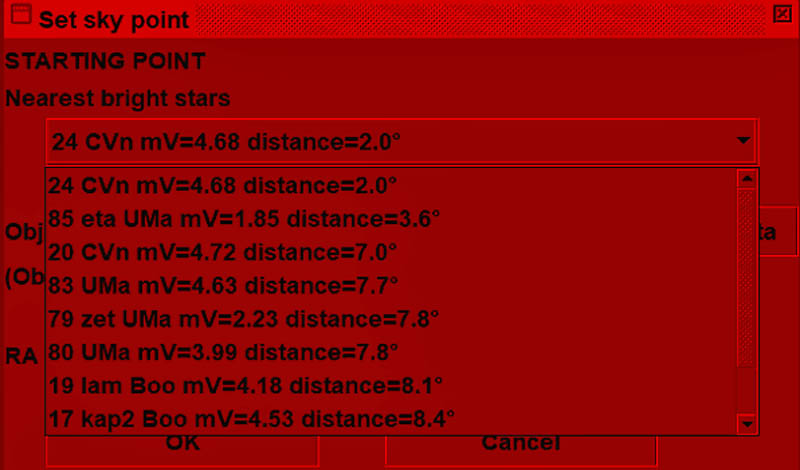
The next step is to select “New Starting Point”, from here we can break out a list of possible start points for our star hop to M51 (Figure 15).
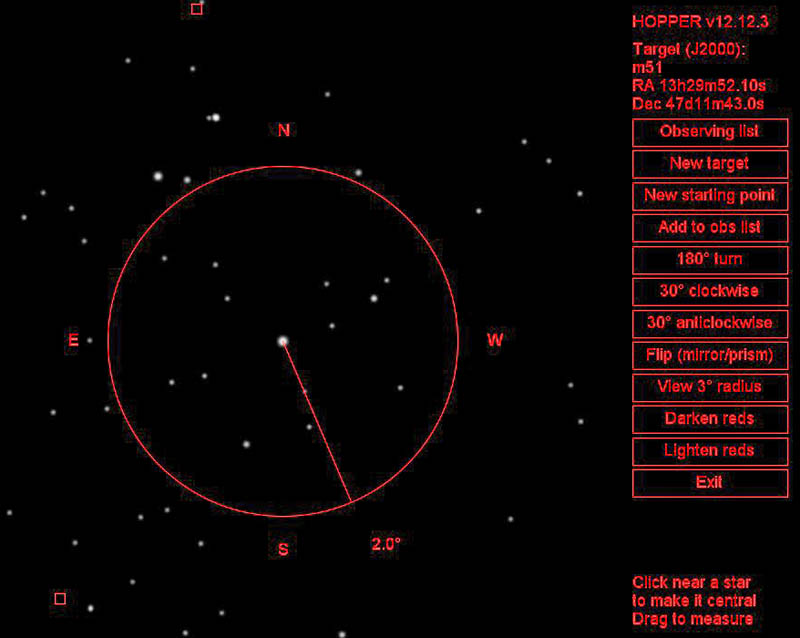
For each starting point listed the program shows how bright the star is and how far away it is from the target. We will select 24 CVn. On hitting OK Figure 16 is displayed.
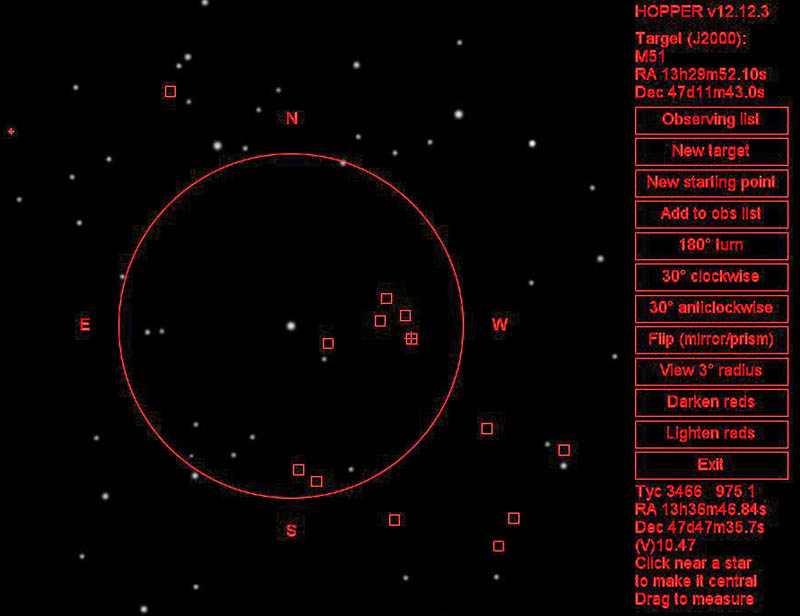
Here 24 CVn is centred and the line indicates the direction to M51. What you then do is locate one of the stars visible in your telescope on the Hopper chart. Clicking that star on the screen centres it on the chart, moving you closer to M51. Centre that star in your telescope.
This brief introduction only scratches the surface of the software and I urge you to visit the download page and explore its capabilities for yourself.
Once downloaded the software will work standalone on Windows, Unix, Mac OS and most Personal Computer operating systems without the need for any further connection to the internet.
However it will not run on Apple IOS or any Android devices. This need not be an impediment if you have reasonable access to the internet where your telescope is located. What you can do is install ‘remote desktop’ software such as RealVNC on both your computer and your mobile device. In this way you can have Hopper running on your main computer indoors but see the Hopper screens and control them remotely from your mobile. Alternatively of course you can print out the screens for use at the telescope or save static images of them on your mobile device.
In conclusion
With star hopping and practice if an object can be seen in your telescope then you should be able to find it without the need for a GOTO system or setting circles.
Having found your object, don’t just tick it off and move on to the next one. Spend some time studying it. With time you will find you will see more and more. The aim of any observation is not just to look but to see. Why not try drawing what you see? This is a really good way to improve your skills at the eyepiece.
Lastly, it is always worthwhile spending some time indoors planning out what you want to see and how to find it. Star hops are sometimes published in various astronomy magazines but the best ones are the ones you create yourself. Some of the happiest times I have had with my telescope have been tracking down the objects I wanted to see, rather than the ones I was told to look at while using routes that I had planned myself.
https://britastro.org/wp-content/uploads/2018/05/Figure-7_0.JPG
https://britastro.org/wp-content/uploads/2018/04/Figure-7_0.JPG
https://britastro.org/wp-content/uploads/2018/04/Figure-7_0.JPG
https://britastro.org/wp-content/uploads/2018/04/Figure-7_0.JPG
https://britastro.org/wp-content/uploads/2018/04/Figure-7_0.JPG
https://britastro.org/wp-content/uploads/2018/04/Figure-7_0.JPG
https://britastro.org/wp-content/uploads/2018/04/Figure-7_0.JPG
https://britastro.org/wp-content/uploads/2018/04/Figure-7_0.JPG
https://britastro.org/wp-content/uploads/2018/04/Figure-7_0.JPG
https://britastro.org/wp-content/uploads/2018/04/Figure-7_0.JPG
https://britastro.org/wp-content/uploads/2018/04/Figure-7_0.JPG
https://britastro.org/wp-content/uploads/2018/04/Figure-7_0.JPG
https://britastro.org/wp-content/uploads/2018/04/Figure-7_0.JPG
| The British Astronomical Association supports amateur astronomers around the UK and the rest of the world. Find out more about the BAA or join us. |

