2019 April 6
Filters for visual observations of deep sky objects
Background
The invention of nebula filters by Del Woods of Daystar in the late 1970s, and then their popularisation by Jack Marling of Lumicon in the early 1980s, revolutionised what could be seen by amateur observers. One only has to look at observations of these objects in the Webb Society Deep Sky Observers Handbook, Volume 2, on Planetary and Diffuse Nebulae, published in 1978, where the observations were made without filters, to see how they revolutionised what could be seen with amateur telescopes. Prior to the invention of the nebula filter, observing the Veil Nebula was regarded as difficult, but by the mid-late 1980s it became a showpiece object at star parties, visible in small telescopes.
How they work
To understand these filters we need to understand first of all how they are made and then what they do. Nebula filters are not like the coloured filters used for planet observations. They are Fabry-Perot Interference filters and consist of up to 50 layers of a dielectric material deposited to an accuracy of half the wavelength of light on a glass substrate. They are often then protected by another layer of glass. The original Lumicon versions did not have this protection and had problems in a damp atmosphere, and also degraded badly with time. If we look at the construction of these filters, the interference that creates the passband really only works when light passes orthogonally through the filter. As the light cone goes further and further away from orthogonal then one of two things may happen. The passband may shift so it is no longer covering the wavelengths of interest, or the contrast enhancement may be diminished so you don’t get the impact you hoped. This can impact their use when used with very fast (sub f/4) modern telescope because of the steep light cone entering the eyepiece.
The complexity of manufacturing these filters and the low yields meant that the prices were high, and in the early days cheap, low quality examples gave the nebula filter a bad reputation. The materials used in the construction were also environmentally unfriendly, and Lumicon had to stop making filters in California when they fell foul of environmental regulations. These filters were of two types, a broad band filter, and a narrower band UHC (ultra high contrast) filter, both of which which passed the H-beta and O III lines, at 5007 and 4959 Angstroms (Å) respectively, emitted by deep sky objects.
As they were designed in the US, they were designed mainly to block the emissions of mercury streetlights, but they also worked well for the sodium streetlights found in the UK. Unfortunately with the proliferation of broad band LED street lighting it is likely that the effectiveness of these filters, certainly UHC types, may be reduced.
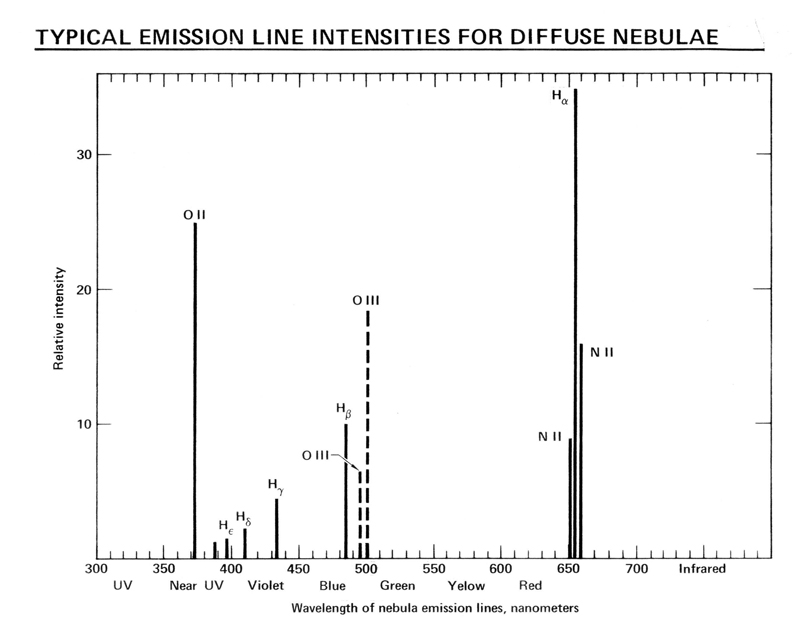
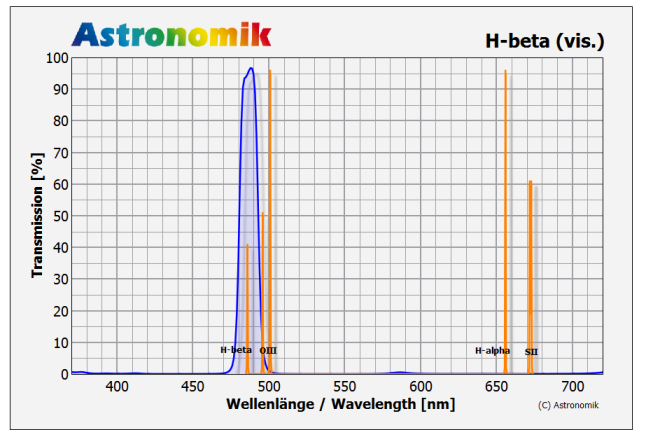
Fig 1 shows the main spectral lines emitted by emission nebulae and Fig 2 shows these lines along with the wavelength response of a dark-adapted eye (response from the rods or scotopic vision). Note there is almost no response in the red region of the spectrum so visual filters having a red leak are not as important as they might be. The lack of response out here means that deep sky objects, which are in general very faint, will not show colour in the red part of the spectrum because there is not enough light to trigger the colour receptors in the eye. This means that reports of red colour seen must be treated with caution. The rods are not colour sensitive and only will record the object in shades of grey.
![Figure 2. [Image courtesy of Astronomik]](https://britastro.org/wp-content/uploads/2019/04/darkadapted-eye-response.jpg)
How they should be used
It should be noted from the start that these filters really only work well on emission nebulae. To see galaxies, reflection nebulae or anything made of stars, you really need to employ what our American cousins define as a ‘gas filter’, i.e. you need to drive somewhere dark, as these sources all have continuous spectra and no filter will work well on them. DGM optics did produce what they called a GCE or Galaxy Contrast Enhancement filter, but this was really just a broadband filter and did not help much with galaxies. It is also true that when using a filter, even in its proper mode, the stars will dim more dramatically than the nebulae, by up to say five magnitudes in the case of an H-beta filter, so the views through a filter become a very much personal thing. Some people, including myself, are interested in what nebulosity is visible; others may prefer the aesthetic view and use a less hard filter, so the they sacrifice some of the nebulosity for a view with stars in it.
It is important to understand what a filter does. It enhances the contrast, but you are always going to lose some light as no filter has 100% transmission. The best filters will have transmissions up in the high 90% range. The other way to enhance contrast is to increase magnification. I tend to find that when using low power an O III filter works best, with medium power an UHC type filter is the filter of choice, and for high power the best is no filter. It is also true that a filter is going to add some form of colour, so any estimates of the colour of nebulae will need to be done without a filter. Although these filters were designed to help with light pollution they will also help even at dark sky sites as they will block the airglow lines.
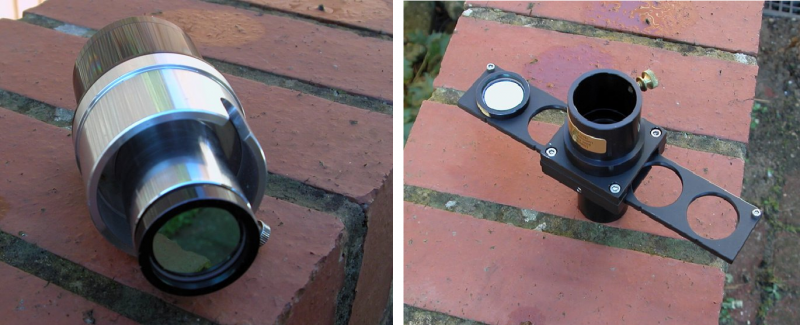
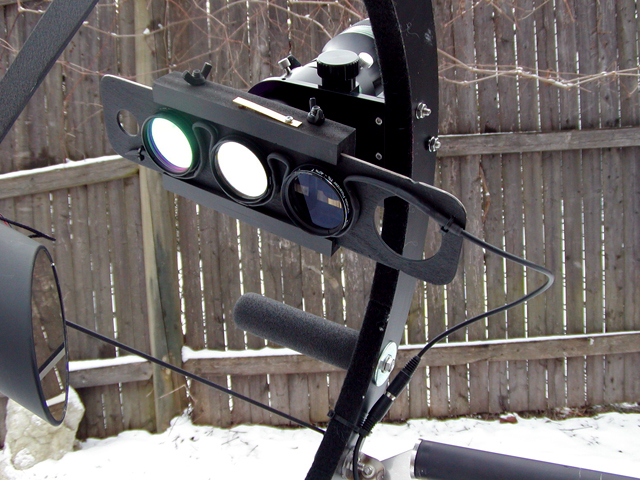
Note that using a filter slide may also require the use of a Barlow, to move the focus point outwards. This is particularly the case with the open filter slides produced in the US. These would never be much use anyway in the UK because they are prone to getting damp. Some of the more advanced filter slides are either enclosed or so get around the problem by having heater elements. There have been options to have a filter wheel, much like imagers use, but these have not been very popular amongst visual observers, mostly because of requirement to have a Barlow in the system which makes it very unwieldy. Recent innovations have also included diagonals with filter cutouts.
Choosing filters
Choosing a nebula filter used to be an easy task as there were only a very few manufactures making these filters, however with the proliferation of manufacturers producing filters of variable quality there are now something like 120 nebula filter brands on the market, many just rebadged filters from Optolong. On top of this there is now little consistency in keeping the bandpasses the same over time so it is very difficult to recommend a brand of filter based on a previous year’s model. Even quality brand Lumicon suffered after their takeover by Farpoint, and although the brand remains the same, the quality of the filters over the last three years has varied dramatically from good to bad and back to good again. There have also been issues on the second-hand market, particularly with Lumicon filters, as some of the early versions badly decayed with time and the performance went from good to useless. This can be usually be seen as a form of delamination caused by the fact that the filters were not sandwiched in glass. It is also true that the quality of the glass substrate has been an issue with some filters. Poor, non-optical quality glass, tends to bloat the star images.
Figures 6, 7 and 8 show the predicted passbands for H-beta, OIII and UHC filters made by the German company Astronomik; images courtesy of Astronomik.
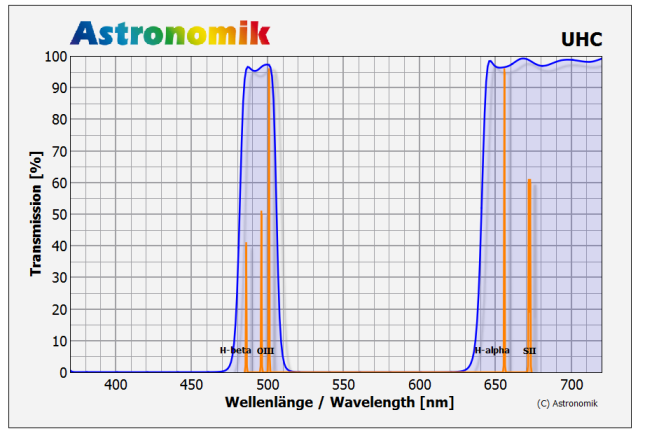

The main spectral change we see between filters designed for visual use and those designed for CCD use is the occurrence of a red leak in UHC and O III filters. When using a CCD, having a red leak is a bad thing, but the eye is not really sensitive in the red region, so by having a red leak the cost of the filter can be brought down. For some O III filters the bandpass of the filter may be so narrow that it only passes the 5007Å line, not the 4959Å line. Whether this makes a difference to the view is something of a moot point as the 4959Å line is usually about a third of the strength of the main OIII line at 5007Å. The other issues with the band pass are whether it has a flat transmission through the bandwidth of interest, how steep the cutoff is at the blocked bands, and whether the bandwidth is too wide.
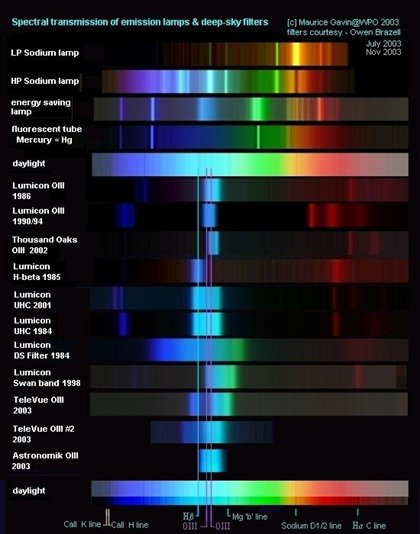
The original TeleVue O III was a classic example of having a too wide bandwidth so the contrast enhancement effect was not so good. (Note that the new TeleVue Bandmate 2 filters are made in co-operation with Astronomik and are much better quality). Unfortunately, as with everything in the astronomy world, you get what you pay for, and although a cheap filter may be better than nothing, in general it is not as good as a quality one. The only way to really understand filters is to actually compare the view through different types at the same time, on the same object, with the same telescope.
You also need to understand the bandwidth or FWHM (full width at half maximum) of a filter when purchasing. The wider the bandpass, the more unwanted light it transmits, and the worse the contrast is. For a UHC type filters you are looking in the range 24-26nm for the passband (fig 10), and for the line filters, around 12nm. Much wider than this will not have the desired effect. Obviously as well you are looking for transmissions in the range over 92% at the principal wavelengths. One advantage of going to a shop or show to actually look at filters rather than just using online shopping is that you can inspect them for quality.

The order of purchase (unless one is really only interested in faint planetary nebulae) should be UHC, O III, and then, if money allows, an H-beta filter. There are probably only about 50 objects that respond well to an H-beta filter. The O III filter it is quite a specific filter and views through it of, say, M42, will be quite disappointing. It is possible to do qualitative astrophysics on an object such as M42 with the filters. An O III filter for example will show the central part well, as that is where the hottest gas is, a UHC filter will show both the centre and some of the outer parts, and an H-beta filter will show the outer tendrils so beloved of imagers. Bear in mind that if you have a small telescope, then the line filters may not be as effective as you would hope because there is just not enough aperture to render the objects well.
It also helps to have some knowledge of the objects you are looking at. For instance some planetary nebulae (NGC 40 for example) have very little O III emission, so for these a UHC or perhaps even an H-beta filter may be the best choice, rather than using an O III filter. M1 is another classic case: it does not respond well to filters as it is powered by synchrotron radiation and therefore is a continuous emission source. You may find however that using an O III filter with a sufficiently large telescope will show some of the filaments.![Figure 11. Spectra of Planetary Nebulae using direct vision spectroscope on Lick 36” Refractor from 1918 showing different line intensities for planetary nebulae. Note the N1-2 lines are those from OIII which was not understood at the time. [See article footnote for source]](https://britastro.org/wp-content/uploads/2019/04/spectra2.jpg)
You can find a list of available filters at <https://www.cloudynights.com/topic/577303-2017-nebula-filter-buyers-guide/>. Note that at the bottom of the thread it has been updated for 2018. If you want to see filter bandpasses for real filters then this is an excellent site <https://searchlight.semrock.com/?sid=a08a1af9-84ee-49d2-959d-153d7e7c0eb8>
Owen Brazell
My main interests are in Deep Sky, Solar and Comets. I have been involved in astronomy for 50 years and been a member of the BAA on and off since the early 70’s. I am currently mainly a visual astronomer using large Dobsonians from dark sky sites and a medium Dobsonian / small Mewlon from home.
[Figure 11 from: The wave lengths of the nebular lines and general observations of the spectra of the gaseous nebulae, by William Hammond Wright. Semi-centennial publications, University of California. Publications of the Lick Observatory, Vol. XIII, Part VI. 1918.]
| The British Astronomical Association supports amateur astronomers around the UK and the rest of the world. Find out more about the BAA or join us. |

