2019 September 15
Imaging comets: an introduction
(Note: this tutorial is an abridged section of the British Astronomical Association’s Comet Observing Guide, which has multiple authors.)
Background
On September 27 1858 an English photographer called William Usherwood obtained the first ever photograph of a comet. He used an f/2.4 portrait lens and a seven second exposure on a collodion photographic plate. The resulting image of Comet 1858 VI Donati showed the bright nucleus and a faint tail and the photographer was sufficiently excited to send a copy to a leading astronomer of the time, Richard Carrington. Sadly the photograph no longer survives, but we can at least get an impression of this spectacular comet through a contemporaneous painting by William Turner (Fig. 1).

In 1858 photography was in its infancy and photographic plates were extremely slow with exposures of several seconds required to capture pictures even in daylight. Photography developed dramatically through the twentieth century only to be gradually replaced by digital imaging in the 1990s. These days, with the exception of light pollution, comet imagers are living in a golden age of large, sensitive, relatively inexpensive digital imaging sensors.
The following article, extracted from the comprehensive Comet Observing Guide, discusses the fundamentals of comet imaging. Subsequent articles will cover particular techniques in depth.
Most comets are faint, low-contrast, objects with diffuse tails or coma features which merge gradually into the sky background. Consequently, imaging a comet requires techniques similar to those used by deep sky photographers, though we have the added complication that comets move relative to the background stars. Since the techniques are so similar, you can use a suitable deep sky object to practice on if a comet isn’t currently available.
Cameras
The days of film are now long gone and the vast majority of astronomical imaging is done with digital sensors. These sensors consist of an array of light-sensitive detectors called pixels which convert incoming photons to electrical charge. When the sensor is read out at the end of an exposure the charge in each pixel is measured and stored as an array of numbers in an image file. The number of grey levels represented by the pixel values ranges from 8-bit (256 levels) for some low-end cameras to 12 or 14-bits for DSLRs to 16-bits or more for scientific cameras. A 16-bit word can represent 216 = 65536 grey levels which is far more than the human eye can distinguish or any monitor can display but this large number of grey levels is important when we come to calibrate and stretch the very subtle detail visible in a comet.
The pixels represent shades of grey. For colour images we need to use filters in front of the pixels to isolate the red, green and blue components of the image. This can be achieved using separate filters in a filter-wheel which are used sequentially to obtain individual greyscale images that allow a colour image to be generated later. Alternatively the filters can be built in to the sensor so that red, green and blue filters are placed over adjacent pixels and a colour image is obtained by processing a single grey-scale image. A popular arrangement is the Bayer matrix where each group of 2×2 pixels has one red, one blue and two green filters. This has the advantage that a colour image can be taken in one shot but the disadvantages of reduced sensitivity and resolution.

Cameras used for comet imaging fall into two general categories. These are specialised scientific cameras which are designed for astronomy and which have cooled sensors and commercial designs such as Digital Single Lens Reflex (DSLR) cameras which are designed for the (much larger) general market and which do not have cooled sensors. For any given image sensor size (Fig. 2) the former are generally much more expensive than the latter but they can give much better results. That said, DSLRs and other modern digital cameras are remarkably capable and have been used to produce spectacular images of bright comets. Higher end DSLRs use a sensor which corresponds to the frame size of 35mm film (36×24mm). These full-frame cameras can be quite expensive and heavy. The majority of consumer DSLR cameras use a sensor around 2/3 the size of full-frame cameras (approx 24×16 mm). This is often referred to as the APS-C format.
While DSLRs can be very effective the highest sensitivity is provided by specialised astronomical cooled cameras. For any given sensor area these are generally a lot more expensive than commercial DSLRs and they usually require an external power supply and computer for operation but they do perform far better on faint objects. Larger sensor sizes are now available and more recent cooled cameras can be very affordable.
Wide-field imaging
In addition to the light-sensitive element any camera system must also include an optical arrangement to bring an image into focus on the detector. Comets range from faint, small objects that need to be imaged using a telescope to much brighter objects that need a wide field imaging system. Standard photographic lenses can make a very capable bright comet imaging system.
Since comets are extended objects their apparent brightness on the image sensor will depend on the focal ratio of the optical system (assuming that the focal length of the system is large enough that the comet is shown as a fuzzy, extended object on the image). The faster the optical system (i.e. the smaller the f/ratio) the better. Most comets are small and so quite long focal length lenses are required for good results. The combination of long focal length and fast f-ratio can be an expensive one, however the modern demand for high-tech image-stabilized, auto-focus zoom lenses means that good, fast, fixed focal length lenses can often be found second hand at a good price.

Most lenses will have a relatively poor optical performance when used at their widest aperture. If you are using a sidereal drive it may be worth closing the iris by one stop to improve the optical performance and extending the exposure to compensate. An alternative is to pay a high price for a lens which performs well when used wide open. The pictures of C/1996 B2 Hyakutake shown in Figure 3 were obtained using a Canon 85mm, f/1.2L aspheric lens. This type of lens has a very good performance when used wide open, even at the edge of the field. Such lenses are very expensive new but second hand versions using the Canon FD mount can be picked up for £650. Such a lens would make a superb imaging sensor when coupled to a modern sensor. Similar lenses are available from various manufacturers but they are seldom justified by comet photography alone.
To get sharp star images the lens should be focused to infinity but you may find that the infinity mark on the lens isn’t actually the best focus point and some experimentation will be required. This is particularly true with long focal length mirror lenses which often have no stop at the infinity point. Since different wavelengths of light are brought to focus at different points the infinity focus mark usually only applies to light in the visible range. Many CCDs are sensitive well into the infra-red and it is often necessary to employ an infra-red blocking filter to get sharp star images. One advantage of modern DSLRs is that it is possible to display a zoomed-up image live on the screen and this is a significant aid to precise focusing.
An ideal lens would provide even illumination over the entire focal plane so that the sky background would produce a uniform density on the film or CCD detector. Real lenses do not achieve this and the amount of light reaching the edge of the detector is less than the amount received by the centre. If this vignetting effect is not corrected it will lead to an uneven background in the final print. This is particularly troublesome in the case of a large, low contrast object such as a comet’s tail since detail will be lost when you try to stretch the final image with a high contrast. The effects of vignetting can be eliminated by good flat fielding.
Since comets are best observed from dark sky locations and are often at their best near the horizon many people will need a portable imaging setup. Many, high quality tracking mounts are now available. For particularly bright comets air travel overseas is worthwhile so equipment must be light enough to carry onboard an aircraft. An example is the Sky Watcher Star Adventurer mount but other equivalent types are available.
Remote observing
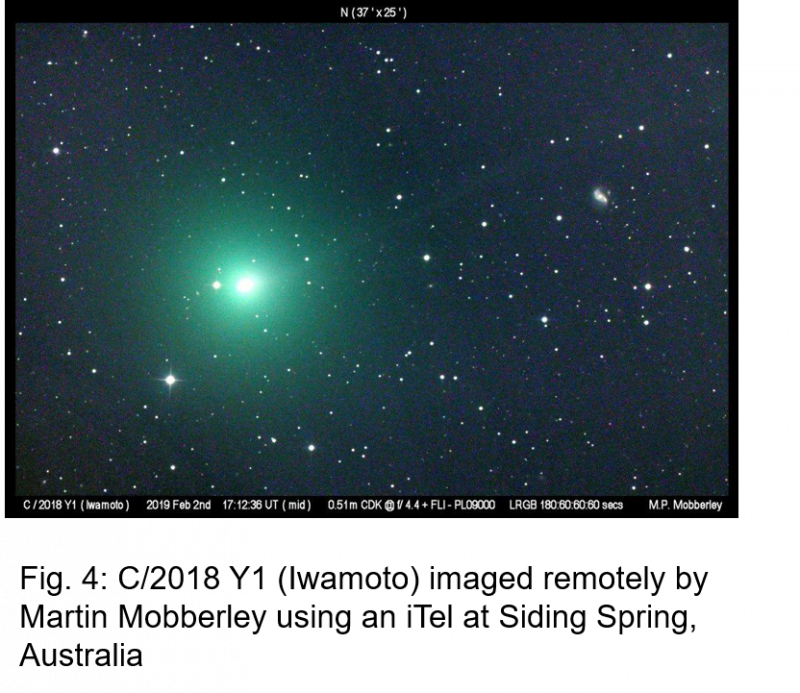
A significant advance in amateur astronomy in recent years has been the setting up and use of remotely operated or robotic telescopes. Use of such facilities is not expensive, especially when compared with the cost of setting up one’s own observatory from scratch. All the sky, not just the hemisphere in which you are located, is available to robotic telescope users and not necessarily in the middle of a cold night. Unfortunately, UK-based observers are often at a disadvantage because of poor weather, light pollution in towns and cities, or because of our latitude (50°–56° N), which prevents access to many celestial phenomena further south, and also means that our summer nights are very short. Figure 4 is an image of C/2018 Y1 (Iwamoto) captured by British observer Martin Mobberley using a remotely operated telescope in Australia.
There are a wide range of options for remote observing and some of these are described below.
One option is the Sierra Stars Observatory Network (SSON) which has telescopes located in California and Australia. Before using SSON one must register and purchase credits. Observations are scheduled as follows:
– input object data. Comets may be selected from a list
– add project title and observer name
– input data and time (if not input then job will be run at the next opportunity)
– select telescope, filter, number of times to run series, time between series
Emails will be sent to confirm a job and when imaging is complete. Images are then available for download.
It is always worth checking images to see what else might be on them other than the intended target. Another popular facility is iTelescope, http://www.itelescope.net/. This offers the user both the opportunity to schedule images in advance or reserve time slots to take control of the telescope, the latter choice not being available with SSON. iTelescope has a wide selection of telescopes distributed between five sites around the world and operated via an online control panel. Payment is by a monthly subscription which provides a certain number of points which can be carried over into subsequent months.
| The British Astronomical Association supports amateur astronomers around the UK and the rest of the world. Find out more about the BAA or join us. |