2018 March 4
Finding the way – part 2
An earlier article discussed the various ways of working out what is in the sky at any particular time.
This article will show how to move from a chart in front of you be it paper, planisphere or software to actually finding the constellations in the sky.
Direction and scale
In order to translate what’s in front of you into what is seen above the horizon there are two important things to know, which direction to look in and how large something is. To do this it may be useful to review a few basics regarding the celestial sphere.
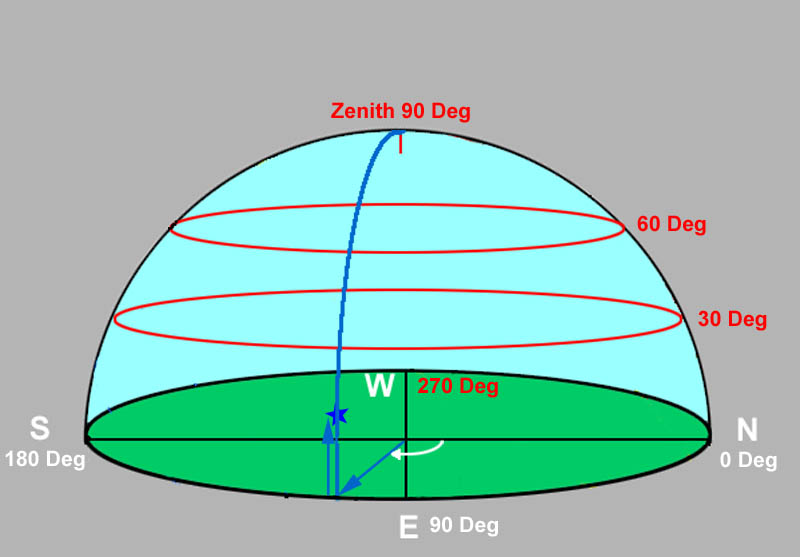
This horizontal direction is often expressed as a compass bearing, measured in degrees and termed azimuth. On this scheme, north is zero or 360 degrees, east 90, south 180 and west 270 (Figure 1).
If you are not sure of how these directions line up where you live it would definitely be useful to find out. If you have a magnetic compass or compass app on a smartphone this will give you the directions. If you can already find the Pole Star then this shows the direction of North. Alternatively recall that the Sun is approximately South at midday (1pm if Daylight Saving Time is in force). The actual position does vary with the seasons but the accuracy is sufficient for our purposes here.
Distances on the sky above the horizon are also measured in degrees, in this case altitude. From horizon to the overhead point, the zenith, is 90 degrees. From horizon to horizon passing through the zenith it is therefore 180 degrees. Halfway up the sky, from horizon to zenith is 45 degrees and so on.
Given an azimuth and altitude, one could quite easily point to where in the sky something should be. However as described in a previous article, the rotation of the Earth on its axis means the stars and constellations appear to move across the sky so their altitude and azimuth coordinates will change throughout the course of the night though of course their Right Ascension and Declination will remain constant.
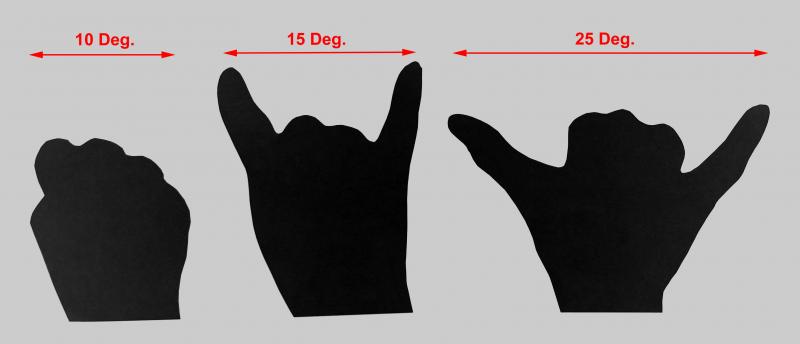
So if you know that at a given time a particular star is at an altitude of 15 degrees with an azimuth of 100 degrees, first find east (90 degrees) using one of the methods described earlier. One fist width to the right (90+10=100) will give you the correct azimuth. Spread your index and little fingers to measure the altitude of 15 degrees and there it should be!
Into the sky
You are now outside under a clear starlit sky. You have a map of the sky in front of you be it a planisphere, a laptop, smartphone, tablet or paper chart, set up for your date, time and location and oriented correctly with respect to the sky.
The first thing you will likely notice is that there seems to be a lot more stars on the chart than in the sky. It may be that light pollution is robbing you of some of the stars you would otherwise see. Short of moving to a less light polluted area there may be little you can do about this. However, perhaps one part of your sky is relatively dark while other parts suffer from light pollution. For example from where I live the sky is reasonably dark apart from one direction towards a large built up area. In cases like this concentrate your observations whenever possible in the darker parts of the sky.
Incidentally a bright moon is also a source of ‘light pollution’ when looking for fainter stars so going out for the first time if the moon is above the horizon and much more than a slim crescent may not be a good idea!
A second reason for seeing fewer stars in the sky as opposed to on the chart is dark adaption. It takes time for the eye to become used to the darker conditions and pick out fainter objects. For our purposes 10-15 minutes should suffice depending on how faint you want to see although the eye does continue to adapt for some time after that.
Having achieved dark adaption, keep it. Avoid looking at bright lights if possible as this will ruin your dark adaption, if you can stand in a spot shaded from street lights and the like so much the better. It is useful, if using a torch, to cover it with a red film since red light is much less detrimental to dark adaption than white. Most sky charting software has a facility for ‘night vision’; this basically changes the display to red. Again using this mode is a good idea.
You now need to move from what you see in front of you to what is in the sky. This may be more difficult than you imagine, whatever you have in front of you is likely quite small while the sky is a big place and moving from one to the other does take practice.
The best way is to find a bright, prominent group of stars such as Orion or the Plough/Big Dipper or even a single bright first magnitude star and use this as a guidepost to other constellations. Going out and trying to start by finding something like Equuleus (a small faint constellation in the Northern summer sky) is not a good idea and likely to fail.
This of course begs the question of how to find the bright group of stars or the bright individual star in the first place. If you have oriented your chart correctly with respect to the North then facing in the correct direction should not be too difficult. Once done, we need to know how high up in the sky to look. A smartphone app will give you the altitude or it is easy to estimate altitude from a planisphere or printed chart remembering that from horizon to zenith is 90 degrees. Quite often, for example, it is enough to think in terms of half, quarter or one third of the way up in the sky, after all many constellations are quite large. Remember your clenched fist at arm’s length is about ten degrees across and you can always use this to work your way across the sky. Be warned, if looking very high up there is a curious illusion when tilting your head back that things at 60 degrees altitude or more can feel as if they are directly overhead.
Also consider how large something will appear, the scale of your chart should give you a clue as to your target’s size in degrees that you can then use to convert into ‘fists’. For example the two stars at the end of the Plough/Big Dipper’s bowl are a little less than one fist width apart, Orion is about two fist widths tall. Knowing what direction to face, how high up in the sky and how large your target constellation will appear all help to make finding it a great deal easier.
Signposts in the sky
Having found your bright group of stars or single bright star you will now want to move on to other constellations. There are a couple of ways to do this. One is to draw lines through stars that roughly point to other stars or constellations. Here are a couple of examples.
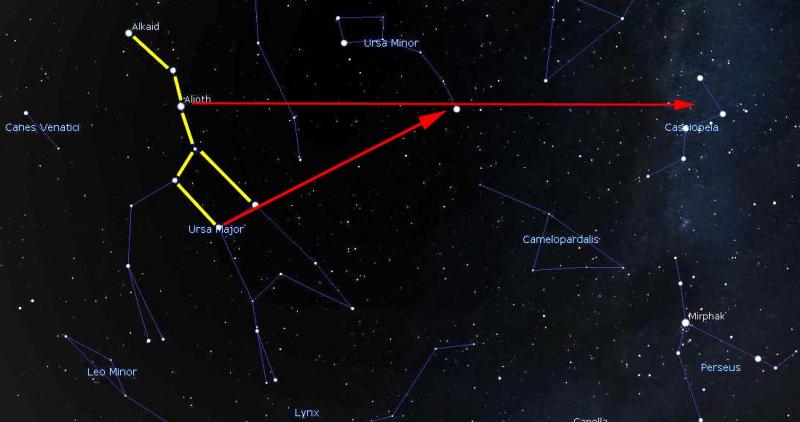
Also in Figure 3 you can see how by extending a line from the star in the ‘handle’ nearest to the ‘bowl’ through Polaris and an equal distance beyond brings us to the key constellation of Cassiopeia.
Cassiopeia has the shape of a ‘W’ or ‘M’ depending on which way up it appears, once seen it is easy to find again. With Ursa Major and Cassiopeia being on opposite sides of the pole one or the other of these two constellations will always be at a reasonable altitude in mid-northern latitudes and can serve as an anchor for finding other constellations.
The Plough however can be used to find many other stars and constellations as Figure 4 shows.
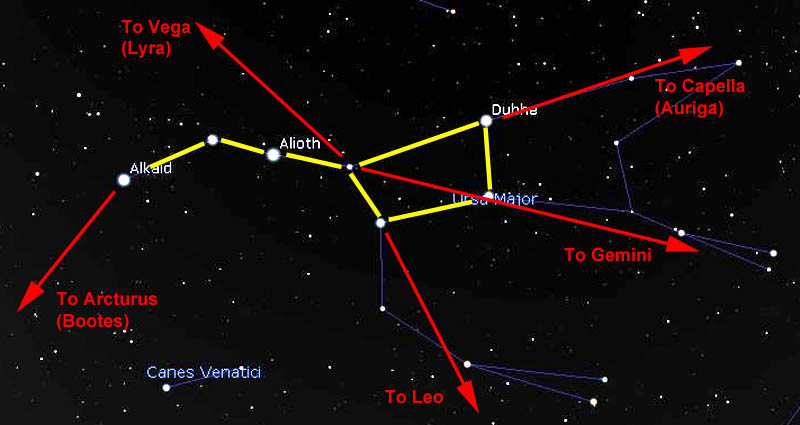
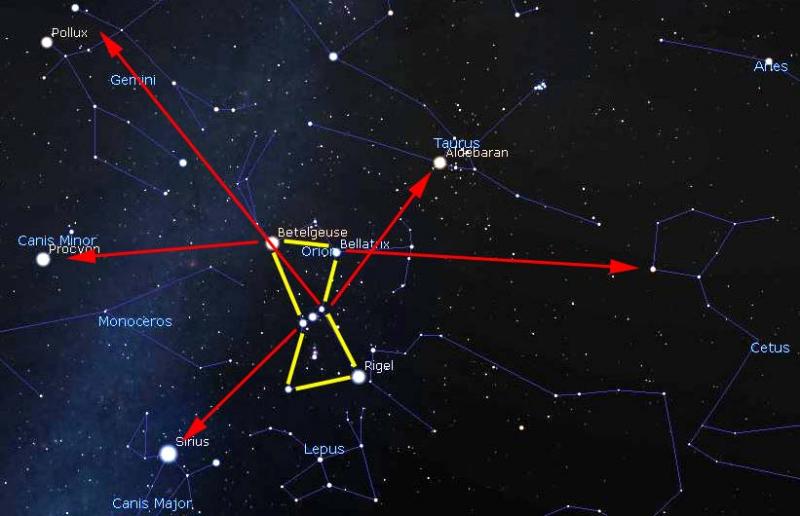
These are just two examples, always be on the lookout for such alignments.
Near neighbours
A second method is to note the position with respect to a constellation and ‘hop’ to it from there.
Cassiopeia, which we just discovered how to find, gives a useful example. From the chart in figure 6 we can see that Cassiopeia lies between Cepheus and Andromeda.
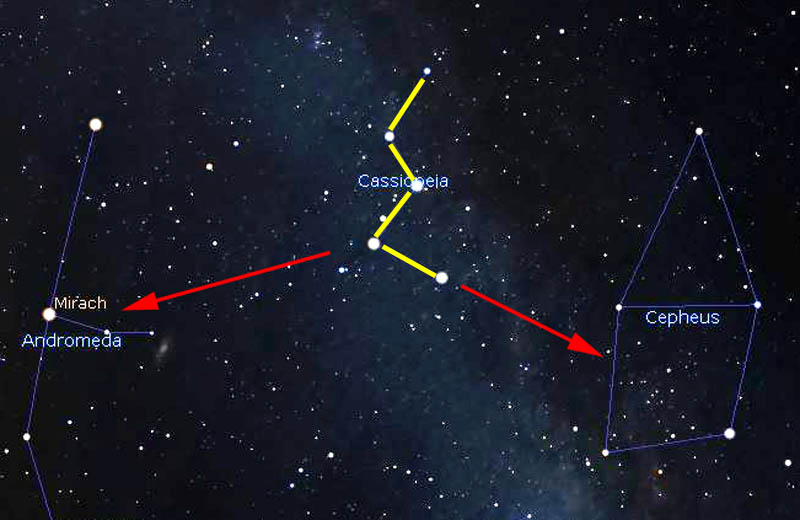
Now let’s use this method to find the faint constellation of Equuleus mentioned earlier.
Looking at the chart (Figure 7) for our date and time we find that the first magnitude star Altair in Aquila the eagle is roughly due South and halfway up in the sky.
Incidentally as well as being useful in finding Delphinus and Equuleus, Altair and Aquila are excellent guides for finding Sagitta the arrow and Scutum the shield as well.
Conclusion
With a chart in front of you, look for alignments and neighbours and then translate them on to the sky to find your way around. With patience and a reasonable sky it is not too difficult. You will likely find that once you have identified a constellation it will stand out next time you look for it.
So we can now find out what is in the sky and hopefully look up and see those very constellations themselves. A future article will cover getting in close to find faint objects in your telescope or binoculars.
In the meantime, if it is clear, go outside, look up and start learning your way around the sky, you will not regret it.
https://britastro.org/wp-content/uploads/2018/03/Figure-7.JPG
https://britastro.org/wp-content/uploads/2018/03/Figure-7.JPG
| The British Astronomical Association supports amateur astronomers around the UK and the rest of the world. Find out more about the BAA or join us. |
