2020 November 12
Through which end do I look?
Having advised beginners previously on purchasing a telescope (What is the best telescope for an adult. December 2018), it seems appropriate in this new year to write about getting a new telescope up and running. The author has written this tutorial with the complete novice in mind, but it is hoped more experienced observers will find them interesting as well.
As we know, there are many different types of telescope and mounting, each with their own peculiarities of use. It would not be practical to cover them all on one page, so will concentrate on a few issues that are common to many. If you purchased the telescope new, the first piece of advice is to read the instructions. The instruction may be, however, not much help at all, given the standard of technical writing and translation often found. Frequently, manufacturers use one instruction manual to cover a wide range of equipment, and often most of the instructions found in a manual prove to be irrelevant to the beginner’s specific telescope.
The telescope needs to be unpacked and assembled; the optics then need to be uncovered for use. If this process proves baffling, an engineering or mechanically-minded person – or a photographer – might well be able to help, even if they have no experience of telescopes. The process of uncovering the lenses may not be as trivial as it sounds. I have known the plastic caps on object glasses to be so tight as to need tools (like the ‘snake’ used for taking the lids off jars) to remove. A further word of warning: do not inadvertently unscrew items, that the manufacturer never intended to be moved. A further word of warning: don’t inadvertently unscrew things you are not meant to. The author recently helped a lady who was struggling to remove the white plastic covers from her eyepieces. The manufacturer had designed the eyepiece cover so that the owner should remove it by pulling it off, but she was unscrewing them,, in the process, disassembling the eyepieces.

- Test your telescope in the daytime first.
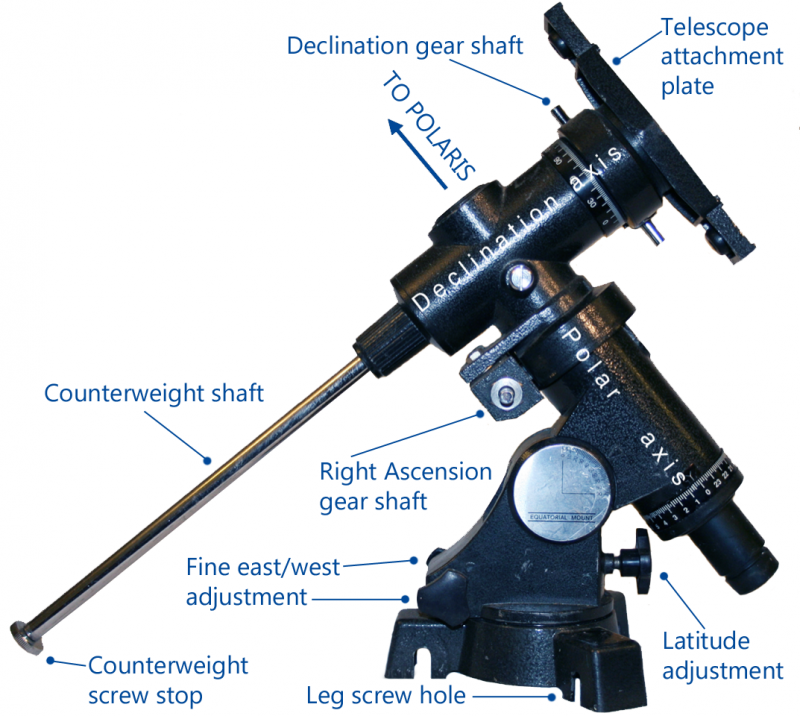
- Familiarise yourself with the operation of the clamps for the axes and the controls that drive the geared wheels (these may be hidden in casings), turning the telescope slowly around said axes.
- Ensure that the telescope is balanced,– so it does not swing when the clamps are loosened – by moving it along its cradles or the dovetail bar, and by adjusting the position of the counterweight on its shaft.
- Do this balancing with accessories like the finder, star diagonal and eyepiece fitted.
Additionally, ensure you have the screw stop on the end of the counterweight shaft, so the weight cannot fall on your foot.
Many small, manual German equatorial mounts (I’m talking the EQ2 grade here) do not have a full circular gearwheel on the declination axis, but a sector drive which, if the nut is driven to the end of the thread, becomes jammed-up and requires tools to be freed again. Indeed it is unusual to see an EQ2 mount that has not been put into this state by a hapless operator. With this poor system, you must always ensure the nut is somewhere near the middle of the thread before you start driving the scope.
Some refractors will not focus without the star diagonal in place, so use that at first, with the longest focal length eyepiece (the one with the highest number of millimetres printed on the side). The diagonal also makes the daytime view less disorienting by putting the image upright, although left and right will be reversed. Start by trying to focus the telescope on a very distant terrestrial object, like a tree or chimney. That focus point will be close to what you need for looking at the Moon and stars – these will however be more tricky, because they move!
When night falls, first try your luck with the Moon, if it is up – failing that, try a planet or a bright star. If all appears to have failed and you can see nothing, do not despair. Try to get hold of some astronomers through your local society, use the BAA website forum, or e-mail me. Someone will be able to help you to get your telescope revealing the amazing sights the heavens have to offer, if you have enough patience. Or, if your telescope really is useless, they will be able to advise on what to do next. If you have bought it (as I advised) from a proper telescope dealer, they will be willing to help you in all circumstances – they have a reputation to keep up in this small world of enthusiasts.
Best of luck!
David Arditti, Director, Equipment & Techniques Section
https://britastro.org/wp-content/uploads/2020/11/1Finder.JPG
| The British Astronomical Association supports amateur astronomers around the UK and the rest of the world. Find out more about the BAA or join us. |
