Topographical Study
By Peter Grego
Introduction
For a number of very good reasons, a great deal of emphasis is placed on the importance of sketching the lunar surface. Until the advent of photography in the latter half of the 19th Century, drawing at the eyepiece was the only means of recording the Moon’s features. Professional astronomers interested in researching the Moon have not needed to peer through telescope eyepieces armed with a pencil and sketch pad for more than a century. Now, the topography of the Moon’s surface, both near side, far side and its polar regions, have been mapped in great detail and the composition of its surface is well known. These days, few professional observatories ever turn their big telescopes towards the Moon, other than to impress new students, or to test out new equipment.
Visual lunar observation is entirely the province of the amateur astronomer. Just seeing the Moon’s surface through the telescope and being able to locate and identify the main lunar features is satisfying enough for many people who enjoy looking at the Moon. However, many lunar observers want to take their enjoyment of the Moon a step further, by making their own permanent record of their forays around the Moon’s surface.
The continuing importance of visual studies
It may be asked, what possible reason is there to draw the Moon’s features, in view of the fact that digicams, camcorders, webcams and dedicated astronomical CCD cameras are capable of securing detailed images of the Moon, recording features that the visual observer would find impossible to draw with any degree of accuracy, so why bother? Surely, the lunar surface appears so detailed, even through a small telescope, that only an expert artist could hope to accurately draw even a small section of it? What is the point, when CCD cameras can do it all effortlessly in a fraction of the time? Why bother to draw or even image the Moon through a backyard telescope, when the entire lunar surface has already been mapped in exquisite detail?
Such arguments are among those used nowadays to dismiss the efforts of the observer who sketches the Moon’s features and, for that matter, anyone who dares make an observational drawing of any other celestial object. These arguments completely miss the point of why many lunar observers choose to draw the Moon’s surface.
Learning how to draw the Moon’s features is an activity that has the potential to improve every single aspect of the amateur astronomer’s skills of observation. With its hundreds of craters and mountains and vast grey plains, the lunar surface can appear utterly confusing to a novice, but it becomes increasingly familiar over time. Novices are often amazed at how the effects of illumination vary with the distance from the terminator, craters look incredibly deep near the terminator, but a little distance from it they may not look so cavernous. At first, the observer, armed with a map, may struggle to correlate the view through the telescope eyepiece with the major features marked on a map. However, as the major landmarks are noted, they can be used as stepping stones to hop across to other, more subtle features that may have originally been overlooked. Without exception, an observer’s ability to discern the fine detail on the Moon will improve in proportion to the amount of time that is spent studying the lunar surface through the telescope eyepiece.
Just studying the Moon through the eyepiece with the aid of a map, photographs and/or a written description hones the skills of observing and is a continual learning experience. But one certain means of fine tuning one’s skills of observation that goes hand in hand with learning one’s way around the Moon, is to spend time drawing individual features or small groups of features. By paying full attention to a small area of the Moon, instead of allowing the eye to roam around the lunar surface, the brain begins to make sense out of the light and shade, teasing fine topographic detail from what may have initially looked like a plain hole in the ground. It is remarkable how much more detail can be discerned when the observer has the task of attempting to draw a single small feature as accurately as possible.
Observational information
Finished observational drawings should ideally be accompanied by more than just the basic information of the feature name, date and instrument used. A complete observation may include some or all of the following details:
Name of feature(s). IAU (International Astronomical Union) official names of features should invariably be used. Many older atlases may contain errors of nomenclature or outmoded and unofficial designations for features. Pickering, for example, was a name once unofficially given to Messier A in Mare Fecunditatis. However, the ‘official’ IAU crater Pickering is a different crater, located near the centre of the Moon’s disk. If the feature that was observed cannot be identified with an official IAU designation, note its location in relation several of the nearest named features, eg., ‘small group of low hills in Mare Frigoris, immediately west of Harpalus’.
Date and time. Amateur astronomers around the world use UT (Universal Time), which is the same as GMT (Greenwich Mean Time). Observers need be aware of the time difference introduced by the world time zone in which they reside and any local daylight savings adjustments to the time, and convert this to UT accordingly – the date should be adjusted too. Times are usually given in terms of a 24-hour clock – for example, 3.25 pm UT can be written as either 15:25, 1525 or 15h 25m UT.
Seeing. To estimate the quality of astronomical seeing, astronomers refer to one of two scales of seeing. In the UK, many observers use the Antoniadi Scale, devised specifically for lunar and planetary observers.
AI – Perfect seeing, without a quiver. Maximum magnification can be used if desired.
AII – Good seeing. Slight undulations, with moments of calm lasting several seconds.
AIII – Moderate seeing, with large atmospheric tremors.
AIV – Poor seeing, with constant troublesome undulations.
AV – Very bad seeing. Image extremely unstable, hardly worth attempting to observe lunar surface features.
In the United States, seeing is often measured from 1 to 10 on the Pickering Scale. The scale was devised according to the appearance of a highly magnified star and its surrounding Airy pattern through a small refractor. The Airy pattern, an artefact introduced by optics, will distort according to the degree of atmospheric turbulence along its light path. Under perfect seeing conditions, stars look like a tiny bright point surrounded by a complete set of perfect rings in constant view. Of course, most lunar observers don’t check the Airy pattern of stars each time they estimate the quality of seeing during an observing session — an estimate is made, based on the steadiness of the lunar image.
P1 – Terrible seeing. Star image is usually about twice the diameter of the third diffraction ring (if the ring could be
seen).
P2 – Extremely poor seeing. Image occasionally twice the diameter of the third ring.
P3 – Very poor seeing. Image about the same diameter as the third ring and brighter at the centre.
P4 – Poor seeing. The central disk often visible; arcs of diffraction rings sometimes seen.
P5 – Moderate seeing. Disc always visible; arcs frequently seen.
P6 – Moderate to good seeing. Disk always visible; short arcs constantly seen.
P7 – Good seeing. Disk sometimes sharply defined; rings seen as long arcs or complete circles.
P8 – Very good seeing. Disk always sharply defined; rings as long arcs or complete but in motion.
P9 – Excellent seeing. Inner ring stationary. Outer rings momentarily stationary.
P10 – Perfect seeing. Complete diffraction pattern is stationary.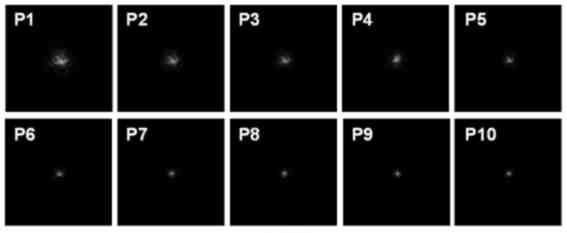
Considerable confusion can be caused if a simple figure is used to estimate seeing, without indicating whether it’s made on the Antoniadi or Pickering scale. So, in addition to designating the seeing with a letter and a figure (AI to V or P1 to 10), a brief written description of seeing, such as ‘AII – Good with occasional moments of excellent seeing’ can be made.
Conditions. An indication of the prevailing weather conditions, such as the amount of cloud cover, the degree and direction of wind and the temperature.
Transparency. More relevant to deep sky observers than lunar observers, the quality of atmospheric clarity is known as transparency. Transparency varies according to the amount of smoke and dust particles in the atmosphere, along with cloud and haze. Industrial and domestic pollution causes transparency to be worse in and around cities. A transparency scale of 1 to 6 is often used, according to the magnitude of the faintest star detectable with the unaided eye. Some lunar observers choose to include a measure of transparency for the sake of completeness.
Age and phase. An average lunar month, or lunation, lasts 29d 12h 44m, from one new Moon to the next. Many observers choose to note the time elapsed from that lunation’s new Moon, in days and hours, to the time of the observation. The age of the Moon may be used to estimate the approximate phase of the Moon at the time of observation. The Moon’s phase can also be indicated by a short note, such as ‘waxing gibbous’ or ‘waning crescent’ for example. A more exact figure to gauge the Moon’s phase is a figure denoting the percentage of the near-side that appears illuminated — for example, at first quarter phase, the Moon is 50 percent illuminated (waxing); at last quarter it is 50 percent illuminated (waning).
Libration. Combined, the effects of libration in latitude and longitude cause a displacement of the Moon’s mean centre. Features on the Moon’s mean far-side are brought onto the Earth-turned lunar hemisphere on one limb, while features move onto the hemisphere facing away from the Earth on the opposite limb. At extremes, libration in latitude amounts to ± 6.5°, while libration in longitude can be as great as ±7.5°. These figures are useful to quote, especially on observations of near-limb features in the libration zone.
Selenographic coordinates. Coordinates on the Moon are called selenographic coordinates. The mean centre of the lunar disk is located at a selenographic latitude of 0° and a selenographic longitude of 0°. Going northward, selenographic latitude is positive, and negative going southward. The Moon’s north pole is located at a selenographic latitude of 90°, and the south pole is at -90°. Selenographic longitude increases eastwards from the Moon’s mean central meridian. The mean eastern limb is located at 90°, increasing eastward around the far side to 180° at the point opposite the mean centre of the disk, 270° at the mean western limb, and 360° (0°) at the mean centre of the disk. On maps, features either side of longitude 0° are often marked as positive (degrees east) or negative (degrees west). A feature located at +45° (45°E) corresponds to a selenographic longitude of 45°. A feature located at -45° (45°W) corresponds to a selenographic longitude of 315°. A feature’s selenographic coordinates can be indicated on the observational drawing.
Selenographic colongitude and the lunar terminator. If the Moon maintained a perfectly circular orbit around the Earth and did not undergo librations, it would present the same face towards the Earth — its morning and evening terminator would cross over the same features at exactly the same point in each and every lunation. But this is not the case, and libration has a considerable effect on the apparent position of features in relation to the terminator. For example, the eastern part of the large crater Ptolemaeus lies on the Moon’s mean central meridian, at a selenographic longitude of 0°. Therefore, at a mean libration, Ptolemaeus appears on the sunrise terminator at precisely first quarter phase. However, at extremes of libration, Ptolemaeus can lie more than 3° east or west of the mean centre of the Moon, and it appearance on the terminator can be advanced by more than 12 hours prior to first quarter or retarded by more than 12 hours after first quarter phase.
In order to calculate precisely where the morning or evening terminator of the Moon lies, a figure called the Sun’s selenographic colongitude is used. The Sun’s selenographic colongitude (S) is numerically equal to the selenographic longitude of the morning terminator — the figure is published in astronomical ephemerides and can be displayed on many lunar computer programs. At new Moon, the Sun’s selenographic colongitude equals 270°, at first quarter 90°, full Moon 180° and last quarter 180°. To work out exactly where the near-side morning or evening terminator lies in relation to the actual selenographic longitude at the Moon’s equator, the following table is used:
Phase Terminator Sun’s sel. colongitude (S) Longitude of terminator
New Moon to first quarter Morning 270° to 360° 360° – S East
First quarter to full Moon Morning 0° to 90° S West
Full Moon to last quarter Evening 90° to 180° 180° – S East
Last quarter to new Moon Evening 180° to 270° S – 180° West
The Sun’s selenographic colongitude increases by approximately 0.5° per hour, or 12° per day.
A table allowing you to work out the Sun’s selenographic colongitude for any given date and time is provided in the BAA Handbook each year.
Sun’s selenographic latitude. Another figure that many lunar observers state on their observations is the Sun’s selenographic latitude – this equals the Sun’s selenographic latitude at the subsolar point, and varies between +1.5° and -1.5° over the course of around six months.
Lunation. The numbering of the Moon’s lunations officially began with lunation 1 on 16 January 1923. Lunation 1,000 began on 25 October 2003. Many lunar observers include a lunation number on their observational reports.
Lunar data. Much of the necessary information about the Moon is published in annual astronomical ephemerides such as the Handbook of the British Astronomical Association, the Astronomical Almanac (a joint publication of the US Nautical Almanac Office and Her Majesty’s Nautical Almanac Office in the UK) and the Multiyear Interactive Computer Almanac (MICA, published by the US Naval Observatory). Programs for personal computers are becoming increasingly sophisticated, and are capable of giving the user much more than a few dry figures. Many of the more advanced lunar programs are capable of displaying high-resolution images or maps of the surface of the Moon, fully adjusted for phase and libration. It won’t be long before personal computers are capable of running advanced programs that display detailed topographical 3-D models of the Moon’s surface, adjusted for lighting and libration, that show all the features that can be discerned through a small telescope. Such a program could only help encourage amateur astronomers to take out their telescopes and view the Moon’s splendours with their own eyes.
Click here to return to the Lunar Section Observation Activities
Click here to return to the Lunar Section home page.
| The British Astronomical Association supports amateur astronomers around the UK and the rest of the world. Find out more about the BAA or join us. |