The Art of Drawing the Moon
By Andrew Johnson
Based upon an article, originally published in ‘The Strolling Astronomer’, Vol. 37 No.1, May 1993.
Contents
Introduction
Why make drawings of the Moon?
Telescopic equipment
Preparation
Making the observation
Finished drawing methods
References
Introduction
This article addresses the problems usually encountered by the beginning visual lunar observer. It discusses drawing equipment, paper selection, telescopic observation, drawing techniques, and producing finished drawings. The article is intended to encourage beginning lunar observers who wish to record what they see in the form of drawings, and to gain a deeper understanding of an increasingly neglected field of observational astronomy.
The Moon is the first telescopic target for most amateur astronomers. Undoubtedly, few of them were unimpressed by what they saw. However, it is increasingly often that these first impressions fail to develop into a long-term interest in the Moon. Why is this? One of the most often-cited reasons is that since the Apollo missions there is nothing more to be learned from Earth based observation, at least by amateurs. In this respect, the current low level of interest in the Moon parallels that during the period after Beer and Mädler’s publication of ‘Der Mond’ in 1837.
Why make drawings of the Moon?
Drawing the Moon introduces the observer to, and familiarizes him with, this stark world, ever changing in appearance, as no other method can. You never fully develop this one-to-one relationship with the Moon through the study of books or photographs. Seeing this wonderful landscape for yourself, is as close as is possible to first-hand experience of our subject.
In this age of CCDs, some observers wonder why others still bother making drawings. The answer is simple, we observe as we do because we enjoy it! This reason is often overlooked or forgotten. Rather than to try to assign scientific merit to my chosen method of making drawings, I justify this approach on the basis of history, heritage, and individuality.
It is only natural that observers wish to use the best equipment and the latest technology in pursing their interest. However, in our headlong dash toward technology, are we not in danger of ignoring the real objective? I consider this last to be to develop a full understanding and enjoyment of astronomy. Were we all to adopt tunnel vision, or more topically CCD vision, then we could lose sight of all the other aspects of our study, which are highlighted by other methods of observation.
In addition, what are we to make of the work of our predecessors? You cannot interpret the observations of Schröter, Beer and Mädler, or Elger, in terms of the CCD images of today. If you try, all you will conclude is that they often made inaccurate observations. To understand their work, one needs to be a contemporary observer who is still practicing the old methods.
Technology is progressing at a quickening pace. Visual observers were at the cutting edge of observational astronomy for some three hundred years. Photography held that position for a century. It is my guess that CCDs will last considerably less than that. However, when CCDs are finally classified as obsolete, I hope that not everyone will abandon them. If with every new technological advance we abandon all that has gone before, then we lose touch with our past, and hence with our history and the heritage of our predecessors’ work. The result would be that our common interest is much poorer. Also, we must not forget individuality. It is astronomers, and their interpretations of what they find, that add flesh to the science. On its own, the pure science of astronomy is cold, and less captivating than some of us might suppose.
Telescopic equipment
There has been much discussion of this subject in recent issues of this Journal [3, 4], so I will not dwell long on this subject. My overriding concern is to encourage more observers to draw the Moon. Thus the only appropriate suggestion about telescopes is, “Whatever you have, use it!” The ideal situation would be for all of us to have the telescopes of our dreams. However, in reality most of us have to compromise on the basis of portability, storage space, ease of use, or more likely, cost. More often than not, those promoting the virtues of a particular form of telescope are defending the telescope that they already have, by which they hope to reassure themselves that they made the right choice when they parted with their hard-earned money.
Many people with small telescopes think that they cannot contribute useful work in observing programs unless they own some computerized all-resolving monster of a light bucket! This is simply not the case the majority of the time, especially where the Moon is concerned, and it is well to remember the small telescopes successfully used by the early selenographers. What those pioneers might have given to have one. Of those telescopes that now lie idle on clear moonlit nights! Remember, more often than not it is the skill, determination, and enthusiasm of the observer that determines how useful a given set of observations is, rather than the equipment used.
Preparation
Before going to the telescope to make a drawing of a lunar region, spend some time in preparation, so as to get the most out of the time spent at the eyepiece. First, you should know in advance, what you are going to observe. There is nothing worse than trying when at the telescope to decide what feature to draw. This is time-consuming and wasteful of your concentration, energy, and enthusiasm, and of those all-too-rare observing opportunities.
Once you have set an observing goal, the next step is to prepare for making a drawing at the telescope. For this, you will need certain items: a clipboard and clips, a source of illumination, drawing supplies, such as good quality copier paper and pencils. Although they are not strictly necessary for making the drawing, it will help to have a copy of the Elger Intensity Scale and a fairly detailed outline map of the Moon.
Most of us have our own preferred ways of equipping ourselves, so we will discuss this topic only briefly. The nature of the source of illumination is not so critical as it is for deep sky observation. You can use something more substantial than a tiny red LED because you are not too concerned about ruining your dark adaptation when you are observing the Moon! A small flashlight attached to your clipboard will do. As for the paper, we now simply note that it will have to be thick enough so that, when the humidity is high, it will not wrinkle due to moisture while the drawing is being made. Pencils of various grades can be used, such as HB and B. The harder grades are less suitable because the marks that they make will be hard to see under dim lighting conditions.
The Elger Intensity Scale is a method of gauging the intensity of light and shade on the lunar surface. This numerical intensity scale was actually introduced by Schröter and was later elaborated by Elger. In many ways it parallels the intensity scale used by planetary observers – The Elger Scale runs from 0 through 10, with 0 being black shadows and 10 the brightest feature normally seen on the Moon, usually taken as the sunlit central peak of Aristarchus. This scale can be calibrated by reference to well-known lunar features.
0 — Black – the darkest lunar shadows.
1 — Very dark greyish black – dark features under extremely shallow illumination.
2 — Dark grey – the southern half of Grimaldi’s floor.
3 — Medium grey – the northern half of Grimaldi’s floor.
4 — Medium light grey – general tone of area west of Proclus.
5 — Pure light grey – general tone of Archimedes’ floor.
6 — Light whitish grey – the ray system of Copernicus.
7 — Greyish white – the ray system of Kepler.
8 — Pure white – the southern floor of Copernicus.
9 — Glittering white – Tycho’s rim.
10 — Brilliant white – the bright central peak of Aristarchus.
If you are unfamiliar with the locations of the standard features used for Elger’s Scale, it will help to have a simple outline map of the Moon, with the relevant features prominently marked on it. You can paste both the verbal description of the scale and the reference map to each side of a piece of cardboard, covering them in clear plastic for use at the telescope.
The simple outline map just described should be adequate for identifying features. I would not take anything more detailed to the telescope to ensure that my observations are objective and unbiased.
Making the observation
Upon commencing an observation, it is best not to start drawing right away. It will pay dividends later if you spend some time studying your subject through the eyepiece, familiarizing yourself with some of its details.
One important consideration is the scale you will use for your drawing. In my very first drawing of the Moon, I represented the crater Clavius, 225 km in diameter, by an oval only 50 mm across! Needless to say, it was not a great observation. The question of scale has as much to do with convenience as with anything else. It is hard on a small drawing to fit in all the details visible. Drawings that are too large, however, are daunting and difficult to place detail upon. There are no set rules, so experiment to determine the drawing scale that is best for you. If you find that the details on your drawing are cramped, of if you are having problems with proportions, then the first thing to check is what scale you are using. However, as you can see from the foreshortening evident in the figures, any scale you adopt can only be approximate.
When you are finally prepared to make your drawing, the question is where to start. Before drawing, study the shape of the crater or other formation you intend to draw. A common mistake of beginners is to assume that all craters are circular, at least as seen from directly above. This is definitely wrong; you will be hard pressed to find a circular crater larger than 30 km in diameter anywhere on the Moon. Most larger craters are actually polygonal, so study their sides: How many are there, are they of the same length, are they straight or are they curved?
Also remember the effects of foreshortening. The classic example of this is Mare Crisium, which is actually elongated east-west. However, as seen from Earth, it appears elongated north-south. Most of the features you observe will be elongated. In drawing them, decide what ratio best describes the proportion of their apparent major and minor axes; for example, is it 2:3 or 3:4? This proportional way of considering a feature to be drawn is quite useful, especially in the placement of minor details.
Very frequently, the observer will draw a crater, such as is illustrated in the figures with this article. For this reason we will now concentrate on drawing craters.
Once the shape and outline of the crater have been considered, we can turn to its details. Again, two separate aspects have to be considered; the actual features on the Moon, and the appearance of these features due to the effects of light and shade. The study of minor detail can become very absorbing, so be careful not to study one little area too long. The purpose of the initial scrutiny is simply to prepare yourself for making the drawing. Ask yourself what details are visible; whether there are craterlets, hills, scarps, or rilles. Then look at the shadows and bright areas. Consider how the shapes of these tonal areas are affected by the actual relief, and what is the nature of the relief that can produce such a pattern. Build up your initial study along these lines, and only then start to think in terms of putting this information down on paper.
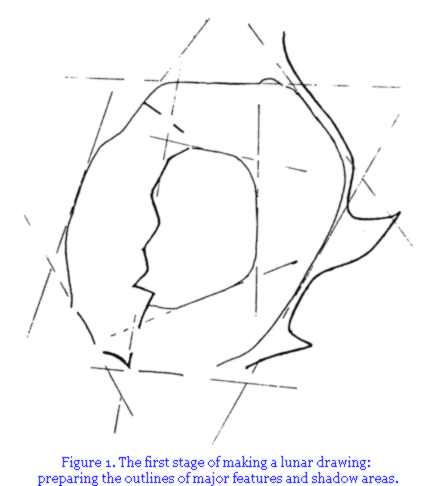
Figure 1. Shows the creation of the main outline and the major shadows. Some construction lines are shown to reinforce the concept that crater walls need not be circular, or even curved. At this stage, draw the outlines of the crater walls and shadow areas slightly heavier than any other lines. Once the main shadow outline has been delineated, it is important not to alter it because shadows are the visible features that are most likely to change during the observation. Subtle changes in the tones of other areas will occur as the solar angle changes, but these changes are nothing like so important as the changes in the shadow outlines. These last can occur in less than a half hour, especially when near the terminator. No really useful observation is likely to be completed in less time than this, so the early fixing of shadow outlines is necessary.
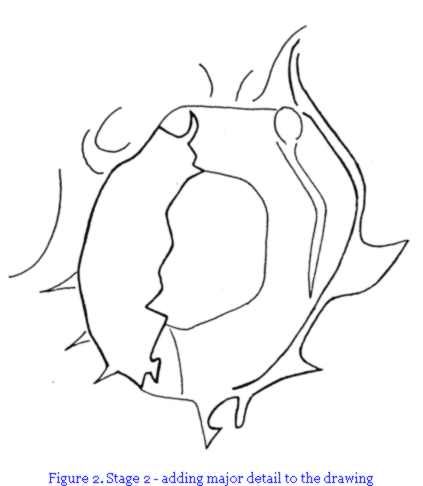
Figure 2. The next step, is to start filling in the major details. Such details include inner-wall terraces, large craterlets, and similar features. The best way to determine these objects’ positions and proportions is to establish their sizes and positions in terms of fractions of the dimensions of the main crater. You can do this mentally by dividing up the crater into fractions; such as quarters sixths, eighths, or whatever proportions suit you. You can also follow this procedure for minor de tails, using the sizes of features to determine their positions in terms of their own diameters. Follow this procedure for all the features that you can definitely see, working from the largest to the smallest, constantly checking that you are maintaining correct positions and pro portions. Your drawing should be almost complete by now as far as linework is concerned.
You should not attempt shading at the eyepiece, but you can add it later instead if you make annotations on the drawing concerning the levels of light and shade. This is best done using the Elger Scale. However, if as a beginner you are not confident about its use, then just jot down some notes about which areas were darkest and which were lightest. As your experience grows, you will find a need for refinements such as the Elger Scale.
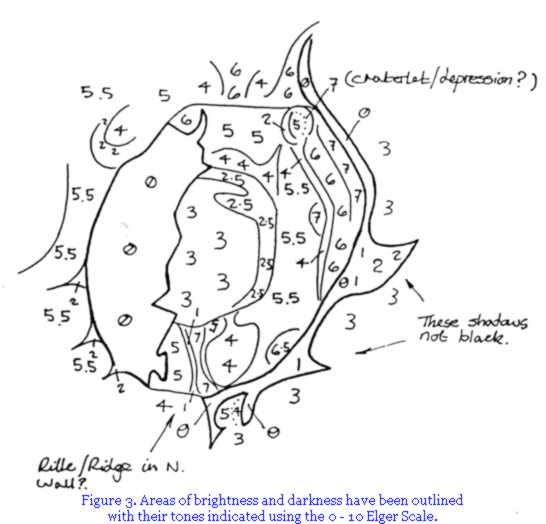
Figure 3. Shows the nearly completed drawing with tonal areas outlined and the Elger Scale value drawn within them or indicated with arrows. In addition, you should have added background documentation: name of formation, UT date, UT beginning and finishing times, seeing and transparency, telescope, magnification, and your name and address. You should also add the current solar colongitude and latitude. Finally, it is helpful to have some notes regarding the observation itself, with the approximate scale.
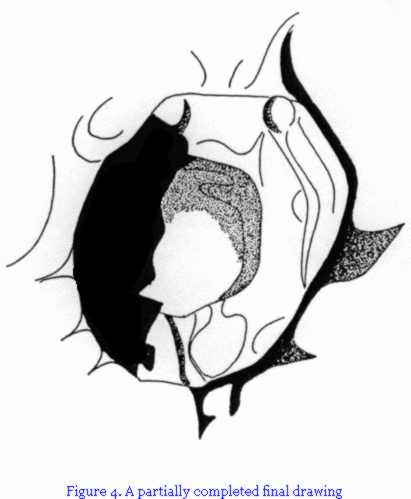
Figure 4. By now the observation itself is nearly complete. If you still have sufficient energy, you can start the initial stages of finishing the drawing when you return indoors. However, you need not finish the drawing immediately if the observation was completed carefully in the first place
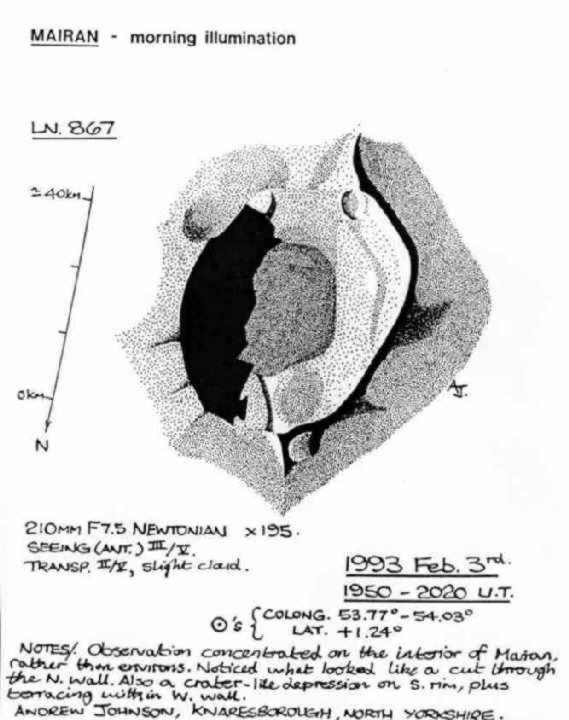
Figure 5. Is an example of a finished drawing made from the observation described above, using the stippling technique. The finishing of the drawing depends on which drawing technique you wish to use.
Finished drawing methods
Line Diagrams. There are two basic approaches to making finished drawings from lunar observations; line diagrams (outlines) or tonal drawings. There are three methods of making tonal drawings, described later. It is simple to finish an observation in terms of a line drawing. One needs to add background information to make the observation useful to others, and perhaps to tidy up the drawing, taking care not to alter any actual details in the process. This type of finished observation is suitable for scientifically-oriented programs. However, it is natural for observers to want their finished drawings to appear as lifelike as possible, and thus to seek other, more ‘artistic’ methods of representation.
Tonal Drawings, Pencil Shading. Most observers will use pencils to make their first lunar shaded drawings. This is because pencils can be easily controlled and thus used effectively by beginners. With sufficient practice, pencils can be used to make beautiful and realistic drawings.
My best advice as to which grade of pencil to use is to experiment and see what suits you. Remember that too soft a grade will smudge easily, while too hard a grade can damage the paper surface and also be harder to remove entirely if mistakes are made. You can buy sets of pencils which provide a good selection of grades from art shops, which may be able to provide you with good advice.
The grade of paper will have to be robust enough to be used outdoors without too much wrinkling due to moisture. Paper is graded by its weight, and I prefer 130 gsm [grammes per square metre; this reflects the system used in Britain. Besides weight, paper is available in different textures. One line of thought is to use the paper texture deliberately to produce a desired effect. This approach is advanced largely in order to improve reproduction. One drawback here is that, as texture size increases, so too does the danger of the texture’s being interpreted as actual observed detail. Thus a compromise has to be reached between smooth and rough texture; again the keyword is experimentation.
You can achieve good pencil-shading effects through numerous layers of cross hatching and slight softening by rubbing with a cotton ball. Alternatively, you can lay down a less-precise layer of cross hatching and use harder rubbing with a cotton ball. Then the lighter areas can be picked out with an eraser, and the darker areas filled in. One refinement is to use black ink for shadows, remembering that not all lunar shadows are totally black. White paint can be used to bring out exceptionally bright areas. This last method has the disadvantage that, if you subsequently use a cotton ball to smooth shading, the recesses in the paint will be shaded as well.
The best advice for photocopying pencil drawings is to make your drawing with shading as dark as you can accept, and then to turn up the copying machine’s contrast by a notch or two. These copies will probably suffice for sending observations to program Recorders and other colleagues. If later on the drawing needs to be published, you should send the original by registered mail.
Tonal Drawings, Stippling. This method, along with hatching, is best exemplified by the work of Harold Hill [8]. It is likely that these methods originated in response to the problems of reproducing continuous-tone drawings. We are all familiar with stippling as used for reproducing pictures in newspapers and magazines. This process builds up a picture using many small black dots, which blur together into a grey sensation when viewed from a distance. Manual stippling works on a similar principle, and since the picture is made up of discrete black ink dots, simple photocopying machines have no trouble in copying them, with the copy virtually as good as the original.
In making a stippled drawing, skill is needed in order to make the dots unobtrusive for anyone viewing the drawing. The factors that are involved in this method are dot density, size, spacing, and the time spent in producing the drawing. The greater the dot density, the greater the apparent darkness of any area, so this density should be matched with the intensity noted in the original observation. The second consideration is that the smaller the dots, the less distracting they will be.
The size of the dots is governed by the size of the pen point; I usually use 0.25 mm, 0.3 mm, and 0.35 mm; more rarely I use 0.5 mm. My favorite size is 0.3 mm because 0.35 mm is, I think, a bit too “coarse,” while stippling can take too much time with 0.25 mm dots. You can use larger pen sizes if you reduce your drawing in copying; reducing a 0.5mm dot drawing to about 70 percent of original size gives good results. You can also enlarge drawings for displays. The choice of type of pen is vast, ranging from professional drafting pens to felt-tips.
You need to compromise between durability and cost. Professional pens are more expensive, but will last almost indefinitely if treated carefully, this is just as well given the cost of replacement nibs! Felt-tips are cheaper, but will blunt rapidly as you constantly tap them on the paper surface.
The keywords here are practice and patience. Also make sure to create the right conditions for completing the drawing. Use good lighting to reduce eyestrain. If possible, use a magnifying glass. Some form of support for the magnifier is helpful, although I use a handheld 75-mm diameter glass myself. Remember that stippling is time-consuming, in my experience a drawing takes 1-1/2 to 2 hours or more to complete. Thus do not be concerned if a stockpile of drawings builds up, each awaiting its turn to be stippled. This is not a major problem if the original observations were made carefully, with all the relevant information included. Then, if you alter none of the original when you make the final version, the finished drawing will not be far removed from what you observed.
Tonal Drawings, Ink Washes. This last method consists of extremes. It is arguably the most realistic method to portray the lunar surface if it is executed beautifully; again, see the work of Harold Hill. It is also perhaps the hardest method to master, and definitely the worst method for photocopying!
Constant practice is the key to this method, and I am still not skilful enough to risk using it on an actual observation. Thus, any or all of the previous methods should be practised first, rather than risk ruining an observation.
To achieve the various tones needed, you must apply various solutions of drawing ink, diluted to different darkness levels. You then apply this ink with soft hop hair brushes. Paper weight is important, and I would not recommend using cartridge paper of weight less than 150 gsm with this method.
References cited:
1. Jamieson, H.D. & Phillips, J.H. ‘Lunar Dome Catalogue (April 30, 1992 Edition).’ J.A.L.P.O., 36, No. 3 (Sep., 1992), 123-129.
2. Benton, Julius L., Jr. ‘1 Lunar Selected Areas Program (SAP): How to Get Started.’ J.A.L.P.O., 35, No. 3 (Sep., 1991), 100-103.
3. Jamieson, H. D. ‘Getting Started: Telescope Selection.’ J.A.LP.O., 35, No. 4 (Dec., 1991), 181-183.
4. ‘Our Readers Speak: Telescope Selection-Part II’ J.A.LP.O., 36, No. 2 (July, 1992),75-78.
5. Benton, op cit., p.103.
6. Westfall, J.E. ‘Getting Started: Moonlighting.’ J.A.L.P.O., 36, No. I (Mar., 1992),23-25.
7. Pedler, J. ‘Making Shaded Drawings That Will Photocopy.’ The New Moon, 6, No. 2 (Dec.. 1992), 38.40.
8. Hill, Harold. ‘A Portfolio of Lunar Drawings’. Cambridge: Cambridge University Press, 1991.
9. Price, Fred W. ‘The Moon Observer’s Handbook’. Cambridge: Cambridge University Press, 1988.
10. Rükl, Antonín. ‘Atlas of the Moon’. London: Hamlyn Publishing, 1991.
Click here to return to the Lunar Section Observation Activities
Click here to return to the Lunar Section home page.
| The British Astronomical Association supports amateur astronomers around the UK and the rest of the world. Find out more about the BAA or join us. |