2017 May 25
Focusing by diffraction
In the early 1990s I built what must have been one of the earliest automatic focusing devices for a CCD camera1 with the help of software written by David Briggs. My favourite method of focusing any telescope however, is to watch the monitor while making very small adjustments until very suddenly, the faintest stars ‘pop’ into view. I prefer to judge for myself if the images are sharp enough rather than let software decide for me.
Some of the amazing images published today are usually taken with either large detectors, short focal lengths, small pixels or a combination of any of the three. When these images are scaled to fit on a single computer screen they can look absolutely stunning. However when enlarged to a scale representing a more modest camera and pixel size, e.g. 10mm detector and 12 microns pixels, they often appear soft or fluffy especially after intensive processing. The easiest way to make images appear sharp is to reduce them in size; enlarging lets you see the truth.
Achieving good focus has been a major interest of mine dating back to the days of photography, so when a friend of mine was having trouble getting sharp star images I was very keen to help. I worked with this person at Southampton University and knew that he was an absolute perfectionist, so his poor star images must have been driving him mad! His problem was that he only had one eye and that was awaiting a cataract operation. For him, software and hardware for auto-focusing were out of the question.
There are various focus testing mask designs on the Internet and some are available commercially. Their main drawback, especially for anyone with impaired vision, is they usually rely on the user’s ability to judge when one object bisects or aligns perfectly with another, and in my view the results can be rather ambiguous. The test I suggested was very easy, virtually zero cost and most importantly, unambiguous; it is very obvious when perfect focus is achieved. I call it ‘The Diffraction Focus Test.’
In principle it consists of placing a rod or batten, either round, square or rectangular, metal or wood, across the main entrance of an optical system in such a way that it creates a diffraction spike to appear parallel to the edge of the CCD in the resulting image. The width of the rod is not critical as good results have been achieved with both ¼” (6mm) and 1¼” (32mm) on the 14″ (350mm) f/6 SCT setup shown in Figure 1. The resulting diffraction spikes can be made thicker or thinner by adjusting the exposure. The only requirement is that the sides of the rod or dowel are parallel.
Diffraction spikes will appear at 90º to the orientation of the rod and should be approximately aligned with a row of pixels in order to avoid pixellation. Contrast stretched exposures of 2 to 5 seconds are usually adequate for a bright star which should be at a high altitude. When experimentation has determined the correct exposures for a suitable diffraction spike length and width, the software can be set for continuous update. It is advisable to take several exposures after each adjustment to allow time for the telescope to settle.
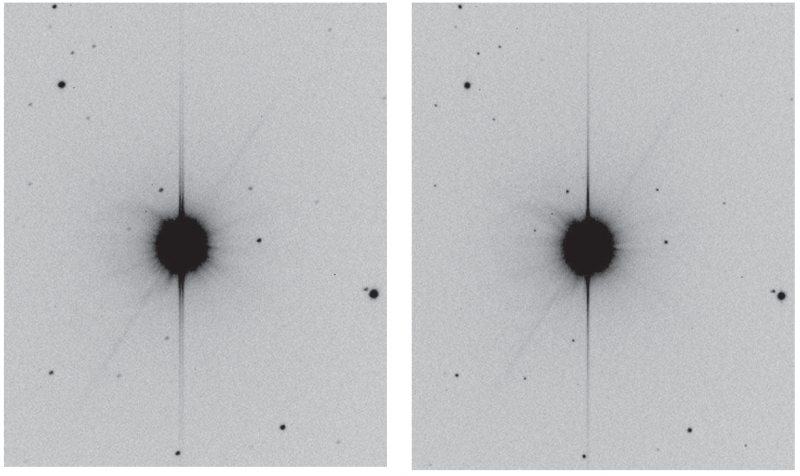
When far from focus there will be two well-separated parallel diffraction spikes on each side of the star. Even when very close to focus there will still be two diffraction spikes (Figure 2). Only when perfectly focused will the image show a solitary spike (Figure 3). My images were binned 2×2, effectively producing 12.9 micron pixels, but the images look as small as in many cameras with much smaller pixels.
Although primarily intended for telescopes of moderate focal length and aperture, i.e. upwards of 6″ (150mm) aperture and 40″ (1 metre) focal length, the test can also be applied to the longer focal length DSLR camera lenses, i.e. >200mm. It is especially useful for those lenses that can focus beyond the infinity setting. It should be mentioned however, that DSLR cameras will need to be set to manual focus and, if possible, manual aperture priority in order to get enough light, and longer exposures to gain adequate brightness in the spikes.

The full aperture setting will produce more light but more importantly, avoid confusion due to the many additional spikes caused by iris diaphragms when stopping down. The shutter should be triggered with delayed action to eliminate camera shake which can cause fake parallel secondary spikes.
As the spike length is very much shorter with short focal lengths and small aperture lenses, the required exposures will have to be longer. This might result in the star overwhelming the diffraction spikes making them hard to see. All resulting test shots will need to be zoomed in the viewfinder.
For critical focusing of a telescope the test leaves little to be desired; the apparatus costs virtually nothing and can be made in a couple of minutes from a piece of steel rod held in place by masking tape and spring clips. Perfect focus can be achieved very quickly and positively leaving no room for uncertainty. Please give this simple test a try if only as a useful confidence check of your usual method.
Reference
- Arbour R. W., J. Brit. Astron. Assoc., 104(4), 179 (1994)
Ron Arbour – While my main interest is searching for and discovering supernovae, I also enjoy designing and constructing telescopes and ancillary equipment to achieve maximum performance.
Article originally published in the JBAA 126, 1, 2016
[Readers may be interested to explore the BAA’s Instruments and Imaging Section, or to look at images of observatories and equipment BAA members have uploaded to the BAA Members Pages.]
https://britastro.org/wp-content/uploads/2022/02/Test-Set-Up.JPG
https://britastro.org/wp-content/uploads/2022/02/Test-Set-Up.JPG
https://britastro.org/wp-content/uploads/2022/02/Test-Set-Up.JPG
https://britastro.org/wp-content/uploads/2022/02/Test-Set-Up.JPG
https://britastro.org/wp-content/uploads/2022/02/Test-Set-Up.JPG
https://britastro.org/wp-content/uploads/2022/02/Test-Set-Up.JPG
https://britastro.org/wp-content/uploads/2022/02/Test-Set-Up.JPG
https://britastro.org/wp-content/uploads/2022/02/Test-Set-Up.JPG
https://britastro.org/wp-content/uploads/2022/02/Test-Set-Up.JPG
https://britastro.org/wp-content/uploads/2022/02/Test-Set-Up.JPG
https://britastro.org/wp-content/uploads/2022/02/Test-Set-Up.JPG
https://britastro.org/wp-content/uploads/2022/02/Test-Set-Up.JPG
https://britastro.org/wp-content/uploads/2022/02/Test-Set-Up.JPG
https://britastro.org/wp-content/uploads/2022/02/Test-Set-Up.JPG
https://britastro.org/wp-content/uploads/2022/02/Test-Set-Up.JPG
https://britastro.org/wp-content/uploads/2022/02/Test-Set-Up.JPG
https://britastro.org/wp-content/uploads/2022/02/Test-Set-Up.JPG
https://britastro.org/wp-content/uploads/2022/02/Test-Set-Up.JPG
https://britastro.org/wp-content/uploads/2022/02/Test-Set-Up.JPG
https://britastro.org/wp-content/uploads/2022/02/Test-Set-Up.JPG
https://britastro.org/wp-content/uploads/2022/02/Test-Set-Up.JPG
https://britastro.org/wp-content/uploads/2022/02/Test-Set-Up.JPG
https://britastro.org/wp-content/uploads/2022/02/Test-Set-Up.JPG
https://britastro.org/wp-content/uploads/2022/03/Test-Set-Up.JPG
https://britastro.org/wp-content/uploads/2022/03/Test-Set-Up.JPG
https://britastro.org/wp-content/uploads/2022/03/Test-Set-Up.JPG
https://britastro.org/wp-content/uploads/2022/03/Test-Set-Up.JPG
https://britastro.org/wp-content/uploads/2022/02/Test-Set-Up.JPG
https://britastro.org/wp-content/uploads/2022/02/Test-Set-Up.JPG
https://britastro.org/wp-content/uploads/2022/02/Test-Set-Up.JPG
https://britastro.org/wp-content/uploads/2022/02/Test-Set-Up.JPG
https://britastro.org/wp-content/uploads/2022/02/Test-Set-Up.JPG
https://britastro.org/wp-content/uploads/2022/02/Test-Set-Up.JPG
https://britastro.org/wp-content/uploads/2022/02/Test-Set-Up.JPG
https://britastro.org/wp-content/uploads/2022/02/Test-Set-Up.JPG
https://britastro.org/wp-content/uploads/2022/02/Test-Set-Up.JPG
https://britastro.org/wp-content/uploads/2022/02/Test-Set-Up.JPG
https://britastro.org/wp-content/uploads/2022/02/Test-Set-Up.JPG
https://britastro.org/wp-content/uploads/2022/02/Test-Set-Up.JPG
https://britastro.org/wp-content/uploads/2022/02/Test-Set-Up.JPG
https://britastro.org/wp-content/uploads/2022/02/Test-Set-Up.JPG
https://britastro.org/wp-content/uploads/2022/02/Test-Set-Up.JPG
https://britastro.org/wp-content/uploads/2022/02/Test-Set-Up.JPG
https://britastro.org/wp-content/uploads/2022/02/Test-Set-Up.JPG
https://britastro.org/wp-content/uploads/2022/01/Test-Set-Up.JPG
https://britastro.org/wp-content/uploads/2022/02/Test-Set-Up.JPG
https://britastro.org/wp-content/uploads/2022/02/Test-Set-Up.JPG
https://britastro.org/wp-content/uploads/2022/01/Test-Set-Up.JPG
https://britastro.org/wp-content/uploads/2022/01/Test-Set-Up.JPG
https://britastro.org/wp-content/uploads/2022/01/Test-Set-Up.JPG
https://britastro.org/wp-content/uploads/2022/01/Test-Set-Up.JPG
https://britastro.org/wp-content/uploads/2022/01/Test-Set-Up.JPG
https://britastro.org/wp-content/uploads/2022/01/Test-Set-Up.JPG
https://britastro.org/wp-content/uploads/2022/01/Test-Set-Up.JPG
https://britastro.org/wp-content/uploads/2022/01/Test-Set-Up.JPG
https://britastro.org/wp-content/uploads/2022/02/Test-Set-Up.JPG
https://britastro.org/wp-content/uploads/2021/11/Test-Set-Up.JPG
https://britastro.org/wp-content/uploads/2021/11/Test-Set-Up.JPG
https://britastro.org/wp-content/uploads/2021/11/Test-Set-Up.JPG
https://britastro.org/wp-content/uploads/2021/11/Test-Set-Up.JPG
https://britastro.org/wp-content/uploads/2021/07/Test-Set-Up.JPG
https://britastro.org/wp-content/uploads/2021/07/Test-Set-Up.JPG
https://britastro.org/wp-content/uploads/2017/05/Test-Set-Up.JPG
https://britastro.org/wp-content/uploads/2022/02/Test-Set-Up.JPG
https://britastro.org/wp-content/uploads/2022/02/Test-Set-Up.JPG
https://britastro.org/wp-content/uploads/2022/02/Test-Set-Up.JPG
https://britastro.org/wp-content/uploads/2022/02/Test-Set-Up.JPG
https://britastro.org/wp-content/uploads/2022/02/Test-Set-Up.JPG
https://britastro.org/wp-content/uploads/2022/02/Test-Set-Up.JPG
https://britastro.org/wp-content/uploads/2022/02/Test-Set-Up.JPG
https://britastro.org/wp-content/uploads/2022/02/Test-Set-Up.JPG
https://britastro.org/wp-content/uploads/2022/02/Test-Set-Up.JPG
https://britastro.org/wp-content/uploads/2022/02/Test-Set-Up.JPG
https://britastro.org/wp-content/uploads/2022/02/Test-Set-Up.JPG
https://britastro.org/wp-content/uploads/2017/02/Test-Set-Up.JPG
https://britastro.org/wp-content/uploads/2022/02/Test-Set-Up.JPG
https://britastro.org/wp-content/uploads/2022/02/Test-Set-Up.JPG
https://britastro.org/wp-content/uploads/2022/02/Test-Set-Up.JPG
https://britastro.org/wp-content/uploads/2022/02/Test-Set-Up.JPG
https://britastro.org/wp-content/uploads/2022/02/Test-Set-Up.JPG
https://britastro.org/wp-content/uploads/2022/02/Test-Set-Up.JPG
https://britastro.org/wp-content/uploads/2022/02/Test-Set-Up.JPG
https://britastro.org/wp-content/uploads/2022/02/Test-Set-Up.JPG
https://britastro.org/wp-content/uploads/2022/02/Test-Set-Up.JPG
| The British Astronomical Association supports amateur astronomers around the UK and the rest of the world. Find out more about the BAA or join us. |
