› Forums › Spectroscopy › More Lhires III mods
- This topic has 49 replies, 5 voices, and was last updated 7 years, 6 months ago by
 Robin Leadbeater.
-
AuthorPosts
-
6 February 2018 at 1:33 pm #573948
 Alun HalseyParticipant
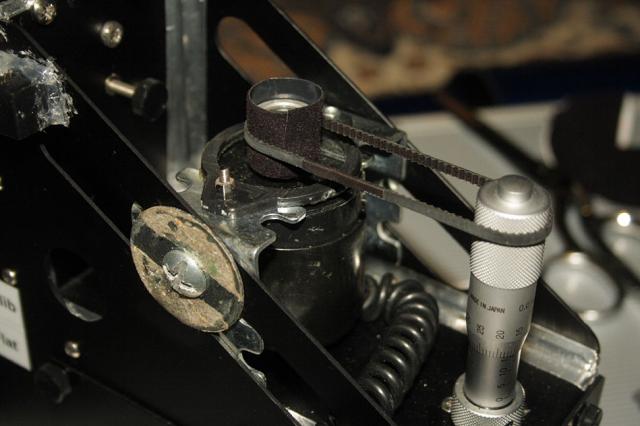
Been busy again tinkering with my Lhires III,this time automating the micrometer arm (grating angle actuator) and the focusing of the collimator lens. For the micrometer I used a JMI motofocus unit off my C9.25 attached to the lhires using two right angle brackets. Drive belt was taken from an old printer,cut a length and used araldite and heat shrink tubing to rejoin the ends. Didn’t bother with gears as such,the belt grips the motor shaft and micrometer due to small teeth on belt. Motor is operated either manually with handheld control box,or connects to PC via a Shoestring Astronomy FCUSB box.
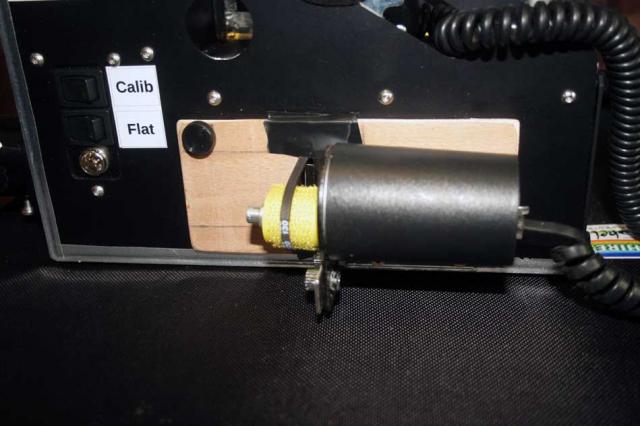
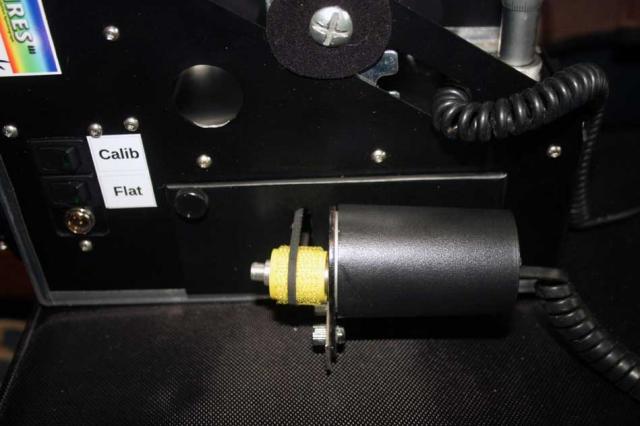
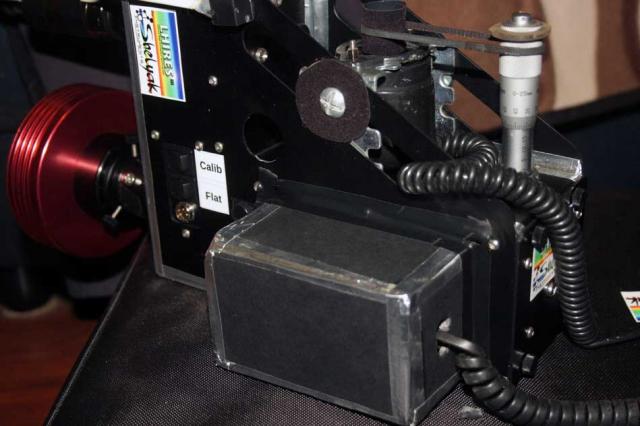
For the focusing of the collimator lens I made a replacement cover so as to mount a Skywatcher focus motor. Cover is locked in place using original screw and is held by metal clip at other end. Using same belt,again cut to desired length and rejoined with glue and heat shrink,just looped over barrel of the collimator lens and over the shaft on motor (wrapped in hook side of velcro) and using enough tension to allow rotation but not too much to cause tilt in lens. Again PC control is via a Hitecastro focus control box. Both systems work well and along with the automated calibration/flat lamp I don’t need to touch the spectroscope at all whilst in operation and also allows me to work remotely when it’s too cold 🙂
Regards
Alun
 6 February 2018 at 5:01 pm #579075
 Tony RoddaParticipant
Well done Alun, that’s a neat mod.
Is there much weight added or vibration?
Regards Tony
6 February 2018 at 5:31 pm #579076 Alun HalseyParticipant
Thank you Tony, there is a little bit of weight added,depends on size of motors, and the box to cover the motor is made from foam card so no weight there 🙂 As far as vibration is concerned I haven’t witnessed any as such. I do know there is a very slight shift within the collimating lens when using motor but that can be sorted by adjustment of the original lock screws (found this out after my posting the info above). I always thought I had focus on neon lines sharp when I set it up manually,but it’s surprising how much sharper the lines get when I can just nudge the rotation,certainly makes a difference.
Regards Alun
7 March 2018 at 12:13 pm #579208 Mr Jack MartinParticipant
Alun,
Excellent work well done.
I would like to do the same conversion for the collimating lens on my Lhires.
What belt would you recommend and from where ?
Regards,
Jack
Essex UK
8 March 2018 at 8:06 pm #579213 Alun HalseyParticipant
Hello Jack,
Thank you.
I got my belt out of an old printer I’d broken up, being a large loop of the stuff I just cut it to the length I wanted then re-joined the ends using Araldite and heat shrink tube. I should think these guys will have what you are looking for though
https://www.robotshop.com/uk/gears-belts-pulleys-tracks-sprockets-chains.html
An update:- A couple of findings,the motor and belts work as planned. No need for gear wheels on neither the collimator nor the micrometer spindle. No fear of belt slipping off the collimator due to lip on the end and both focus motors and micrometer have rubber tap washers on the ends to stop belt slipping off. I am planning on changing the Skywatcher focus motor as it is a bit on the bulky side and now the Lhires will not go back into its supplied case, because of this I am looking at purchasing a much smaller JMI focus motor so as that the box covering the motor now can be done away with. I did state in my last message that there was some shift when operating the focus motor but realised afterwards that there is the same amount of shift when operated manually and also the lock screws need to be adjusted just loose enough to allow the collimator to turn but enough pressure to stop it tilting toward the motor. Same again with the belt, there is hardly any pressure against the collimator and motor, just enough to allow belt to keep contact without slipping .
Regards
Alun
9 March 2018 at 3:27 pm #579214 Mr Jack MartinParticipant
Alun,
Thanks for the link and further info.
Shame that motor is a bit bulky, I assume you don’t have it permanently set up in an observatory.
Wouldn’t a bigger case be a cheaper option than another motor and having to replace what works ?
I see there are a few options from RVO to consider;
https://www.rothervalleyoptics.co.uk/jmi-motofocus-for-celestron-c8-.html
Please can you post a picture showing how and where the motor is attached / bolted to the Lhires.
How many holes did you have to drill ?
This is a worthwhile modification.
Thanks for your efforts.
Jack
Essex UK
9 March 2018 at 9:34 pm #579218 Alun HalseyParticipant
Jack,
I have an observatory but don’t leave the Lhires attached to scope as at times I may use the Alpy or stick a camera on the scope to image 🙂
The motor focus you linked to is much the same as the one I used to operate the grating adjustment,but the one I have ordered to replace the collimator motor is much smaller…
I am hoping I can modify the cog wheel covers by removing the large one and still use the top part to cover slot for belt again hoping to do away with the large box I have at the moment. Okay using the bulky motors but they do add extra weight to the unit.
Lhires was not harmed in any way during these modifications, no extra holes needed and all can be reverted to original. New replacement door/cover made from a bit of ply made long enough to attach the motor bracket (simply a length of ali bent to 90* angle) Bolt holes countersunk on reverse of cover so as not to foul body of Lhires. For latching down I just copied the original idea and moved it to the far end of the cover (only place it can go to clear belt). Also note the yellow velcro (hook side) on the motor cog, helps to grip the belt. (ignore the standoff nuts holding the bracket,they are all I had in the required size!)
Regards
Alun
12 March 2018 at 6:14 pm #579219 Mr Jack MartinParticipant
Alun,
Thank you for further information.
Looking at the link its difficult to see how the JMI would work without some modification, there appears to be no shaft correct ?
Is there one similar to the Skywatcher ? which appears to bolt straight on to the Lhires body.
Regards,
Jack
Essex UK
12 March 2018 at 7:58 pm #579220 Alun HalseyParticipant
Jack,
The motor has a shaft which is obviously a lot smaller than the Skywatcher motor,I am thinking the shaft’s length will be near on the width of the belt so I will use the cover as a stop to keep the belt in place or failing that I will make a sleeve to slide over the shaft so as to make it longer. The motor itself will be easier to attach to the custom cover due to the bolts being at the rear of the unit (aiding stability of motor)
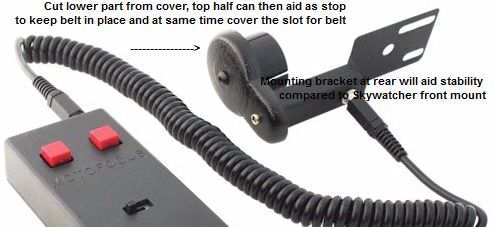
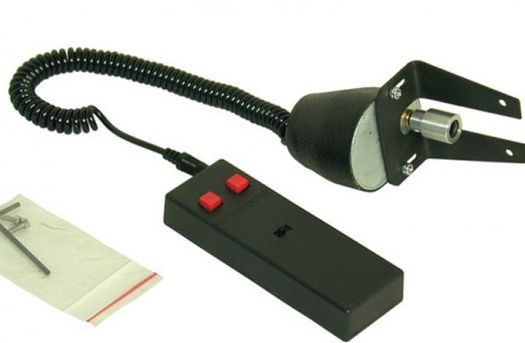
Another alternative to the Skywatcher from JMI is just as bulky and same price as all the JMI motor focusers (£185) is pictured below, but not sure if the width between mounting bracket forks will clear the belt so will possibly need modification with a file. Just to note the Skywatcher focus motor is only £45 – £50 if the bulkiness of the mod isn’t a concern.
Best Regards
Alun
13 March 2018 at 8:43 pm #579222 Mr Jack MartinParticipant
Alun,
RVO say Skywatcher or JMI will do the job.
Its not a question of money, but what works.
Bulkiness should not be a problem, I use a film changing bag to keep the unit light tight which should also accommodate the motor.
I suggest a slotted bracket would be good if the belt needs adjustment.
This is a great improvement.
Thanks for your efforts,
Jack
Essex UK
14 March 2018 at 9:54 am #579227 Alun HalseyParticipant
Jack,
You are welcome and I wish you good luck with your modification 🙂
I agree the slotted bracket would be a better choice, and your mentioning it has made me come to realise that the motor I have planned to use hasn’t got that luxury! Oh well,more head scratching (avoiding the splinters) when the motor arrives 🙂
Best Regards
Alun
14 March 2018 at 12:26 pm #579228 Mr Jack MartinParticipant
Alun,
Which motor have you ordered ?
And why can’t you use a slotted bracket ?
From your posts I am minded to go with the Skywatcher, any reason not to ?
Regards,
Jack
Essex UK
14 March 2018 at 2:37 pm #579230 Alun HalseyParticipant
Jack,
It is the small one pictured in my last posting. I will get round it,just means I’ll have to modify the bracket on the motor.If I cannot get it to fit satisfactorily then I’ll attach it to my 6″ refractor and keep the Skywatcher on the Lhires
Only being bulky other than that it works I have no problem with it at all. In fact if the box covering the motor were to be reduced to just cover the cog and slot to stop light and dust then I believe most of the bulk will be lost. The motor works with the HitechAstro focus controller for PC control. I recommend it for the job 🙂
Best Regards
Alun
16 March 2018 at 11:02 am #579232 Mr Jack MartinParticipant
Alan,
Thanks for clarifying I will order the Skywatcher.
Which is the smaller of the two, top or bottom picture ?
How long is the belt ?
Regards,
Jack
Essex UK
17 March 2018 at 12:05 pm #579233 Alun HalseyParticipant
Jack,
The belt diameter is roughly 3 inches in diameter depends on the thickness of the material you use to make the replacement door/cover. I found it easy to work out the diameter when all the bits where attached to the Lhires,then used length of string to wrap round collimator body and cog of motor. Have attached another photo showing the size of the teeth on the belt (these are small,don’t need them too large) and the bits and pieces before assembly. As I described in my opening post the belt was originally in an Epson printer. Being a large loop I just cut it open and then just cut suitable lengths off to use for both the micrometer shaft and this mod,to close the loop I used Araldite and heat shrink tube.
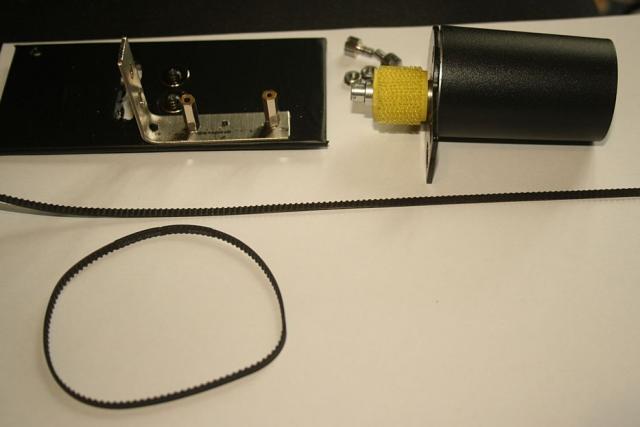
Just to clarify the motor I have on order is the one I’ve added the text to a few posts back.
Best Regards
Alun
21 March 2018 at 6:54 pm #579245 Mr Jack MartinParticipant
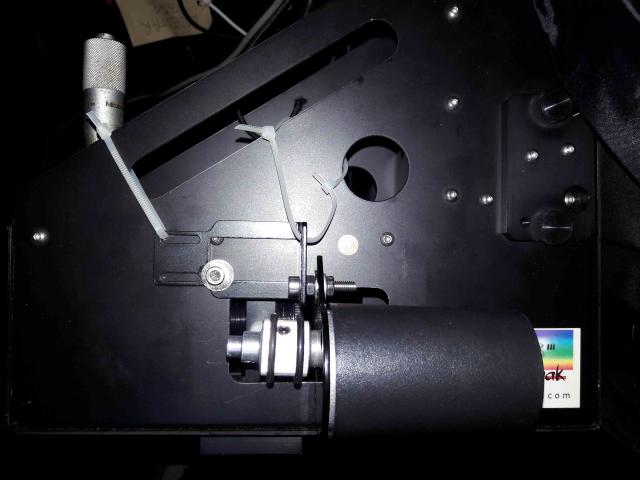 Alun,
Alun,Thanks for your advices. and pictures.
Today I installed the Skywatcher motor to the Lhires.
I have yet to get a suitable drive belt.
What is the yellow attachment on the motor shaft ?
Regards,
Jack
Essex UK
21 March 2018 at 8:32 pm #579246 Alun HalseyParticipant
Jack,
Looking good, I was going to ask how you intend to cover the hole but then remembered you use the black bag to cover the whole Lhires. Hopefully you’ll find a belt to fit soon, as I stated earlier the Robot shop should have something suitable. The yellow is just a strip of velcro (hook side) stuck to the spindle just to give the belt a bit more purchase.
Regards
Alun
22 March 2018 at 5:50 pm #579248 Mr Jack MartinParticipant
Alun,
Found this on Robot shop is it suitable ?
Regards,
Jack
Essex UK
22 March 2018 at 7:51 pm #579249 Alun HalseyParticipant
Jack,
That belt looks ideal for the job. To join my belt I made sure that each end was in the middle of a tooth to ensure ample area to bond, slid a length of heat shrink tube on belt then used Araldite rapid (sets in 5mins) to glue the joint. Held the belt in place until glue held but was still slightly tacky then slid tubing in place over joint and added heat to shrink ensuring a good strong bond 🙂
Regards
Alun
26 March 2018 at 10:00 pm #579261 Mr Jack MartinParticipant
Alun,
I found a belt that fits from RS Components;
https://uk.rs-online.com/web/p/timing-belts/7785064/?sra=pstk
Saves cutting and gluing.
The belt around the lens keeps slipping, but sort of works, I will try some Velcro or o ring.
Regards,
Jack
Essex UK
-
AuthorPosts
- You must be logged in to reply to this topic.
