Forum Replies Created
-
AuthorPosts
-
William Bristow
ParticipantHi Martin.
Good to hear that you have made some progress with HOPS.
I can’t explain why HOPS will not calibrate your images, with the test images I have it works with quite large data sets and I have not experienced any hangs during calibration.
As your other processing programs are able to calibrate successfully the same data volume without problems I can’t really guess what might be going wrong when you try to run calibration in HOPS.
There are just a couple of items I can think of to double check:
With HOPS, the reduction and science files must be in the same source folder, no sub-folders are allowed. Hops does not identify and sort frame types from the fits header but reads frame type from the file name and therefore relies on the user to create unique file names for each of the reduction frame types and the reduction frames must not have the same identifying name as the science frames.
A long shot – in Windows 10, type “Control Panel” in the search box on the bottom toolbar and open the “Control Panel App” to bring up the classic Windows Control Panel > Click on the “System” icon > In the System page click “Advanced system settings”, the “System Properties” window will open > Click the “Advanced” tab, at the top of the “Advanced ” tab click the “Settings” button under the “Performance” option, the Performance Options windows will open > Click the ‘”Advanced” tab in the “Performance options” window and under “Virtual memory” click the “Change” button, The “Virtual Memory” tab will open > Deselect the option “Automatically manage paging file size for all drives” and select the Custom size button > If you have more than one drive you can define a page file to be used as virtual memory on each drive and Windows performance will improve if you are able to define page files on multiple fixed drives but for this walk-through assume only one drive is present > Select the first available drive (C:) and set the “Initial size (MB)” for the page file, the recommendation here is to set at least 420 MB > Set the “Maximum size (MB)” to be at least a third of the available free space remaining on the drive, (the free space remaining is displayed just above the Custom size boxes) ideally, to assure adequate resources are available during post processing the Maximum size should be at least 20000MB (~20Gb) > With those figures entered click the “Set” button > Repeat for additional fixed drives if present and then click “Apply” and “OK” your way out of all open windows then reboot the computer for those changes to take effect.
If that solves the problem during calibration then it was a page file too-small issue and Windows had run out of available disk space for swap files, if the problem is not helped by this then revert the Page File control to Automatic.
If I can find anything else relevant I will update the thread.
William.
ParticipantMartin.
The image size from the Atik 414 is small and your test with the large WASP-12b data set was successful so it can’t be a memory issue.
I tried Nebulosity in demo form many years ago but recall struggling with image calibration and correct pedestal values, often ending up with negative pixel values in the calibrated image so this problem may be related but without being able to inspect a sample of the data and calibration frames that is just a guess.
Can you try capturing data and calibration frames with different acquisition software, the ATIK capture software distributed with the camera should be ok for photometry work.
William.
ParticipantHi Martin.
I can’t see anything obvious wrong with the FITS header, I don’t think HOPS has specific metadata dependencies.
Is the target in the HOPS database and are the target parameters auto loading at run time or are you manually entering the parameters for a new target previously unknown to HOPS?
Assuming the target parameters are loading/loaded correctly, try skipping the calibration frames and just run with a small set of the data frames, perhaps the data frames are being compromised during calibration, if so, running an uncalibrated set would show if that is the problem.
If HOPS still fails to solve, even when uncalibrated frames are used, upload a small set of frames to a file share service (Dropbox, Google Drive, One Drive, etc) and post a share link back here and I can try running them on the mac version of HOPS.
Two of each calibration frames and half a dozen good quality, random, data frames plus the target coordinates and target name would be enough to test.
William.
ParticipantHi Martin.
When you install Anaconda and Python it is important that both programs are installed in a root folder who’s name contains no white space. If you installed both Anaconda and Python in the default ‘user’ folder and that folder is named ‘Martin Smith’, with a space between Martin and Smith, then my experience has been that the Python scripts that HOPS runs will fail to run properly on Windows 10.
If this applies to you, reinstall Anaconda and Python in a dedicated folder at the root of the C: drive and not in the default user directory.
When running a dataset, the enclosing folder should not be write protected and works ok if placed inside the usual ‘My Documents’ location.
While awaiting a response from Roger, carry out a test with a known good data set to determine if the problem is with the source data or with the HOPS installation.
The sample data set I recommend is the WASP-12b series available from here:
https://www.astro.louisville.edu/software/astroimagej/examples/
Select and download the raw calibration folders and uncalibrated image folder in either .zip or .tar.gz to suit your OS.
The total download size is ~4.6Gb and if experiencing problems keeping the server link active recommend using a download manager.
The raw image data coordinates for the WASP-12b data set are in decimal format, to use this set with HOPS the coordinates to be used are RA: 6 30 43.057 and DEC: +29 40 32.20.
When this particular sample data set is used, to identify and match the target and calibration stars to the SIMBAD view click the ‘Flip FOV’ button in HOPS.
Selected filter to be used is ‘R’.
Lastly, the final fitting stage in HOPS is both CPU and memory intensive and for a large data set it may appear that nothing is happening for quite a while. The Wasp-12b set linked to above takes about five minutes to process on an iMac Pro with 12 core CPU, fast SSD and 64Gb RAM, on my small Windows laptop with an Intel i3 CPU standard HD and 8Gb RAM the same data set takes over forty minutes to process. If you are using similar hardware then allow at least fifteen to thirty minutes before assuming that HOPS has stalled.
HTH
William.
ParticipantEric.
On the mechanical systems that I am familiar with, where hollow CF tubes are used, fixings points are reinforced by either gluing into external ferrules which are then clamped or bolted, or an internal solid plug is glued inside the tube at the fixing points that then allow for external clamping or through bolting.
Unsupported or unreinforced CF tubing is too brittle to be secured by just single or double grub screws pressing against the outside of the very ends of the tubes in a hexagonal holder.
For CF tubes in a truss OTA either reinforcement methods would be suitable though an internal glued plug of brass or aluminium is easier to build as it requires no changes to the outer holder and being hidden doesn’t need to be cosmetically perfect.
For light loading applications plugging the tubes at the clamping points with epoxy resin mixed with chopped glass fibre, or CF, extending a couple of centimetres either side of the grub-screw locations would work. If this method is used a breather hole ~0.5mm diameter, some distance along the tube from the plugs is necessary to prevent air pressure changes affecting the tube geometries once the plugs have cured and the instrument is in use.
Plugging with an epoxy CF/GF filler sounds easy but in practice is quite difficult to do successfully and in a production environment requires careful measurement of the volume of filler and spinning the filled tube on a centrifuge to ensure the filler plug sets level in the tube ends and without trapped air voids. Solid machined plugs glued into the tube ends are easier to mass produce.
How about a short piece of hard-wood doweling, epoxy glued into the ends of the tubes at the clamping points? Should be easy enough to turn to size with a bit of DIY tooling.
William.
ParticipantAndrew.
Two other Bessel-Johnson-Cousins and Kron-Cousins photometry filter suppliers I forgot about.
Custom Scientific and Andover Corp, both USA based, there are no UK retailers so you would have to contact direct.
https://customscientific.com/astronomy.html
https://www.andovercorp.com/products/astronomy-filters/johnsonbessel-ubvri-filters
https://www.andovercorp.com/products/astronomy-filters/ubvri/
If you particularly wanted Astrodon you would have to place an order with Farpoint and wait. It is unlikely the Astrodon photometry filters will reappear in the usual retailers any time soon, they are struggling with demand after absorbing several other manufacturers last year and don’t have sufficient production capacity. The parent company, Optical Structures Inc, was emailing previous customers at the end of last year offering shares in the company in order to raise funds for expansion. I have colleagues in the US with back-orders in excess of eight months.
Were you intending to obtain a full set of UVBRI filters or just partial?
Last year I looked at adding to my partial Baader set some of the Sloan series. Running the transmission and QE numbers for my current camera and OTA it was apparent that a full set of Sloan’s would be pointless.
For the Sloan series only the g’2, r’2 and i’2 were of any practical use, u’2, z’2, z-s2 and Y2 are all outside the capabilities of my current instruments.
Similarly, for the Bessel – Johnson-Cousins series U is out of range, only B, V, Rc and Ic are possible and in recent years most of my projects have been in B and V only.
William.
ParticipantAndrew.
Chroma produce a Bessell photometric UVBRI series in 1-1/4“ or 2” mounted and 50mm round or square unmounted, other sizes can be made to order.
Available direct from Chroma USA or on special order from their UK stockists.
https://www.chroma.com/products/optical-filter-sets-for-astronomy-applications
William.
ParticipantHi Nick.
Assuming this is a new computer with Windows 10 start by typing “Programs and Features” in the search box, lower left, bottom tool bar.
From the pop-up search results click the item “Turn Windows Features On or Off”
If not already enabled, in the list of features place a check in the boxes next to .NET Framework 3.5 and .NET Framework 4.8.
Reboot the computer.
Go to the ASCOM website, download and install the ASCOM 6.4SP1 platform from the link at the top-right of the web page:
https://ascom-standards.org/index.htm
Then run the installers again for MaxIm DL and the Pulsar Dome driver.
Install any ASCOM drivers for the equipment you intend to connect.
MaxIm requires the ASCOM platform to function and connects to most hardware devices via ASCOM drivers but includes some native support for their own SBIG camera range and a few older third party legacy devices but in the main you will need to install the ASCOM drivers for cameras, filter wheels mounts, focusers, domes etc.
The Sky X has many built in non-ASCOM drivers (X2) that work with devices directly which is probably why the Sky X works but MaxIm does not. I have no experience with AstroPhysics gear so can’t comment on that.
Lastly, it is most likely your old computer ran with the 32 bit version of Windows 7, your new computer will almost certainly be 64 bit so you may have to visit your astro equipment vendors websites to download the latest 64 bit compatible drivers.
William.
ParticipantIt looks as though the manual has not yet been released, I think they rushed out the new suite before the Chinese New Year holiday.
I had a look at the Planetary Capture app ASICap and the imaging app ASIImg and they looked pretty straightforward to use. The functions only come alive when a camera is connected and powered on.
I will see if I can find a copy of the older version manuals for Windows and post a link for you. It might take me a while though…
Edit:
I found a pdf guide for ASICAP in the Windows version of the ASIStudio and have attached it to this reply.
There is not a written guide as yet for ASIImg or ASILive in either the Windows or the Mac versions of ASI Studio. With all that is going on in China at the moment I think it will be a while before ZWO are able to provide the documentation.
Hopefully the attached .pdf doc will get you started with the ASICap app and the knowledge you pickup in that should see you manage with the ASIImg app. I have no experience with EEVA.
My own series one ASI120MM/MC cameras do not have coolers and are not fully supported in the ASI Studio suite so there is not much I can show you but ask and I will try to answer if you get stuck.
ParticipantHi Paul.
Ok, your HD is too small for a Bootcamp / Windows partition so ignore that.
Your current macOS 10.11.6 El Capitan and MacBook are of a vintage that won’t have Gatekeeper so you can run un-notarised applications from any source, its only from mac0S 10.15.x Catalina that applications that have not been submitted to Apple by the developer and ‘Notarised’ are blocked from running. The developers have to pay a yearly fee to Apple for that service and many freeware developers are not prepared to pay. Apple introduced the concept of app ‘Notarisation’ and ‘Gatekeeper’ as a way to try and maintain security from malware and functional reliability of the macOS.
If you are uncomfortable running unfamiliar developer tools and software on a computer where security is important then to get started I would recommend using the ZWO supplied planetary imaging software for mac, you can find it at the bottom of the ASI camera software download page under the mac software tab, Capture Software, Planetary Imager:
https://astronomy-imaging-camera.com/software-drivers
The above is a safe video capture program that will run natively on the Mac with no extra libraries or support software required.
Once you have the planetary video file you can stack and combine the individual frames using the Mac freeware package Planetary Imager:
https://planetaryimager.gulinux.net
And for time exposure DSO imaging you can stack in ASTAP:
http://www.hnsky.org/astap.htm
If you want to delve into long exposure DSO imaging I would recommend a free trial of Stark Labs Nebulosity which will run natively on your Mac and has ASI camera support built in, if that works for you then a full license for Nebulosity is not too expensive. Nebulosity is one of the easiest capture and post processing suites to master.
For post processing there are several free and safe programs that are Mac compatible, including ImageJ which is science oriented, and Gimp which is a photo editing program although at the outset, Nebulosity alone can capture, calibrate and post process DSO images from ASI cameras to an acceptable standard all in a single app.
Many of the other free Astronomy Imaging apps for Mac such as SiriL require the use of Xcode/Homebrew to install.
It was not my intention to dissuade you from installing Xcode and Homebrew to allow Firecapture to be used on a Mac unnecessarily, only as a warning of the security risks that are taken where open source software such as Homebrew are introduced to the macOS environment since much of the built-in security of the macOS is bypassed. For an experienced developer or advanced user its not a problem to compare actual download checksums etc against the published repository values and to monitor which libraries and directories are being modified but it is not something I would want to do on my principle ‘safe’ computer without understanding what is being done.
Addendum Sun 26th Jan:
ZWO recently released a new suite of free capture software for macOS (and other OS’s), ASI Studio, that you may be interested in trying.
It only supports ZWO ASI cameras and filter wheels.
I downloaded this to my macPro this morning and gave it a try, it is not notarised for macOS Catalina but will run happily on your El Capitan system. My old series one ASI120MC does not support long exposure mode so I could not test all the functions in the suite but it looks as though it will support your camera. The suite contains a planetary capture app, long exposure DSO app and a live stacking EEVA app. It requires no special libraries or modification of the macOS and is simple to install. I scanned the mac download for malware in two different AV suites and it appears clean.
HTH
Link to the macOS version: https://astronomy-imaging-camera.com/software/ASIStudio_V1.0.dmg
William
ParticipantHello Paul.
You will find Terminal via the desktop header menu: Go > Applications > Utilities > Terminal, alternatively, from the Launchpad icon on the bookshelf.
Homebrew requires the use of Apples Xcode command line tool and for recent Apple OS’s Xcode is not installed by default. Xcode is free from Apples App Store, you should install this before trying to install Homebrew. Xcode is Apples native IDE.
Xcode is a big application ~17Gb, over a typical fibre 38 Mb/s broadband internet connection it takes around forty minutes to download, you should temporarily disable sleep and screensaver in Mac settings if you want the download to complete uninterrupted otherwise it can take several hours and require you to continually wake the Mac from sleep.
Since you are new to this it is worth mentioning that installing Homebrew effectively allows you to bypass macOS security and though this does not necessarily make your Mac any less secure it does put the onus on you to verify the download sources are free from malware and are not accessing parts of the Mac system that contain sensitive data. If you use your Mac for things like on-line banking or internet shopping then you may want to reconsider using developer tools and unverified software on the same machine.
If your macOS is Catalina (10.15.x) then you will have to bypass Apples Gatekeeper to use Firecapture since the author of Firecapture has stated he will not pay Apples yearly developer licence fee to have Firecapture notarised. Bypassing Gatekeper is relatively easy at the present time although Apple have hinted they may act to prevent un-notarised apps from running in future OS updates.
If you are unsure that this is the right direction for you then a more secure and pragmatic solution might be to install Bootcamp on your MacBook and install a copy of Windows 10 in the Bootcamp partition. Bootcamp is a free Apple App and you will find Bootcamp Assistant should already be in your Applications list. You can find legitimate Windows 10 licences at a large discount of the normal RRP at various on-line Microsoft accredited bulk resellers.
If you intend to pursue planetary / solar imaging using video data then the capture files can be quite large so you should make your Windows partition large enough to allow capture and processing, I would not try for less than a 250Gb bootcamp partition. The downside of Bootcamp is that you need to choose which partition to boot when you start the MacBook and less room on the Mac partition for Apple apps and data.
There are a few paid-for imaging apps that do run natively in macOS and are notarised for Gatekeeper. The most common Apple apps are referenced at the webpage below, most allow a free evaluation period:
https://www.macobservatory.com/mac-astronomy-software
Some of the apps listed are processing only, others are a mix of acquisition and processing.
William.
ParticipantHi Nick
Just to verify, as I may have read your last post incorrectly, or the Pulsar external-force-shutter-close mod may have changed.
On my controller, you don’t supply a 12V signal into the Pulsar control box in order that the shutter is forced to close, you simply close the circuit with an external potential-free relay contact.
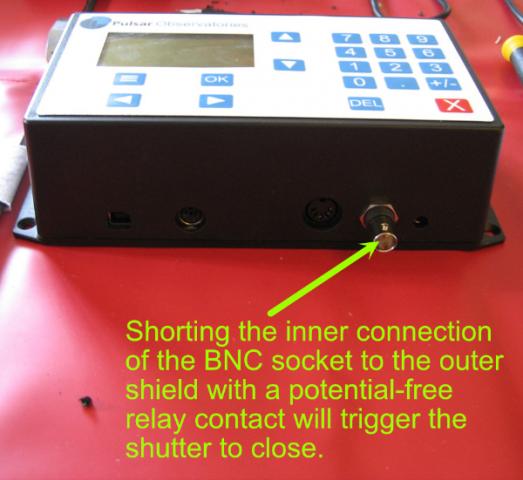
IOW, you simply bridge together the pair of lines leaving the Pulsar unit (on mine it’s a BNC socket as in the image below). If I open the shutter from the rotation unit touch-panel and then temporarily connect a piece of wire between the inner connector and the outer shield of the BNC socket that will trigger the shutter to close.
The AAG, Boltwood, Hydreon RG-11 etc, all have a pair of built-in potential free relay contacts that close when it’s raining, or otherwise weather unsafe, and those contacts complete the return path for the BNC socket you don’t need to feed in an external voltage.
It might be that Mathew Player at Elecsoft has changed the design of the external shutter-close mod since I had my unit modified, or offers a choice of internal or external signal source and your model has a built-in isolation relay inside the Pulsar control box, in which case your description above would be correct.
(For reliability an internal relay in the controller that you feed in an external 12V to operate might be a better method than mine since it is less likely to be prone to false triggering from interference on the cable run out to the rain detector).
To be certain I would recommend you contact Mathew and verify what is needed for your unit, with my one, if I fed in an external 12V it would damage the controller, all I do is bridge the BNC socket connections with a pair of external relay contacts and that triggers the shutter to close. Better to be safe and ask rather than risk damaging the controller.
William.
 Participant
Hello Nick.
I bought an RG-11 on direct import from the USA in 2015 when they were rather expensive and hard to get hold of here in the UK. The price difference between USA import and buying from a UK supplier now is minimal.
Like you, I bought this to use with the Pulsar-Rigel Dome system. The external force-close-shutter mod was not available when I bought my dome but Mathew Player at Elecsoft (designer of the Pulsar dome controller) sent the parts for the Pulsar control box mod around a year after original installation and I fitted those myself.
The RG-11 works quite well, it has limitations though and much depends whether you are looking to fully automate your observatory or just provide a safety net in case you fall asleep while the dome is open.
Rain sensors alone are reactive, they only issue a command to close the shutter once it has begun raining and there are times when they can be caught out. Sudden thundery downpours can drench the gear in the observatory in the time it takes between the first raindrops falling and the dome closing.
The RG-11 has to be set at its most sensitive detection level if you want it to react to fine misty drizzle. The RG-11 is a dumb device, not IoT, you can not configure it remotely and it has to be disassembled to set the sensitivity level (via dip-switches) though once this is done you should not need to open it up again.
There is a built-in heater to evaporate condensation (dew) on the acrylic dome but it is rather weak, only 0.25W. It will keep the acrylic dome clear of dew down to 0c but it is not powerful enough to melt ice or snow when the temperature remains below 0c. If you are adept at DIY you could add a more powerful heating element to the housing of the RG-11.
If it stops raining and the rain drops currently standing on the optical dome remain static then after a while the RG-11 will adapt to the new reflectivity level and the output relay contact will open allowing the observatory shutter to be opened once again, but, if it is windy and the wind blows the droplets on the optical dome around or causes them to evaporate rapidly then the RG-11 will trigger a rain event once more even though it is not raining.
It will lose sensitivity if the optical dome is not cleaned regularly. A build up of salt spray in coastal areas or industrial grime in cities causes the rain drops falling on the dome to dissipate into a sheet and the IR sensors will not see a significant change in reflectivity and the RG-11 will not trigger (depending on the size of the raindrops). You need to keep the acrylic dome clean so that rain drops falling on the acrylic dome remain standing as individual droplets. The same technology used in automatic windscreen wipers for a car relies on the wiper action to keep the optical window clear and allow droplets to stand on the glass but with the RG-11 you need to do this yourself and placement of the sensor has to be considered, no good placing it on a pole if you need ladders to reach it for cleaning once a month.
Because the optical dome is soft acrylic to avoid scratches it needs cleaning carefully with plenty of clean warm water, never dry-wiped (though scratches will not reduce the effectiveness they do help dirt to stick), and detergent should not be used as detergent residue prevents water droplets standing on the dome. A final polish with a soft cloth and a little household silicone polish will help any rain droplets to remain ‘droplet’ shaped on the acrylic dome and aid reliable detection.
The RG-11 is a strong emitter of IR, it needs careful placing so that your observatory instrument does not see stray IR either directly or indirectly.
Ideally, the signal cable between the Pulsar controller and the RG-11 should be twisted two-core screened (or twisted four core-screened if you want to include and splice-in the separate RG-11 power supply lines at the observatory end). The screen should only be connected to the observatory common ground or earth rod, and not to the RG-11 or the Pulsar unit. This is to give a measure of protection against EMP from nearby lightning strikes generating damaging voltages in the wires and harming the Pulsar control board (the Pulsar’s external force-shutter-close input is protected by a light-barrier and small suppression capacitor but it shares a common internal supply with the Pulsar controller). A length of unwanted USB cabling with the plugs cut off is ideal for the four core screened method.
The RG-11 is as reliable as other rain detection methods. It has the advantage of being self-resetting and adapting, in that it reacts to change rather than absolutes. Conventional resistive or capacitive rain detectors remain triggered until the water on the sensor has evaporated, or has been manually removed, so if you are imaging between showers then with a resistive or capacitive sensor you need to go out and wipe the sensor dry, or wait for any heater element to dry the detector plate before you can open the shutter again. The RG-11 only senses and reacts to change so that once it stops raining, provided the droplets on the sensor dome evaporate slowly and it is not windy then the sensor will signal dry again quite quickly and allow the observatory shutter to be re-opened without needing to go out to the observatory and wipe-dry the sensor.
I should add that I no longer use the RG-11. Once I began running the observatory fully-automated I installed an AAG-Cloudwatcher. The AAG also uses a force-shutter-close signal direct to the Pulsar controller that is fully independent of software and operates directly from a capacitive rain sensor built in to the AAG but the AAG allows the observatory automation software to detect clouds and close the observatory long before it rains (at least, most of the time!) as well as using an anemometer input to either delay opening or force-close the observatory when wind speed thresholds are exceeded.
Overall an equal to capacitive or resistive rain detectors, slightly smaller detector area than the aforementioned. Not so good when the temperature is below freezing but react and re-set more quickly to changing conditions when above freezing. Not really suitable for full automation observatory systems as no logging of events and reacting to rain is really a little late but if just used as a backup for an otherwise manual observatory or a backup for a cloud detector that has no direct (non-software) output raining signal then the RG-11 is more than adequate.
Think that covers everything, ask if you need more info.
William.
ParticipantHello Clive, I noticed no-one has answered yet, but it is holiday season!
From the DSS 4.2.x release the RAW decoding engine was changed from DCRaw to LibRaw, you can find out the reasons for the change by a quick Google search but in a nutshell DCRaw was the sole work of a software developer, Dave Coffin, who after many years of unpaid and unsupported work maintaining and updating DCRaw for new camera releases decided to throw in the towel, concentrate on his family life and paid employment and announced that DCRaw was at an end.
A competing RAW decoding engine, LibRaw, an open source project, was left to take over the work of decoding RAW DSLR files in a wide range of free and paid-for photography and astro-photography post processing applications.
Neither DCRaw or LibRaw produce definitive decoded images since the DSLR manufacturers, with the exception of Canon, go to great lengths to hide the algorithms used to decode RAW files, some even employ encryption routines to obfuscate the code and protect their intellectual property rights while the developers of DCRaw and LibRaw have to reverse engineer and experiment with the RAW’s to come up with a suitable conversion.
This explains why your RAW images in DSS 4.2.0 are now being reported as a different size to those processed in DSS 3.x.x since there is not a published ‘standard’ size that they should be. Pretty much all CMOS DSLR sensors have unused rows and columns of pixels at the ends of the arrays and it is up to the RAW engine to decide what the ‘real’ size of the image should be.
If your camera is more than a couple of years old, is supported by DSS 3.x.x using the DCRaw engine and runs without problem on your OS then there is no reason to change to the latest 4.x.x version. It might be that in the future you will have no choice but to migrate to 4.x.x if an OS update renders 3.x.x unstable or unusable or you employ a new camera that was never supported by DCRaw. In that case you will have to make new calibration frames and you will not be able to easily add old 3.x.x data to new data from 4.x.x.
If you want to use DSS 4.2.0 then at present, ‘Use Auto White Balance’ does not function correctly in the LIbRaw/DSS 4.x.x release and the recommendation is to select ‘Use Camera White Balance’ or ‘Use Daylight White Balance’ then adjust the final colour balance in post processing. If your camera supports the option in its settings then ‘Auto White Balance’ should always be disabled for astrophotography if you wish to avoid calibration errors with flats, darks and bias frames but remember to re-enable ‘Auto White Balance’ in-camera for conventional photography.
You might like to open a topic on the DSS and LibRaw Wiki groups regarding the change of reported sensor size between 3.x.x and 4.x.x as this might be something that can be fixed for the next LibRaw engine release cycle, they will need to know the exact model of your camera, it’s firmware version, a sample RAW file from your camera and an exact description of the problem. It’s equally possible that the old DSS 3.x.x and DCRaw engine was misreporting your sensor size and that DSS 4.x.x and LibRaw is now outputting a ‘correct’ size image after decoding the RAW file:
https://groups.io/g/DeepSkyStacker
You can stay up-to-date with DSS releases and known bugs on this page:
https://github.com/deepskystacker/DSS/releases.
HTH
William.
ParticipantNick.
Not had the issues you describe creating Bias Masters with the Image Integration module in PixInsight and input data from a QSI683.
For a Bias Master I use typically 999 frames (maximum frames possible in PI’s II module) to create a manual “Super Bias” and do not use PI‘s ‘Super Bias‘ module which I find tends to generate inaccurate Master Bias frames with data from the QSI683.
Under Image Integration:
Combination = Average.
Normalization = No Normalization.
Weights = Don’t Care, All Weights = 1.
Disable (uncheck) Evaluate Noise.
Under Pixel Rejection (1):
Rejection Algorithm = Linear Fit Clipping (use if >20 frames, otherwise Winsorized Sigma Clipping for 10-20 frames or averaged Sigma Clipping for <10 frames).
Normalization = No Normalization.
Disable (un-check) Clip Low Range and Clip High Range.
Enable (check) Clip Low Pixels & Clip High Pixels.
Pixel Rejection (2).
All settings = Default.
Pixel Rejection (3).
All settings = Default.
Apply Global…..
With the above settings all my bias frames are accepted and the Super Bias Master created works as expected, the same settings should work with your data, selecting the appropriate Rejection Algorithm method in Pixel Rejection (1) according to the number of frames that you are combining.
If PI is still refusing to use all the frames then review the Process Console window after the Image Integration module completes for clues as to why it rejected your frames.
HTH.
William.
ParticipantHi Martin.
I have AIP4Win v1 running ok on a Win 10 Pro VM (Virtual Machine).
Assuming you are trying to run an old version 1 copy of AIP4Win note that it won’t run properly unless you install the last update patch to v1.04.0025 that the publishers Willmann Bell used to provide on their website.
Willmann Bell no longer support v1 or supply a copy of the patch (they don’t even bother replying to emails come to that) however I do have a copy and if you send me an email I can provide a download link and instructions to install the patch. I will not supply an ‘open’ link here in the forum as the software is still under copyright protection even though it is no longer supported.
I have tried the latest AIP4Win v2 release on Win 10 Pro and as others have found it is not stable on the current v1803 version of the Win 10 platform, the older patched v1 version appears to work ok.
To check which version of AIP4Win you have installed go to the program folder at C: Program Files (X86) AIP for Windows, right mouse click the AIP32 Application (exe) file and click ‘Properties’, click the ‘Details’ tab and to the right of item ‘Product Version’ you will see the current release of the AIP4Win application, if it is less than v1.04.0025 then applying the patch update may allow it to run on your system.
The other question you posed “Is there any good free image acquisition software out there?”, the short answer is an ambiguous yes and no, you would have to be a bit more specific in your question and define what exactly you want.
For basic image acquisition with a dedicated CCD the original Starlight Xpress software that was provided with your MX916 should still run on Windows 10 although the latest hardware drivers for the 64bit OS are required. If you contact Starlight Xpress they should be able to provide you a download link to the latest acquisition program for Win 10 64 bit OS’s if you find the original capture software won’t run.
If you want to control and sequence the camera and a filter wheel plus interface with the mount then take a look at Sequence Generator Pro, they have a free ‘Lite’ version that works well and the ‘Lite’ version will interface with freeware PHD2 for guiding and a freeware planetarium program such as Cartes du Ciel or Stellarium will interface with an ASCOM controllable mount. I am not sure though if the ‘Lite’ version will correctly transfer the mount coordinates to the fits header and am not in a position to try this at the present time.
The full paid-for version of Sequence Generator Pro would handle cameral control, guiding and mount control in a single package and SGP has a good take up amongst astro imagers, at around £75 it is probably the lowest price complete package currently on the market but if you are prepared to work with the free ‘Lite’ version, PHD2 and Cartes Du Ciel or Stellarium then you can emulate most of the paid for functions, it’s just a bigger learning curve getting the three software packages working together. There is a free trial period for the full version of SGP before it reverts to the ‘Lite’ version after the trial period expires.
http://mainsequencesoftware.com/Products/SGPro
https://www.ap-i.net/skychart/en/start
At around the same price point as SGP, ~£75, is Nebulosity from Stark Labs which offers camera and filter wheel control plus image calibration only, no mount control.
http://www.stark-labs.com/nebulosity.html
Otherwise, in the mid price range, software that offers good value for money includes Astroart, one of my favourites from a long time back and still going strong, the UI might look a little ancient but Astroart offers full camera and mount control and includes an aperture photometry tool as well as full image calibration and post processing tools. For around £150 at todays exchange rate it sits in the ‘middle ground’ price wise. A free demo version is available that does everything except save an image.
http://www.msb-astroart.com/or_en.htm
Above that price point you are into Maxim DL, Prism and TheSkyX Pro which are between two to six times more expensive depending which add-on options are taken up.
For basic webcam imaging there is Firecapture and Sharpcap, both widely used for planetary imaging capture and for planetary image processing there is Autostakkert and Registax, all free programs.
https://www.astronomie.be/registax/
Finally, for basic image calibration, registration and integration there is the freeware program Deep Sky Stacker:
http://deepskystacker.free.fr/english/index.html
And for normal photographic image post-processing, a widely used freeware app is Gimp, the latest version includes built-in support for the fits file standard and photographic image formats in 32 bit.
HTH
William.
ParticipantHi Grant.
One of the issues you will face with laptops (and most desktop PC’s) is that although you might have 3 or 4 physical UBS ports, on the outside of the laptop, inside the laptop all the ports are connected to a single internal USB root-hub which has an absolute limit on the data throughput from all the connected devices. I find that TheSkyX and my Paramount MX keep the USB root hub pretty busy as TheSkyX is continually polling the Paramount for Protrack drive corrections.
One way around this is that your Dell Latitude E4310 has an ExpressCard 34 slot, just above the DVD drive. If you plug in a ExpressCard 34 USB extension card, you gain direct access to the PC main bus without having to go through the existing laptop’s USB Root Hub.
ExpressCard 34’s are dying out now and becoming harder to find but some good quality brands still remain in stock with a few retailers.
They were available with two or four additional USB2/USB3 ports but recently, amongst the better brands, I notice only two port cards are still available and only USB3 cards are still commonly stocked, two port USB2 cards are getting hard to find.
The ExpressCard carries it’s own internal root hub. Some cards also have the facility to connect an external power supply for the USB devices which can be handy for power hungry devices such as some guide cameras.
This gives you the option to put the low demand devices such as the GPS dongle, filter wheel, focuser etc on the laptop USB internal root-hub and your high demand devices like the Paramount and guide camera on an ExpressCard, or just put the GPS dongle on the ExpressCard alone. There are several ways to connect the devices about the laptops’ and ExpressCards’ available slots to keep the GPS dongle away from high demand devices.
Sample link to a current Startech 2 port USB 3 ExpressCard34:
https://www.ebuyer.com/338306-startech-2-port-usb3-0-expresscard-ecusb3s22
And a sample link to a current Startech 2 port USB ExpressCard34:
https://www.ebuyer.com/138357-startech-2-port-usb2-0-laptop-express-card-ec230usb
The other option is to look for a second hand docking station for your laptop, that is if they ever made one, if you can find one that would usually give you another two/four USB 2 ports, again, directly connected to the laptops main bus and bypassing the laptops internal USB root-hub.
HTH
William.
ParticipantHi Nick.
I can’t comment on CCD Autopilot, I did consider it and sent a couple of pre-purchase technical questions to CCD Ware that weren’t answered so I gave it a miss. It still has a busy forum though so I guess there must be quite a few users out there.
I was using CCD Commander when I began automation and I found that very easy to use. The scripting interface is simple to understand and doesn’t require a degree in computer languages to operate. CCD Commander worked very reliably for a managed observatory operation. By managed I mean remotely operated or locally operated but manually administered on a daily basis. Once a target or sequence of targets was programmed CCD Commander could be left to acquire the data and close up the observatory at the end of a session or shut down and restart a session in the case of a weather event.
I decided to move to ACP and ACP Scheduler mainly because of our fickle UK weather and by the limited unobstructed view afforded by my observatory location. I can only see around 55% of the hemisphere because of surrounding buildings and trees.
I found with CCD Commander I would start a target sequence and then we would have four or five weeks of bad weather, by the time the weather was clear the target was no longer accessible and after a few years I ended up with a large number of folders of incomplete targets and I found it hard to remember which target folders needed completion on any given night as the year turned and a particular target presented itself’ again in favourable conditions.
The basic ACP program has not that much on offer to differentiate itself from other automation programs. The price is higher than others and on technical ability alone the high price is not justified but the programs author considers ACP to be a service and not a product. If you run into problems during the initial software support period, or if you buy a subscription for ongoing support you will be given one-to-one help, either by remote desktop direct to your PC, Skype, or regular telephone and a dedicated user forum. In this respect ACP can be considered a package, software and support, and providing this level of one-to-one support is obviously expensive hence the initial high purchase cost and annual subscription fees for ongoing support and updates.
If you have a fairly straight forward automation setup and can resolve most technical issues yourself, or are happy with a slower customer support then the basic ACP is hard to recommend on cost against technical ability, and bear in mind that ACP requires Maxim DL and FocusMax to function so the total software spend can be staggeringly large for an amateur observatory to carry.
For me, the power of ACP is only revealed once you buy the add-on, ACP Scheduler. Scheduler will look at all the incomplete targets you have begun as well as new targets and decide which target is in the most favourable position for imaging and will start acquiring data as soon as conditions are right. If weather stops the acquisition before completion and a few hours later the weather improves then scheduler will look at the current best target from the outstanding list and continue on with that instead of returning to the earlier one which may no longer be ideally placed. And of course, you can override this sequencing at anytime and go for a target of opportunity, follow up on a supernova alert, whatever, then go back to the original target sequence. All the while Scheduler keeps track of what needs doing and manages the observatory.
Since the move to ACP and ACP Scheduler two years ago I would say my acquired data and completed target rate has increased around 200% to 300%.
Initial setting up of ACP is complex and a first time user will need to make extensive use of the help files provided with the program, they are well written though and I was able to set up ACP and start running without needing support, I had more problems with TheSkYX and my Paramount MX than with ACP.
I don’t know if the above is of any help….it’s certainly a complex subject area and finding an automation product to suit your own needs can be difficult with so many competing applications on the market. Do make use of the free trial periods that most of the software vendors offer before jumping in to one package and be sure to determine what functions are essential for your automation project and which are wish-list items, it may help to narrow down the choice.
William.
ParticipantHi Nick.
If you want an independent low power 12v rain monitor with switched output for the dome controller take a look at the Hydreon RG-11. I have one as a belt-and-braces backup for the AAG. The RG-11‘s switched output is wired in parallel to the AAG so either unit will cause Pulsar’s Rigel controller to close the shutter.
The RG-11 uses IR to detect rain droplets on a transparent dome, same as automatic windscreen wiper control in cars. It does have an internal heater to help evaporate condensation and works in a different way to a capacitive or resistive water sensor by reacting to sudden changes in reflected IR on the clear dome to trigger the relay so even if static water droplets are on the dome as long as no further droplets are seen then it will open the relay much earlier than the AAG unit.
http://www.weatherstations.co.uk/hydreon.htm
My experience so far is that cloud detection is more important than direct water droplet monitoring to prevent the optical equipment from rain damage since the sensing area of capacitive/resistive/optical rain sensors is rather small, the telescope can get quite wet before a single droplet is detected by rain detectors, I consider these to be fall-back safety backup devices rather than a primary controller.
I have mixed feelings about ACP as the observatory control software and was using CCD Commander for a while. Having a Paramount I am tied to having the TheSkyX running and ACP won’t work directly with TheSkyX’s automation interface. ACP requires Maxim and Focusmax so I have four separate applications running that often require updates to adapt to changes to Windows OS.
The only function in ACP that made it attractive was the scheduler engine. With our UK weather, being able to ask ACP to image a target automatically and keep acquiring data at the best times, however many nights / weeks / months that might need until all requested data had been captured, was the ‘killer’ application.
Software Bisque have been dropping hints that they are developing a new version of Orchestrate for TheSkyX that would offer many of ACP’s fuctions for the last four years or so but so far no news of progress or a release date and I couldn’t wait any longer so am committed to ACP, Maxim and Focusmax for some time to come. Certainly keeps you poor this hobby!
Regards.
William.
ParticipantI haven’t published that much Grant, the little that I did put online in various forums I removed.
Unfortunately I received the unwelcome attention of burglars. Not too much was taken from my older observatory, mainly damage caused by forced entry. The tool shed was ransacked and a mini lathe, mill and various power tools taken plus the house window frames damaged, though a combination of metal window frames and strong locks prevented entry.
The insurance company did cover the losses but I was asked about how much information existed about by hobbies and possesions in the virtual world and was warned that placing images or details of personal belongings on an open public forum was considered careless behaviour and that doing so would a) raise my insurance premiums by a hefty sum and, b) may lead to non-payment in future claims. I also had to extend the house alarm and CCTV to the observatory and outbuildings as a condition for continuing insurance protection.
Subsequently I have been more guarded.
Partly too, it has been a thirty year slow evolution to reach this point with nothing that damatic that I felt noteworthy at the time though looking back, moving from a concrete pad for a tripod to a fixed pier in the garden, through a wooden shed built to look like a summer house, followed by Skyshed Pod and now the Pulsar dome were big steps. Each change took many months and even years to complete with big gaps in continuity while work took precedence over hobbies and of course when I began the journey there were no on-line worlds to fill with a virtual life.
One day I will sit down and document the various stages my observatory has evolved through, though how to do that without giving away too many traceable personal details escapes me at present and first I must finish that home made spectrometer that I have been working on for the last eight years, then there is an ultra slim optical path Arduino-controlled rotator/focuser that I have been working on for a few years, still awaiting machining of the metal components to commence, I’ve had the aluminium billets since 2015 but somehow being retired has not given me as much ‘free‘ time that I thought it would….!
William.
-
AuthorPosts