Forum Replies Created
-
AuthorPosts
-
William Bristow
ParticipantI’ll have another attempt at answering, for some reason my replies to this and other topics in recent months just disappear after pressing the submit button.
Tim,
The ‘Dome Following’ button is only active when both the Mount and the Dome are simultaneously connected in N.I.N.A and you have correctly configured the dome and telescope/mount geometry in N.I.N.A’s Options > Dome tab.
Depending on the U.I. colour scheme the ‘Dome Following’ button changes from a dark shade of grey to a lighter shade of grey when the mount and dome are both connected, it’s easier to see when the U.I. Light display mode is selected, you just click the ‘OFF’ button and it will change it’s wording to show ‘ON’.
If you haven’t yet configured, or have misconfigured the dome and mount/telescope options, then an error notification will appear when you click the ‘Dome Following’ button and the dome will be automatically disconnected in N.I.N.A.
William.
ParticipantNick,
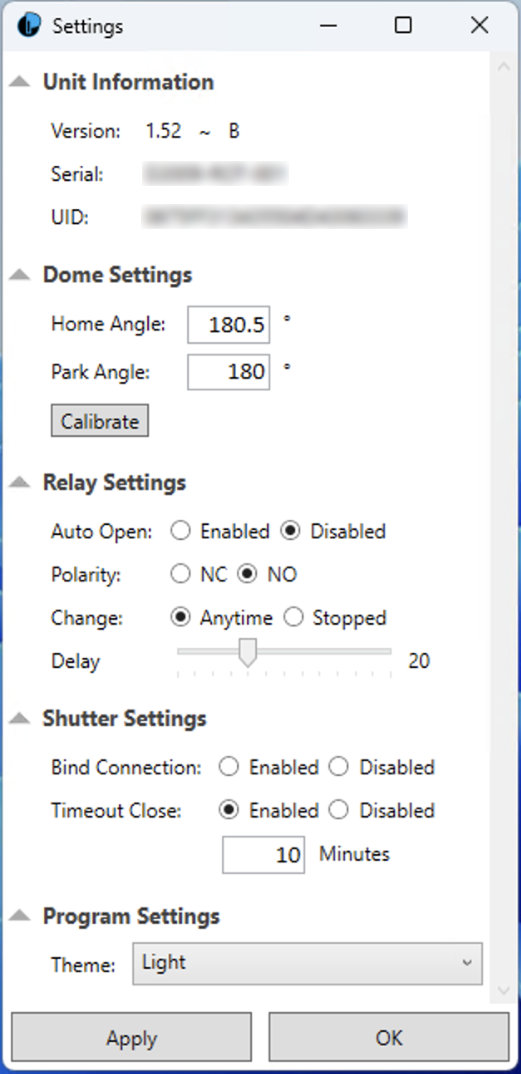
Attached is a screen-grab of the Pulsar settings I have set for use with a CloudWatcher-SOLO and ACP automation.
For daytime testing the CloudWatcher will normally be signalling “Unsafe”, depending on how you’ve configured the CLoudWatcher-SOLO trigger level for “Brightness”, and so if you manually open the shutter in daylight then after the “Delay” time set in the Pulsar configuration has elapsed the shutter will auto-close.
The same conditions will apply at night if any of the CloudWatcher safety thresholds are exceeded with the CloudWatcher-SOLO signalling “Unsafe” and you try and manually open the shutter then after the “Delay” time you configured in the Pulsar configuration has elapsed the shutter will auto-close.
Both the above statements apply when you have the direct hard-wired connection made between the pair of flying wires that exit the CLoudWatcher connecting cable (usually adjacent to the SOLO DB9 input socket) and the safety switch input connector on the bottom of the Pulsar control console.
If you are only using your observatory control application to open and close the shutter according to the CloudWatcher-SOLO’s ASCOM safety driver and don’t use the hardwired connection between the CLoudWatcher-SOLO and the Pulsar control console then in the Pulsar configuration, under Relay Settings, Polarity should be set to “NO” and nothing is plugged into the safety switch socket on the bottom of the Pulsar control console, but this is not a recommended operating setup because you are totally reliant on the observatory management application to tell the Pulsar dome controller to close the shutter and any issues with the management app, or Windows, might prevent that happening therefore it’s vital to use the provided hard-wired safety switch connection between the CloudWatcher-SOLO and the safety switch input on the bottom of the Pulsar control console as a minimum back-up provision in the event that your observatory management app’ or the PC has stopped responding.
HTH
Attachments:
ParticipantHello Jack,
You only see the pixel coordinates and values on the Status Bar at the bottom of the MaxIm desktop when the Status Bar is selected in the “View” menu, have an image open on the desktop and move the mouse pointer over the image.
If the mouse pointer is outside the open image window then the Pixel coordinates and value digits are not displayed.
As far as I know MaxIm installs all the libraries it needs to function stand-alone and only requires ASCOM components for integration with the observatory hardware but just in case this assumption is wrong and you’re installing on a new Windows 11 system make sure to enable Dot.Net 3.5, found in the Windows Features options of Windows Settings, then download and run <u>both</u> the installers for the two Microsoft Visual C/C++ Redistributable libraries linked below, these are no longer distributed with Windows 11, and then if not already installed, install the ASCOM platform.
Can’t think of anything else ATM that might prevent the pixel values appearing in the Status Bar.
William.
ParticipantHow do I enable the numbers and i value row at bottom right of screen?
Thanks,
JackJack,
To enable the image information mouse-over pixel coordinates and pixel value display at the bottom of the MaxIm desktop open the “View” menu at the top of the MaxIm desktop and select “Status Bar”.
William.
-
This reply was modified 2 years, 1 month ago by
 Andy Wilson.
ParticipantJack.
For TheSky error with PHD you need to run TheSky one-time-only “As Administrator” so that TheSky’s automation interface is registered with Windows.
To do that, mouse-right-click the desktop icon for TheSky (or the shortcut to TheSky from the programs menu) and from the pop-up context menu select “Run as administrator”, allow TheSky to launch, wait for a minute while background tasks complete then close TheSky.
If you are up-to-date with your TheSky builds you’ll have two desktop / program shortcuts, one for TheSky, which is the old 32 bit version, and one for TheSky64, which is the current and actively developed 64 bit version, you need to perform the one-time-only startup “As administrator” for both versions and both will be registered for scripting.
After those steps you should not need to run either version of TheSky “As administrator” again, just start up TheSky normally and PHD should connect to the version of TheSky that you are using.
The Windows update error is a common issue and rather than retype the usual full resolution procedure here try following the steps outlined on this webpage:
https://www.ionos.co.uk/digitalguide/server/configuration/0x800f0831/
Note, if you follow the linked guide above and get as far as needing to run the SFC and DISM tools from an command prompt these should be run from an elevated command prompt, something they neglected to mention in the guide.
To open an elevated command prompt type “cmd” (without the quotes) in the desktop taskbar search box and from the pop-up menu’s left-hand window mouse-right-click the shortcut for “Command Prompt App” and select “Run as administrator”.
The SFC and DISM commands may take a long time to run, during which not much will appear to be happening, do not shutdown or reboot the computer until the SFC and DISM commands report successful completion, or unrepairable errors with Windows are discovered, this may take an hour or two for each instruction.
Finally, the DISM commands are shown and described in the linked guide rather ambiguously, each DISM command is a single command and actioned independently, the guide gives the impression that the three DISM commands are somehow run concurrently, this is incorrect, each DISM string is entered as shown as a single line/string and is actioned as soon as the enter/return key is pressed, you must wait until that instruction is reported as completed (or failed) before entering the next DISM command string and hitting enter/return again.
Assuming the above steps fix the problem reboot the computer and carry out a manual “check for Windows updates” from the Windows Settings tool to ensure the Windows Update service is working properly.
William.
ParticipantHi Denis.
Magnifying screens of the Fresnel lens type that are advertised in the press and elsewhere are not always that successful for the visually impaired because the magnified image is still at the native screen resolution and the image may appear pixillated, plus the magnified image has a lower brightness and contrast ratio than the native screen.
If your friend is using a recent Windows build has he tried switching on the built-in magnifier tool?
In windows 10 / 11 this is found under the “Ease of Access” settings.Keyboard shortcuts are:
Ctrl + Windows Logo Key + M to access the magnifier settings page.
Windows Logo Key + Plus sign (+) to switch on magnifier and zoom in.
Windows Logo Key + Minus sign (-) to zoom out.
Windows Logo Key + Esc to exit magnifier.Of particular usefulness in the magnifier settings is the option that allows the user to configure a lens size and zoom ratio that magnifies a defined area centred on the mouse cursor, rather than magnifying the entire screen, although that is also an option if preferred.
Using the magnifier “lens” centred on the cursor allows the user see the entire screen for easy navigation while only magnifying the area around the cursor when required to read some small text or click a button in an application.The magnified area, or full screen, can also be optionally configured to invert colours to improve perception when using poorly designed UI’s.
A further useful feature in Windows Magnifier is the ability to temporarily switch on high-contrast mode and text/graphics smoothing in the magnified region.Because the magnifier is operating in software on the native graphics the visual result is much clearer and brighter than an external Fresnel magnifier and is better suited for interaction with applications.
Have a look at the following Microsoft document which describes the “Ease of Access” magnifier tools and also the link to the RNIB describing how both Microsoft and Apple computer users with degraded vision may continue to use their devices:
HTH
William.
ParticipantHi Robin, Callum.
The jump ahead is working for me using Safari Browser on a Mac, and also on iPad, but with a very long delay (eight minutes on a fast fibre connection), while the entire video up to the chosen jump point loads in the background, and the video only loads up to that point, viewing after that jump point is loaded and shown on demand.
If you want to freely scroll through the video for a particular point without watching the whole thing then click on the scroll bar somewhere near the end of the video and wait while the video loads in the background, eventually the video will begin playing from the jump point you selected, once this happens you can freely scroll back and forwards over any part of the video that lies before that jump point.
I have seen this behaviour with video content on several websites lately and it is due to a combination of the embedded video player that is used and the bandwidth allocated to the video stream on the website server.
You might find it simpler, and much faster, to mouse-right-click on the video pane after it begins to stream and select “Download Video” which will copy the video content to your download folder as a .mp4 file, and then view that video in any suitable player where you will be able to search backwards and forwards in real time.
The video you linked to is almost 0.9Gb and carrying out a download of the entire video this morning on a fast fibre connection took about eight minutes, and that is almost exactly the same length of lag that you will experience when jumping ahead to a point near the end of the video in the embedded video player that this BAA webpage is using.
In comparison, a 2Gb video download from other streaming services (Apple TV, Netflix etc) takes just over a minute on my fibre connection here so it would appear that the BAA server is throttling download speed for the video content somewhat and combined with the embedded players requirement to load all the video stream up to the jump-to point is not providing a very user friendly experience.
William.
-
This reply was modified 4 years, 4 months ago by
William Bristow.
ParticipantWhat happened to the private message function?
Is the PM facility hidden away somewhere or no longer possible?
That was a useful way of contacting other members for conversations that would otherwise be of little interest to general readers.
I have been trying to find a way to contact @paul-leyland (was Xilman) off-forum with a download link for the latest ASCOM LazyFocus drivers which I know he is trying to find.
William.
Paul, if you read this, log-in to the ASCOM user forum and look in the files section for a folder called “EasyFocus”, in that folder is a RAR archive called “LazyFocus”, unzip that RAR archive to find the necessary LazyFocus DLL’s and a readme that describes how to install them and the Windows registry entry that you need to manually create.
This web address takes you directly to that folder on the ASCOM Groups.IO site: https://ascomtalk.groups.io/g/Help/files/Easyfocus
If you don’t have a Groups.io account and no access to the ASCOM users forum then open a new LazyFocus topic under the Imaging category here and I will post a link to that folder in my personal shared G-DRIVE folder.
ParticipantNick.
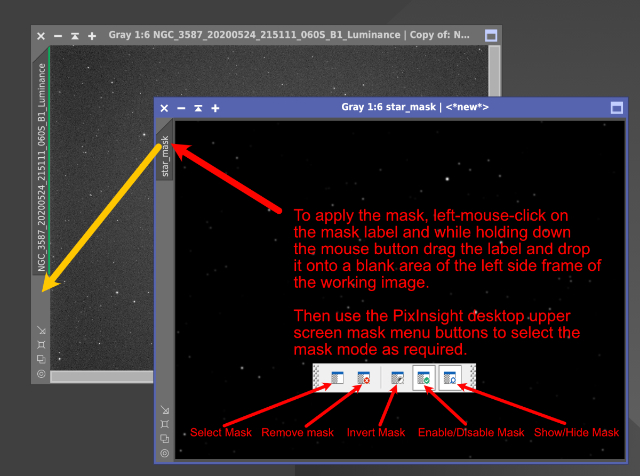
Left-mouse-click on the name-label of the mask (left side of the mask frame) then while holding down the mouse button drag and drop the mask-label onto a blank area of the left-side border of the active image, as shown in the attached (low res) screen grab.
Once the mask is applied to the active image use the mask menu buttons from the desktop upper screen menu ribbon to select the mask mode as required. Hover the mouse pointer over the menu buttons to reveal the button functions if unclear.
William.
 1 February 2021 at 8:28 pm in reply to: Installing HOPS into an existing Anaconda/py3 environment #583779Participant
Gordon.
Did you unzip the HOPS software before trying to open it…?
If you did unzip the download then using a regular web browser (Edge, Chrome, Firefox etc) it should download the zipped HOPS installer to your user downloads folder on the C: drive, unzip the HOPS installer in that user downloads folder location, do not choose the root of a different drive as shown in your screen shot.
Try downloading the HOPS software again to your regular downloads folder, unzip the package in the downloads folder and run the windows_installer_cmd from that location.
Any different?
AFAIK there are no reported problems with the installer on Windows 10, I have installed HOPS on both real and virtual Windows 10 platforms without any issues.
If still unsuccessful contact me using the private message service off-forum and maybe we can set up a remote AnyDesk session.
William.
30 January 2021 at 3:05 pm in reply to: Installing HOPS into an existing Anaconda/py3 environment #583762ParticipantGordon.
Please try the following steps, hopefully this will provide a solution.
Type “sysdm.cpl” (without the quotes) in the Windows desktop search box and select sysdm.cpl, Control Panel Item from the “Best match” menu.
In the System Properties window click the “Advanced” tab and then click the “Environment Variables” button.
In the Environment Variables window double click “Path” under the lower “System variables” heading and delete your previous entry for the path to Python.
Assuming that you installed Anaconda with the option for your use only, and not all system users, and that the default location for the Anaconda installation was used then navigate to the upper panel “User variables for <user name>” double click on “Path” and add the following paths on separate lines:
C:UsersgordoAnaconda3
C:UsersgordoAnaconda3Librarymingw-w64bin
C:UsersgordoAnaconda3Libraryusrbin
C:UsersgordoAnaconda3Librarybin
C:UsersgordoAnaconda3Scripts
After adding the paths move all to the top of the tabulated listing by selecting each entry in turn and click the “Move Up” button, the paths listed must be above all other pre-existing environmental paths and in the sequence as described above.
If you used a different location for the Anaconda installation files then modify the above paths accordingly.
Click “OK” to apply the new variables and close out the System Properties window.
Next, re-boot the computer.
After booting the computer go to the programs listing and select from the Anaconda folder “Anaconda Navigator”, Launch the Navigator and allow it to fully load, this takes a few minutes the first time it is launched and various blank screens will open and close, finally after the Navigator desktop is fully up wait a few minutes then close it again.
Next, go to the programs listing and select from the Anaconda folder “Anaconda Prompt (Anaconda)” then in the Anaconda Prompt (Anaconda) window at the cursor type “Python” (without quotes) followed by the enter key.
This should return “Python 3.8.5 ~”.
If ok type “exit()” (with brackets, without quotes) to exit the Python editor then type “exit” (without brackets, without quotes) to close the Anaconda Prompt (anaconda) window.
If, when querying the Python version as described an error message is displayed “Warning: This Python Interpreter is in a coda environment, but the environment has not been activated~” then while still in the Anaconda Prompt (Anaconda) window type at the cursor (without quotes) “cd c:” so that the prompt now operates at the root of the c drive, next type (without quotes): “CUsersgordoAnaconda3Scriptsactivate base”, press enter to run the script, there should be no error message and nothing will appear on screen but the script should execute and activate the Anaconda – Python environment.
Lastly, delete the extracted HOPS folder from wherever you unzipped it and unzip a fresh copy, or download it again if you deleted it, unzip a fresh copy and modify the HOPS windows-installer file as you did previously by editing in Notepad, adding an extra two blank lines then typing CMD /K in the last line of the installer document and saving the changes so that you can monitor the HOPS installation.
Beyond the above there is not much else I can suggest. I built and installed a virgin Windows 10 Pro build 20H2 VM today, replicated the above steps and installed HOPS successfully after installing Anaconda with the options you used with your computer. If still having issues you will need to find help from someone with a deeper knowledge of Windows 10 system variables, my experience with earlier versions of Windows is not always directly transferable to the current Windows 10 platform.
William
29 January 2021 at 11:05 am in reply to: Installing HOPS into an existing Anaconda/py3 environment #583756ParticipantGordon.
Try the steps as described here, reboot the computer and then re-run the HOPS installer:
https://geek-university.com/python/add-python-to-the-windows-path/
The linked web page refers to older Windows builds and the screenshots are rather out-of-date but the principle is the same. Double click on the “Paths” entry under “System Variables” and for the latest Windows builds this will open a tabulated list of system variable paths rather than a string as described in the linked web page, double click on the first available empty line in that list and add the path to the Anaconda Python build, in your case this will be C:UsersgordoAnaconda3python
When installing Anaconda with its own Python library it is best practice to uninstall all previous Python versions first, this is particularly troublesome if your previous Python version was downloaded from the Windows App Store as extra steps are required to prevent Windows redirecting any Python calls to the Windows App Store after the old Python version is uninstalled.
The linked web page and the instructions above should hopefully resolve the current issue.
William.
27 January 2021 at 6:12 pm in reply to: Installing HOPS into an existing Anaconda/py3 environment #583751ParticipantGordon.
When you say that the windows_installer failed what were the symptoms, were there any failure messages?
In the HOPS installation notes, Appendix A, there is a description under section 2.0, following figure A.2.2, that describes an optional step to edit the “windows_installer_cmd” file and monitor the installation of the HOPS software in a CMD window.
If you have not tried this then edit the “windows_installer_cmd” file as described and run the installer, any errors encountered during the installation should appear in that window as plain text which may give you a hint to the underlying problem. If necessary you can copy and paste any error messages from that monitor window into a text document for later fault diagnosis.
Other things to watch for are third party anti-virus programs or Windows protection that may be blocking the installer. For the latest builds of Windows 10 you may be limited to only writing the HOPS software to your user documents folder or the desktop, other locations are routinely blocked by Windows protection software.
After HOPS is installed normally it never appears as a program in the Windows applications menu, HOPS is run directly from its desktop shortcut.
William.
ParticipantEric.
Have a look at GoodHand UK adjustable quick-release toggle clamps, there should be a size and design variant to suit your purpose.
https://www.goodhanduk.co.uk/Catalogue/Toggle-Clamps
I have used their stainless steel adjustable toggle clamps to lock down the storm hatches on a yacht, which are a very similar design to a rolling roof.
For an observatory roof the nickel plated steel versions would suffice though they will take on a surface coating of rust eventually, for long term corrosion resistance the more expensive stainless steel versions are best.
If you search on Amazon or eBay you will find several UK based suppliers of similar toggle clamps.
William.
ParticipantNick.
The SkyX dome setup is fairly well described in the manual (with one exception, see below) but here are a few tips from my experience using the smaller 2.2m Pulsar dome, the current Rigel dome controller and ACP/MaxIm with The SkyX and a Paramount.
Firstly, the dome driver (ASCOM or X2) does very little other than drive to a commanded AZ angle and open/close the shutter, the actual calculations for the position of the slot relative to the OTA are all handled by the observatory control program, in your case TheSkyX.
While the ASCOM driver for the Rigel dome controller works well in both ACP and MaxIm I found that it was unreliable and rather erratic when used with TheSkyX. I think this is a SkyX issue and nothing to do with the Rigel ASCOM driver and you will find TheSkyX X2 plugin for the Rigel dome controller works more reliably. I use the X2 driver when operating the dome via TheSkyX, for instance when building a T-Point or PEC model for the Paramount, but when running the dome normally under ACP/MaxIm I use the Rigel ASCOM driver where it performs well (in this configuration the dome is controlled by ACP and not TheSkyX).
You can download the X2 driver for the Rigel dome controller via the RTI-Zone website here.
Install the X2 driver as described in TheSkyX manual and select it in the dome setup tab, the geometry settings you already have remain intact.
Measuring accurately when configuring the dome geometry is vital for good OTA-slot alignment. You have to measure to within +/-5mm the mount and optical axis offsets and be sure to set the offset value signing correctly. Beside the mount and optical axis offsets the dome home-sensor offset setting must produce a real AZ value for the slot centre line that is within a degree of the displayed AZ value. To determine an accurate north reference I found using a compass bearing with lots of buried rebar in the dome concrete pad was useless with at least a 7 degree declination from true north at my location. For both pier and dome I used the local noon solar transit shadow method to determine true north, marked that on the dome wall and based my measurements for the dome home-sensor offset from that.
In TheSkyX dome setup there is one poorly explained setting that is critical for alignment between the OTA and the dome slot. In Dome Setup, Preferences, you will find the setting “Minimum angle from slit edge to telescope position” and it is not explained in the documentation how to determine the angle.
The starting point for calculating that setting is the formula: Arctan((L-D)/(2R)) where L = Width of slit in mm, D = Effective diameter of the OTA in mm (including guide scope if applicable) and R = radius of the dome in mm. Enter your calculated value in the box for “Minimum angle from slit edge to telescope position” and that should be a good starting value to ensure that the OTA optical axis always remains close to the centre on the slot. If you find any remaining overlap between OTA and slot then increase that value a degree at a time until the overlap is no longer present. For my current 100mm OTA = the calculated value was 8.58 deg and the actual value required was 12 deg to ensure that OTA and separate guide scope always remained aligned with the slot on both sides of the meridian. If that angle value is set too high or too low then the OTA will overlap either edge of the slot on both sides of the meridian.
Lastly, when driving the dome from TheSkyX the Rigel controller should be set to 0.00 sidereal rate on the control panel otherwise TheSkyX and the Rigel controller will argue over who is in control and the dome will oscillate continually. When driven from TheSkyX the dome does not continually track at sidereal speed but it moves in a series of incremental updates, the larger the diameter of the OTA relative to the size of the dome slot then the incremental updates occur more frequently. For my current 100mm OTA and 560mm width slot the dome increments about every three minutes, when I use a 350mm diameter OTA the dome increments every thirty seconds.
When setup correctly TheSkyX and the Rigel dome controller work well (using the X2 driver rather than the ASCOM driver) and I do not experience the overlap issues that you are reporting.
Hopefully there is something above that helps.
William.
ParticipantJeremy.
Forgot to mention earlier, while setting up the new laptop and testing cameras etc make sure that you don’t place loops or coils of excess USB cable and power cables close to the laptop.
Camera should be as far away as it would be when attached to the telescope and the USB cable should be laid out straight, same applies to the camera power cable. Avoid running USB cables parallel to the laptop chassis, cables should always be run outwards from the laptop where possible to avoid induced interference.
William.
ParticipantHard to tell from the laptop screen shot but it looks a little like parasitic noise, especially if it is erratic in nature.
Try running the laptop on internal battery only for a short while while acquiring images, the laptop mains supply/charger unit should be completely disconnected for this test.
If the noise disappears when on internal battery then the source is the laptop charger.
If the noise is still present when running on internal battery only then possibly there is some RF leakage from the laptop CPU/RAM modules that is being picked up in the USB cable shield or the power supply lines to the camera and the addition of some anti-parasitic ferrite clamps to either ends of the USB cable and the SX power supply cable might be sufficient to deal with this source of parasitic noise.
William.
ParticipantHi Nick.
Currently running the previous version, (V7.0), of Lunatico Astronomia’s own dedicated software provided with the AAG CloudWatcher.
https://lunatico.es/ourproducts-aag-cloud-watcher-software-other-downloads.html
The software version linked above is V8.10 but I need to update the older firmware currently in the AAG unit to run this later version software and I haven’t got around to doing this yet.
AAG’s CloudWatcher software continually writes and updates a Boltwood compatible single-line data file to a folder on the host PC that observatory control software can read and monitor for safe/unsafe weather conditions, in my case I use ACP which accesses that Boltwood style file.
Lunatico Astronomia also provide weather feed software that allows integration with third party weather station data though I don’t use that software myself.
William.
ParticipantGeorge.
For the Ariel Space Mission, ExoClock project, the preferred data input method is specifically the fitted plot straight out of HOPS.
You can see some data that has already submitted by following the link below, click the “View” button(s) to inspect the plots:
https://www.exoclock.space/database/observations
For newly announced exoplanet discoveries that are currently unknown to the ExoClock database and your own survey projects then AstroImageJ would be first choice since HOPS will be unable to process the data until a minimum set of object properties are known and the HOPS database is updated.
William.
ParticipantGeorge.
I have re-run and compared three sets of transit data through HOPS using the latest Anaconda – Python 3.8.3 distribution against the previous Anaconda – Python 3.7.6 distribution and the output from HOPS is identical with no issues found on Windows 10 build 2004 or macOS Catalina. I’m not currently able to test on a Linux build or earlier builds of Windows 10 or macOS.
Based on this (limited) test I would say it is ok to use the latest Anaconda – Python 3.8.3 distribution as a platform for HOPS using Windows 10 build 2004 or macOS Catalina.
The installation guide for Anaconda – Python – HOPS contained in appendix A of Roger Dymock’s Ariel Space Mission document remains valid with only the need to account for the latest version numbers of Anaconda and Python in the text and figures:
https://britastro.org/sites/default/files/ARIEL%20Space%20Mission%20V5.pdf
Ultimately though it is the responsibility of the HOPS software author to test against a new release of Anaconda – Python, which historically occur two or three times per year, and revise the HOPS release build and instructions accordingly. All the previous versions of Anaconda – Python are available should you wish to install and run HOPS in it’s original build environment:
https://repo.anaconda.com/archive/
Regarding using AstroImageJ for exoplanet detection you will find Roger’s exoplanet section here on the BAA website contains links to all the information you require:
https://britastro.org/node/15640
Roger’s page provides web links out to the most relevant sites, I would suggest beginning with the Grady Boyce – Dennis Conti Cookbook and guides and the latest release of AstroImageJ:
https://astrodennis.com/AIJCookbook.pdf
https://astrodennis.com/Guide.pdf
https://www.astro.louisville.edu/software/astroimagej/
William.
-
AuthorPosts